Saturday, January 31, 2015

Beautiful Butterflies

I've made another new card this week, using a beautiful stencil from Clarity Stamps and papers from Craftwork Cards.


I started with an 8x8 white card blank to which I attached the heart/leaf Clarity stencil using low tack tape. I inked through (and around) the stencil using distress ink (lipstick?). I removed the stencil and then used thin double sided tape to apply gilding flakes around the border left by the edge of the stencil. The butterflies were cut out of a Craftwork Cards paper stack (Pretty in Pink) that has been in my stash for a while. I carefully bent the wings of the butterflies and then attached the body part using PVA glue.

I am entering this card into the following challenges:-
Crafty Boots 'butterflies' 1.2
Crafting for all Seasons 'things with wings' 2.2
In the Pink 'pink & pearlie' (tricky to see but the butterflies are all pearlescent) 5.2
Pink Elephant 'anything goes' 5.2
Craft your Passion 'anything goes' 2.2
Crafter's Cafe 'make your own background' 4.2
Penny's Paper Crafty Challenges 'anything goes' 3.2

Tuesday, January 27, 2015

you can leave your hat on!

I'm still trying hard with my Christmas Card challenge and here is my second one of this month. It was really quick and simple to make.


I started with a 6x6 white card blank. I took a piece of Dovecraft 6x6 Christmas paper and trimmed it to fit the card base leaving a small white border. I layered it using double sided tape. I then added a chipboard topper that has been in my stash for ages and finished the card with the peel-off message and peel-off stars. Done!

I am entering this card into the following challenges:-
Catch the Bug 'photo inspiration' (the robin with the hat on) 31.1
Crafty Hazlenut 'joy to the world' (there is nothing more joyful than building a snowman in my opinion!) 30.1

Sunday, January 25, 2015

Read, Know, Learn, Go

I'm always finding things on Pinterest and Create & Craft that inspire me to try something new and today's make is no different.

The original idea was shown on Create & Craft ages ago when they had a new show with lots of beautiful papers and large stencils/masks (can't remember the brand name but there were American). The guest took a canvas and covered it with paper, masked words and then painted over the top. When the mask is removed, the words are revealed in the base design. I've wanted to try it since I saw it and I've finally found an excuse!

In my school, I am the literacy co-ordinator and one of the projects I want to work on is improving the use of our library. I've found lots of nice ideas on Pinterest that I will be doing but my first project has been to make something arty to brighten up the room a bit.

This is what I've made


I started with a canvas that I've had for ages (but they are on offer in The Works at the moment) and covered it using PVA glue with pages torn from a spare copy of Harry Potter and the Philosophers Stone that I have for crafting purposes! I used the glue over the top of the papers also and then left to dry.

I then used the Cricut Explore to cut my lettering out of sticky back plastic- I used 3 different fonts all included in the Cricut Design Space subscription package. I laid the letters out onto the canvas (with the backing still on) so that I could place them accurately and then carefully stuck them onto the dry canvas.

When I had attached all the letters, I painted over the whole canvas with purple emulsion paint from a tester pot (Wilko's new 'magic' colour) and them dry brushed some hints of dark grey emulsion (Wilko's 'barely black') on top.


When the paint was dry, I used my pokey tool to carefully remove the sticky back plastic letter masks to reveal the text underneath. It was actually kind of fun too to see which words would be revealed. When one of the small letters revealed 'Professor Weasley' I had to smile (maybe Charlie teaching Care of Magical Creatures?).

I now want to try one for my own classroom with a fab quote I've seen on Pinterest that says "excuse the mess but we're learning in here", although this could work just as well for my craft room!

I am entering this project into the following challenges:-
CRAFT 'recycling' (old canvas)- 28.1
A Blog named Hero 'personalise' 29.1
Craft your Passion 'anything goes' 25.1
Ooh, la, la, 'once upon a time' (pages used from a book & it's for a library) 1.2
Polkadoodles 'case it' (idea seen on Pinterest and C&C) 30.1
Penny's paper-crafty challenges 'anything goes' 27.1

Sunday, January 18, 2015

Christmas in January

Last year, I had a plan to make at least 1 Christmas card each month so I didn't have a mad December rush. I think I managed about 3 months before it went pear shaped! Maybe this year will work better!

Here is my January Christmas card-


This card was really simple to make and uses some old stash and some new goodies too. I started with a 6x6 white blank card and added a Dovecraft patterned paper to the bottom half. The paper is from a monochrome set that included papers, ribbons buttons etc. from The Range and was a great deal. The snowflake dies are also new but the mirror card I used to cut them out of has been in my stash for years(no exaggeration!)

Before attaching the die cut snowflakes, I used double sided tape and glitter to add an extra sparkle to the join between the card base and the paper. I attached the snowflakes and then used a fine black pen to draw on the strings. I finished the card with a really simple peel-off greeting.

I am entering this card into the following challenges:-
Crafty Hazlenut's Extra 'xmas'- 31.1
Country View 'use something new'- 31.1
Crafty Cardmakers 'old and new'- 25.1
Love to Create 'snowflakes'- 18.1
Papertake Weekly 'all new'- 20.1
Penny's 'anything goes'- 20.1
Paper Shelter 'punches and/or dies'- 20.1
Creative Inspirations 'anything goes'- 20.1
CRAFT 'Xmas'- 21.1
Creatalicious 'winter'- 14.2
Crafty Catz 'new beginnings'- 22.1

Tuesday, January 13, 2015

hop hop hooray!

Here's another of my SWALK cards, this time using a topper that could be suitable for a whole range of occasions- new baby, exams, driving test, child's birthday, thank you etc.


I started with the topper which is printed from the SWALK cd and created my own message topper using the verse writer facility. I inked both of these pieces with 'salty ocean' distress ink and then mounted them onto a star print holographic mirror board. I then got a 6x6 white card blank and topped it with a Kanban star print paper. I then added the toppers and finished the card with 3 star gems.

I am entering this card into the following challenges:-
Creatalicious 'new beginnings' 14.1
Quirky Crafts 'clean & simple' 17.1
Creative Card Crew 'for a child' 18.1
Digi Choosday 'thanks' 20.1
Crafters Cafe 'new' 14.1
Crafty Catz 'polka dots' 15.1
Cute Card Thursday 'what's new?' 14.1

Sunday, January 11, 2015

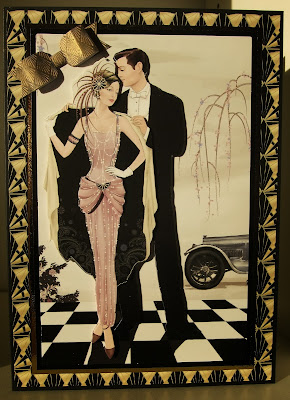
art deco- black & gold

Ages ago, I made an Art Deco style card using a red & black colour scheme. I've just made another, but this time it's black & gold.


As with the red & black card, I started with an A4 sheet of black card that I folded into an A5 card blank. I added a backing paper from the Papermania 'Art Deco' ultimate die-cut paper pack. The decoupage topper came from the same pack, so I just matted it onto some gold mirror card to help it stand out. I finished the card with another of the Craftwork Cards paper bows- this time I added some gilding wax to it to give it a shine.

I am entering this card into the following challenges:-
Crafts Galore Encore 'anything goes' 31.1
Graph'It 'shiny & new' 16.1
The Pink Elephant 'colour combo- black & gold' 12.1
Love to Create 'anything goes' 11.1
Papertake Weekly 'anything goes' 13.1
Clear it Out 'anything goes' 13.1
Penny's Papercrafting Challenges 'anything goes' 13.1
Creative Inspirations 'use a bow' 13.1