Showing posts with label Mirror Board. Show all posts

Tuesday, April 14, 2015

Caravan Club

It's been a really nice few days weather wise here so I've been inspired to make a summery card.


I made this caravan shaped card using a template printed from 'Garden Sheds' cd-rom. I printed the caravan image and then used it to cut out the shape onto a folded piece of A4 card. To make sure it stands up, I added the small square at the front of the caravan as a stopper. I then used various patterned papers, mirror card & flower embellishments to decorate the caravan and to create the shapes needed for the details.

I am entering this card into the following challenges:-
Crafter's Cafe 'shaped card' 15.4 (2am)
Crafty Catz '2+ patterned papers' 16.4
Polkadoodles 'pink & pretty' 24.4

Sunday, March 1, 2015

Christmas in March

Here is my Christmas card for March-


Can't quite believe I'm still managing this- though I suppose 3 months isn't many is it?

It's another really quick and simple card which is great for me when I do need to make 20 Christmas cards in one night- hopefully not this year though!

Both the backing paper and topper came from a Papermania 12x12 paper pack that I had completely forgotten I had! The topper was from a sheet that had 9 different squares on it so 9 cards in an instant!

I started with a 6x6 card blank, added the cut down backing paper, mounted the topper onto red mirror card and added that to the opposite corner to the corner detail on the backing paper. Done!

I am entering this card into the following challenges:-
The Pink Elephant 'anything goes' 2.3
Crafty Cardmakers 'stripes' 8.3
Craft your Passion 'anything goes' 1.3
Clear it out 'animals and stripes' 3.3
Cute Card Thursday 'fancy corners' 4.3
Crafty Hazlenut's Extra 'anything goes' 31.3
Crafty Hazlenut's Xmas 'cut it up' 6.3
That Craft Place 'anything goes' 14.3
Crafts Galore Encore 'anything goes' 31.3
Christmas Card Challenges 'winter hues' 7.3

Tuesday, January 13, 2015

hop hop hooray!

Here's another of my SWALK cards, this time using a topper that could be suitable for a whole range of occasions- new baby, exams, driving test, child's birthday, thank you etc.


I started with the topper which is printed from the SWALK cd and created my own message topper using the verse writer facility. I inked both of these pieces with 'salty ocean' distress ink and then mounted them onto a star print holographic mirror board. I then got a 6x6 white card blank and topped it with a Kanban star print paper. I then added the toppers and finished the card with 3 star gems.

I am entering this card into the following challenges:-
Creatalicious 'new beginnings' 14.1
Quirky Crafts 'clean & simple' 17.1
Creative Card Crew 'for a child' 18.1
Digi Choosday 'thanks' 20.1
Crafters Cafe 'new' 14.1
Crafty Catz 'polka dots' 15.1
Cute Card Thursday 'what's new?' 14.1

Sunday, January 11, 2015

art deco- black & gold

Ages ago, I made an Art Deco style card using a red & black colour scheme. I've just made another, but this time it's black & gold.


As with the red & black card, I started with an A4 sheet of black card that I folded into an A5 card blank. I added a backing paper from the Papermania 'Art Deco' ultimate die-cut paper pack. The decoupage topper came from the same pack, so I just matted it onto some gold mirror card to help it stand out. I finished the card with another of the Craftwork Cards paper bows- this time I added some gilding wax to it to give it a shine.

I am entering this card into the following challenges:-
Crafts Galore Encore 'anything goes' 31.1
Graph'It 'shiny & new' 16.1
The Pink Elephant 'colour combo- black & gold' 12.1
Love to Create 'anything goes' 11.1
Papertake Weekly 'anything goes' 13.1
Clear it Out 'anything goes' 13.1
Penny's Papercrafting Challenges 'anything goes' 13.1
Creative Inspirations 'use a bow' 13.1

Sunday, March 9, 2014

DJ love

Only 1 card made this weekend as I've finally started my Harry Potter scrapbook and while I seem to be in the mood, I want to get as much done as possible!

Here it is...

A nice simple card using a fab Saturated Canary digi stamp.

I started by colouring my digi aiming to use the colours to emphasise what I see in the image- a very confidant woman and a shy man. I used very bright colours for her and quite muted tones for him. When I had finished the colouring of the digi, I mounted it onto some silver mirror card just to help it stand out.

I chose a piece of bright orange A4 card to make into the A5 base card that matched the orange colour used on the digi. I then took a piece of turquoise chevron patterned paper from DCWV Girlhood Stack and embossed it with Sheena Douglass 'splat' embossing folder. I then inked the paper with Spiced Marmalade distress ink to highlight the embossing.

I used double sided tape and 3d foam tape to attach all of the pieces together before finishing off with the turquoise jems.

I am entering this card into the following challenges:-
cards galore 'use a digi/stamp' 30/3
Daring Cardmakers 'colour challenge' 14/3
Graph'It 'male colours' 21/3
Paper Shelter 'DT call' 20/3
Penny's paper crafty challenges 'not square' 11/3
Paper shelter 'anything goes' 11/3
Creative Inspirations 'anything goes' 11/3
Craft room challenges '20th Century' 17/3 (records being used on the turntable)
Challenges 4 Everybody 'anything goes' 4/4

Sunday, March 2, 2014

Rising from the ashes...

Back in November, at the Lincoln Sincerely Yours show, I bought a brilliant Sweet Poppy stencil of a Phoenix- they had done a demo card where the Phoenix had been zen-tangled and it was fab. I had to get the stencil so I could make my own Fawkes inspired cards (and possibly use it in my Harry Potter scrapbook if I ever get it started!).

This is the first time I've used it so I've gone for quite a simple design


I started with a sheet of golden yellow A4 cardstock that I folded to make an A5 base card. I inked the edges of the card with Barn Door (Red) distress ink. I then used a Versamark pen to draw the phoenix design through the stencil onto a piece of white card. I did small parts of the design at a time, heat embossing with gold embossing powder. After I had embossed the entire phoenix, I went around the edge of the design firstly with a red promarker and then orange and yellow, blending the colours together. I also used my black promarker to colour the embossing on the eye- just to help it stand out a bit. I then trimmed down my phoenix topper and mounted it onto red mirror card.

I wanted to add a layer of texture to the background of the card so I cut a piece of orange net fabric, slightly smaller than the card, and then attached it using double sided tape.

I am entering this card into the following challenges:-
Challenges 4 Everybody 'anything goes' 4/4
That Craft Place 'anything goes' 15/3
Blog named Hero 'stencil' 14/3
Catch the Bug 'anything goes' 8/3
Crafty Calendar 'animal' 2/4
Crafty Catz 'anything goes' 6/3
Paper Shelter 'animal magic' 4/3
Creative Inspirations 'boy thing' 4/3
Love to Create 'anything goes' 2/3

Sunday, February 2, 2014

Sunny Sunflowers

This is my final card of the weekend and one that I'm really pleased with. It uses some new stash and some new ideas that I've not tried before but now I know it works, I'll definitely be using it again.


This card is made using another new Sheena Douglass embossing folder.

I wanted to create a distressed background but didn't have a core'dinations cardstock in the colour palette I needed- so I made my own!!! I started with a piece of brown A4 card that I painted with yellow emulsion from a tester pot (it even had its own brush so no mess!). I then embossed it using the sunflower embossing folder and then used fine sand paper to sand back the paint to reveal the brown paper underneath. It works really well and I'vegot hundreds of tester pot colours that now have a new use!


I trimmed down my backing paper, tied a brown organza ribbon around the spine and attached it to an 8x8 white base card. I then embossed the same sunflower design onto gold/yellow mirror card and then went over the top of the raised aspects of the design with a brown promarker. I cut them out and used various levels of 3d foam to mount them onto the card.


I finished the card by using the remainder of the painted cardstock to cut a small mat (using a Kanban one as a template) and then attaching it to the card backwards and adding the peel-off message.

I am entering this card into the following challenges:-
Country View Challenges 'paint' 28/2
Totally Gorjuss 'sunny colours' 7/2
Cute Card Thursday 'new' 5/2
A Blog Named Hero 'flowers' 14/2
Daring Cardmakers 'belt & braces' 7/2
Crafty Catz 'anything goes' 6/2
Crafters Cafe 'ribbon' 4/2

Sunday, January 26, 2014

one in a million

Another SWALK card today using toppers from the cd and a message I've created myself using the verse writer. I'm really loving the designs from this cd at the moment- I've been colouring my own images and using the pre-coloured ones from the 'Pawfect Pals' cd.


For this card, I inked the edge of the topper & the message with 'picked raspberry' distress ink and then mounted them onto silver mirror board. I chose a piece of A4 pink card, and folded it to make an A5 card blank and then used a piece of Kanban patterned card as the background. I added my toppers and then placed some small holographic circle stickers into the centre of the flowers to add extra sparkle.

I am entering this card into the following challenges:-
Totally Gorjuss 'furry friends' 31/1
Cute Card Thursday 'so sweet' 29/1
Paper Shelter 'digit image & sentiment' 28/1
Crafting for all Seasons 'for the girls' 3/2
The Pink Elephant 'pink &/or red' 27/1

Loud Music

Before Christmas, I was lucky enough to win a £100 voucher to spend at Create & Craft. It was surprisingly difficult to find things to spend that much money on, even though I never seem to struggle when I don't have a voucher!

One of the things I bought was a brilliant Indigo Blu A5 stamp set called 'Loud Music'. It has a wide range of stamps fitting many different music styles e.g. flowing notes, a guitar, a tape & some fun sentiments. I've already used the set once to make a birthday card for a musical man at work and thought it was about time I did another.

It's a mix between chalkboard & grunge...


I started with a piece of A4 white card which I folded to make an A5 card blank. I cut a piece of black card 2.5cm smaller on each side than the base card and stamped it with the Indigo Blu stamps using white Brilliance Ink. Before the ink had a chance to dry, I rubbed each image gently with some distress ink foam to blur the edges and look like the chalk had rubbed off slightly. When I had finished stamping, I mounted the black card onto some silver mirror board.

I then used 2 off cuts of black stripe paper (left over from my 'pretty grunge' card) in 2 opposite corners of the card and used Black Soot distress ink in the other 2. To finish the card I then used black memento ink and an Inkadinkado star stamp over the top of the distress ink.

I am entering this card into the following challenges:-
Craft Your Passion 'music' 27/1
Crafty Cardmakers 'black & white' 2/2
Crafty Catz 'monochrome' 30/1
Daring Cardmakers 'stripes' 31/1

Present time!

I'm still doing quite well in my Christmas Card quest for 2014 and have managed to make another one today. It's a CAS style card and was very quick to make.


I started with the topper (pre-coloured image from Lili of the Valley) and mounted it onto silver mirror card. I then chose a blue snowflake pattern paper from the Forever Friends Kraft Notes range and mounted them all onto a white 6x6 card blank. To finish the card, I used a bow and 3 buttons, all from the Papermania Festive Spots & Stripes collection.

I am entering this card into the following challenges:-
Christmas Card Challenges 'anything goes' 1/2
Catch the Bug 'photo challenge- penguins' 1/2
Crafty Hazlenut's Christmas Challenges ' trees' 31/1
Craft Room Challenge 'water' 3/2 (ice is just frozen water after all)
Cutie Pie Challenges 'cute blue' 1/2
Love to Create 'buttons' 26/1
Creative Inspirations 'ribbon' 28/1

Tuesday, January 14, 2014

winter wonderland

This card uses another topper that I coloured a while ago but ran out of time to make into a card. I've finally got round to using it, and it means that I've made 2 Christmas cards so far in January!!!


I coloured the topper using both Spectrum Noirs & Promarkers and then used a Kanban mat as a stencil to cut it into the decorative shape. I added a, hand cut, blue mirror card mat and a larger mat cut from Dovecraft 'Merry & Bright' snowman paper. To add extra detail to the 6x6 elegant edge Craftwork Cards card blank, I ran it through my grand callibur with a snowflake mask, and then gently rubbed on some pale blue chalk with my finger.

I am entering this card into the following challenges:-
Christmas Card Challenges 'anything goes with option of polka dots' 19/1
Catch the Bug 'winter wonderland' 18/1
Crafty-Hazlenut's Christmas Challenge 'winter weather' 17/1
Cute Card Thursday 'cold & frosty' 15/1
Creatalicious Challenges 'turquoise winter' 13/2

Saturday, January 4, 2014

Christmas 2014!

As I mentioned, in a previous post, my New Year's Resolution is to keep making Christmas cards all year round (so I don't have to try and make 14 in one night!). My plan is to try and make 2 a month and, so far, I'm on track- I've made one and we're only a few days into January! I'm really pleased with it too...


Pretty much everything on this card is brand new or something that I've had for a while but not used yet.

I started with the Stag design which is a Sweet Poppy metal stencil. It is a beautiful design with so much detail to it. I simply inked the design onto the kraft card using a stencil brush & Brilliance 'Pearlescent Crimson' ink pad. I then edged the design with the same ink pad before mounting it onto green mirror board.


I wanted a tartan background to match the Scottish theme of the stag but I didn't have anything in the colour scheme I needed so I decided to make my own. I took a piece of 8x8 kraft card and masked stripes with low tack tape. I inked the remaining kraft card with the 'pearlescent crimson' ink used for the stag. I carefully removed the tape and then re-attached it to the card the opposite way (to create stripes in both horizontal & vertical) and inked again. I then repeated this process but using Brilliance 'pearlescent olive' ink. The olive colour seemed to take a while to dry so I carefully removed the tape and left it for a few minutes to dry. I then trimmed the kraft card slightly so it would fit onto an 8x8 card.


To finish the card,  I wrapped some 'metallic copper' raffia around my background 3 times before I attached it to my 8x8 base card and then attached the topper.

I am entering this card into the following challenges:-
Christmas Card Challenges 'anything goes' 5/1
Craft Your Passion 'new' 6/1
Crafters Cafe 'animals' 8/1
Pink Elephant 'anything goes' 5/1
Crafty Hazlenut Extra 'anything xmas' 31/1

Sunday, December 22, 2013

It's nearly here...


The Christmas holidays have finally arrived (YAY!) and I've already made myself a new years resolution! The Christmas crafting goodies will not be going away this year as I plan to make Christmas cards all year round (trying to make 14 cards in one night after a long day at work including a nativity play was not a great idea!)

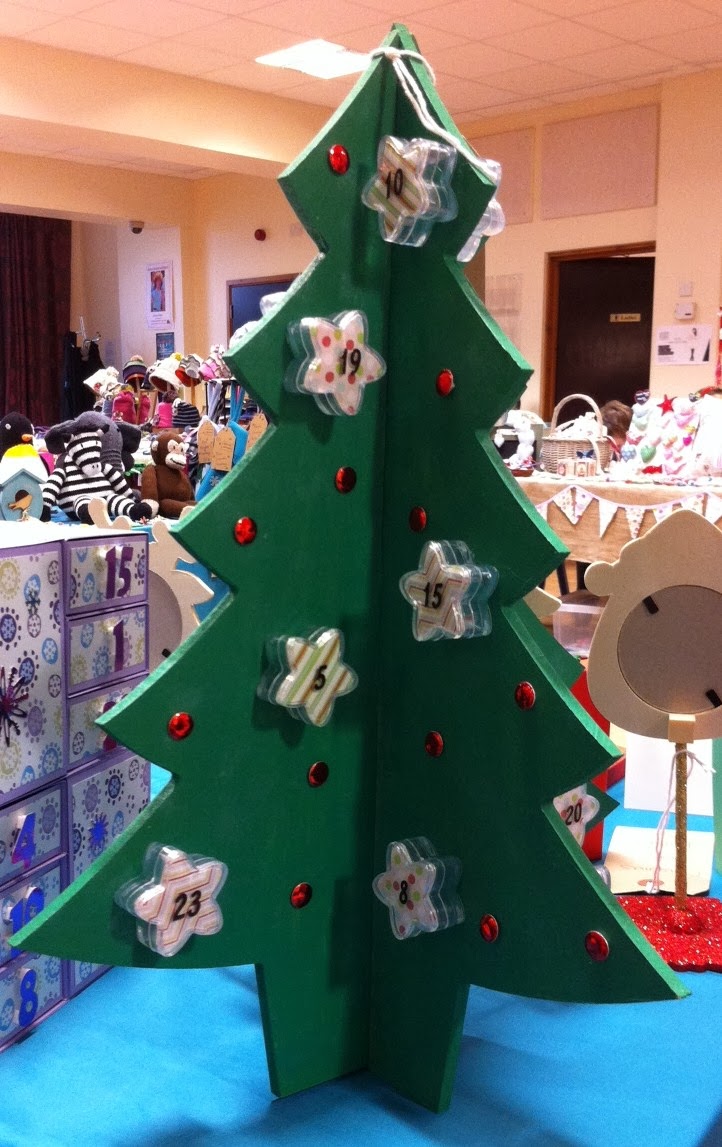
I haven't been able to post as much as I would like during November & December but I hope to make up for it now. Today's post is of 3 different advent calendars I've made- 2 using a 'House of Zandra' template I modified and 1 using a fab-u-lous wooden tree from the MDF man!

For the first two, I used the House of Zandra 'crafty drawers' template but made 2 of each piece so that rather than having 12 drawers, I had 24 (enough for a proper advent calendar). For the first one, I made half of the pieces in red card & half in green so that I could mix & match when I put the drawers together. The second one was made completely in lilac. It was a really easy template to use and rather than cutting all the pieces by hand, I measured each of the template pieces and then used my paper trimmer (I may spend some time making up all of the shapes into my Cricut craft room to make it even quicker next time). I put all of the pieces together with super sticky tape arranging the drawers into a red, green, red patten for the first one. I then used some 12x12 paper to decorate each panel before adding the mirror card numbers (cut using my cricut) & the decorations (Dawn Bibby stocking peel-offs using the waste to fill in and add the colour, peel-off snowflakes & mirror card snowflakes cut using the cricut).


The tree came about after I spotted the small star shaped pots in my local Carole's Crafts shop- they were having a 50% off everything sale so the pack of 24 pots was only £2.50 (bargain!). I have had them since the start of the year and wanted to make some kind of advent calendar with them. I was originally planning to mount them onto a circular shape to make a wreath but when I saw the 3d wooden tree from The MDF Man at the Lincoln Sincerely Yours show I knew it was perfect. I had taken the pots with me hoping to find a wooden circle but this was even better- the mdf tree was just £4 too!

I painted the pieces of the tree with a flat green paint and then sponged it with a metallic green paint over the top to add texture. I then attached the pots to the tree with a hot glue gun, putting 3 on each side (I did this with the tree put together to make sure that I didn't get any pots too close together). I then used the lids of the pots as a template to draw the star shape onto 3 different patterned papers to insert into the lids so that the goodies inside can't be seen. I used peel-off numbers in black to number each pot. I then finished the tree by simply adding some red mirror card candi as decorations.


I am entering the advent calendars into a new challenge blog I have just found:-
Crafting for all Seasons 'anything but a card'

Wednesday, December 11, 2013

the cats miaow

I'm back! It's been an absolutely manic few weeks at work and with a load of craft shows (where I've bought lits of new things) & craft fairs (where I've managed to sell a few bits too) I've not been making as much as I'd like! BUT, I've finally made another SWALK card today and have also managed to use up a bit of some Kanban papers that have been in my stash for years (no exaggeration!). Not sure what's wrong with me- I don't tend to do actually using stuff!!!


This was a really quick card to make- I started with a sheet of A4 white card that I folded into an A5 card blank. I then added the metallic Kanban paper, leaving just a small white border. The main image topper was a pre-coloured one from the SWALK cd and I again created the message myself using the verse writer function. I inked the edges of the toppers using 'dusty concord' distress ink and then mounted them onto a dull gold mirror board.

I am entering this card into the following challenges:-
Penny's Paper-Crafty Challenges 'feminine with a sentiment'
Cutie Pie Challenge Blog 'cute card for a special friend'

Saturday, October 26, 2013

let it snow, let it snow, let it snow!

I've been busy colouring this week, using some images from a cd-rom that I've had for a while but have recently re-discovered. I love it when you've forgotten exactly why you bought something and then look through it again and get that whole "ooooooo" again!

Anyway, this is another Christmas card using the Crafters Companion SWALK images.


I started by printing the image at the 4 to a page size, and then coloured it with a mix of promarkers & spectrum noirs. I used a Sakura glitter pen to highlight the snowflakes and then 'white opal' perfect pearls for the small snow blobs. I'm not yet an owner of any die-cutting shapes so I had to cut these out by hand- I used some Kanban mats as the stencil for the patterned paper and coloured image. I didn't have a stencil for the mirror layer so I used the same stencil as the topper and then just cut a little away from the pencil line to create the mat. The tree design paper is from a Dovecraft 'Merry & Bright' 6x6 paper pad which was a bargain last January! The card blank is from Craftwork Cards and already has the fancy edge that matches my chosen mat shape. To add a little extra interest to the plain white base card, I used a snowflake mask and 'picked raspberry' distress ink to stencil the snowflake design.

I am entering this card into the following challenges:-
Polkadoodles 'xmas'
Papertake Weekly 'oh Christmas Tree'
Creative Inspirations 'anything goes'
Graph'It 'alternative xmas colours'
Crafty Catz 'spots & stripes'

Thursday, October 24, 2013

snowflake kisses

This is my most recent card, and the start of a bit of a SWALK marathon. Last Christmas, I bought a Crafters Companion triple cd-rom featuring the SWALK images as digis to colour myself and 'Pawfect Pals' themed toppers. This is one of the digi designs that I have coloured myself.


I coloured my digi image with both Spectrum Noirs & Promarkers and added the snow using 'white opal' perfect pearls. I used a Kanban mat as a template to cut the topper into the decorative shape and then mounted it onto a purple mirror card mat that I also hand cut. I cut a larger mat (again using a Kanban mat as a stencil) from a pre-glittered DCWV paper. I wanted to layer the 3 parts onto a Craftwork Cards card blank that has the same shape to the edge as my toppers but I found that it looked a little plain. I therefore, decided to stamp some small snowflakes using a Versamark ink and to use a mix of lilac & blue mica powders to dust over the ink. This has given the base card a subtle sheen.


I also rubbed the versamark ink onto the edge of the card and dusted this with the lilac mica powders too.

I am entering this card into the following challenges:-
Graph'It 'xmas blues & purples'
Daring Cardmakers 'digital'

Tuesday, October 22, 2013

art deco- red & black

I know that the run up to Christmas is going to be absolutely manic for me both at work and at home, so I'm trying to make the most of half term this week by making as many cards as I can. Over the next couple of months there are nativity plays, pantomimes & everything Christmassy at work and then various shows (so I can buy lots of new goodies) & craft fairs (so I can hopefully sell a few bits & bobs too)!

I was also lucky enough to win a £100 Create & Craft voucher in a Pinterest competition, so I'm doing my best to spend it (suprisingly not that difficult!) and this card uses 2 of the new things I've ordered.


I started with a decoupage topper from the Papermania 'Art Deco' Ultimate Die Cut & Paper pack, which I mounted on to some bright red mirror board from Creata (one of my freebies!). I then took a sheet of black A4 card and folded it to make the base card. I attached the layered topper to the corner of the card and added the 3 Hobby House gems to the corner. I completed the card by adding the paper bow to the corner which is from Craftwork Cards Paper Bows pad (another C&C freebie). The bows are all white/gold & black- so I coloured it with Barn Door & Festive Berries distress ink to match the card better. I attached it to the card and then edged it with 'xmas red' stickles.


I am entering this card into the following challenges:-
Creative Card Crew 'sun, moon & stars'
Paper Shelter '2 colours'
Penny's Paper-Crafty Challenges 'anything goes'

Sunday, October 6, 2013

on top of the world...

I just had to make the most of the sunny weather this weekend to get some cross stitch done as I'm desperate to finish my Hogwarts crest that I started back in July but it's so detailed, I can only do it in perfect daylight and that's hard to come by most of the time right now! That means that I've only had time for 1 card, but I think it's a goodie...


It's another really simple card made using 'Gorjuss' products from DoCrafts that I've had for ages. I started with an 8x8 white card blank onto which I matted some striped 'gorjuss' paper. I took a sheet of blue 6x6 paper (also from the gorjuss range) and stamped the image using just a black memento ink. I also stamped the message which is from the same stamp set. I used a stencil to trace the stars onto double sided adhesive sheet and then cut them out with non-stick scissors! I added these stars to the card and then used gilding flakes over the top of them. When I went to mount the topper onto the stripe paper, it needed something to make it stand out so I added a layer of black mirror card which I distressed the edges of using sandpaper. I rubbed in a circular motion giving the loopy edge to the distressing.


I am entering this card into the following challenges:-
Papertake Weekly 'anything goes'
Penny's Paper-Crafty Challenges 'anything goes'
Crafty Catz 'anything goes'
Totally Gorjuss 'stars'
Catch the Bug 'anything goes'