Last night, I was having a look around Pinterest (like you do) and found the most fabulous idea for using badges. You can find the original idea here.
I loved it because every time I go to a concert (which is usually at least 3-5 times a year), I tend to buy a t-shirt and a badge pack. This means that I have a stupid amount of badges! When having a clear out a few years ago I also found an original Take That badge from the early 1990's and some Rainbow badges (brilliant kids tv programme) from the late 1980's. I know that I'd never throw them away but it also seems a bit daft that they just sit on a shelf gathering dust. Today I've used an old canvas and some of my badge collection to create this fabulous artwork!
It took a while to make and I'm not convinced that I've stuck the badges securely enough but time will tell! I'll definitely be making another as I have lots more badges to use.
I started with an old, roughly 10" x 10", canvas. It was a bit dirty so I decided to cut a piece of white cardstock to create my design onto and then mount that onto the canvas. I used my Cricut to cut an 8" x 8" heart as a stencil and very lightly traced the shape onto the white card. I then laid out a selection of badges (trying to be as random as possible) onto the shape of the heart to make sure they would fit well. I then carefully removed each badge one at a time and stuck it to the card using a double (sometimes triple) layer of foam pads. Once all the badges were attached, I coated the canvas with a layer of pva glue and then stuck the card to it.
I love it because it uses 2 'old' things and I can now display my badges rather than them being hidden on a shelf!
I am entering this project into the following challenges:-
Clear it out 'use 2 things I'm hoarding' (old canvas & old badges) 7.4
The Pink Elephant 'anything goes' 6.4
Craft Your Passion 'anything goes' 5.4
Penny's Paper-Crafty Challenges 'anything goes' 7.4
Creative Inspirations 'anything goes' 7.4
Crafty Catz 'anything goes' 9.4
Catch the Bug 'anything goes' 11.4
I love to craft and I love to shop, particularly for crafty stash (and shoes). I'll blog about the shops I visit, the stuff I buy and what I've done with it all!
Showing posts with label Cricut. Show all posts
Sunday, April 5, 2015
Badges galore
Labels:
badges,
canvas art,
Cricut,
Pinterest
Monday, March 9, 2015
You should read this book!
A few weeks ago, I made a Dr. Seuss inspired canvas for my school library. This week, I've been making a pin board that will also go in the library and be somewhere for the children to recommend books that they've enjoyed to everyone else. It took ages as the Cricut was playing up a bit but I'm pleased with the final result- now it's done!
I started with a £2 cork pin board from QD which I painted bright yellow using the remains of an emulsion tester pot. All of the letters and images that I have used are from the Cricut Design Space subscription and I made them using the print and cut feature so that I didn't have to layer up lots of different pieces of card. I simply attached the letters and the images around the board with pva glue and then used some DoCrafts Gorjuss baker's twine to make the hanging string.
I am entering this project into the following challenges:-
Crafty Catz 'song title to match image' 12.3 (Paperback Writer by the Beatles)
Crafty Boots 'not a card' 15.3
Clear it out 'anything goes' 10.3
Papertake Weekly 'anything goes' 10.3
Catch the Bug 'anything goes' 14.3
I started with a £2 cork pin board from QD which I painted bright yellow using the remains of an emulsion tester pot. All of the letters and images that I have used are from the Cricut Design Space subscription and I made them using the print and cut feature so that I didn't have to layer up lots of different pieces of card. I simply attached the letters and the images around the board with pva glue and then used some DoCrafts Gorjuss baker's twine to make the hanging string.
I am entering this project into the following challenges:-
Crafty Catz 'song title to match image' 12.3 (Paperback Writer by the Beatles)
Crafty Boots 'not a card' 15.3
Clear it out 'anything goes' 10.3
Papertake Weekly 'anything goes' 10.3
Catch the Bug 'anything goes' 14.3
Labels:
Baker's Twine,
Cricut,
DoCrafts,
not a card,
paint
Sunday, March 8, 2015
Princess words
I've been busy starting work on a crafting project for school, so just 1 quick card this weekend.
This is another card made using the 'word collage' images on the Cricut Explore. It's a set of designs that I hadn't used and then fell completely in love with!
I started with the 6x6 base card and a sheet of pink star print backing paper also in 6x6. I used the Cricut to draw the princess lettering in gold ink and then trimmed the design down to fit onto the card. I added a small brush of gold metallic acrylic paint around the edges of the card and to highlight some aspects of the design such as the crown. I then used a pale pink ranger alcohol ink to colour a silver key charm which I then tied into a large gold bow down the spine of the card. To finish it, I added a double layered flower secured with a gold glittery brad.
I am entering this card into the following challenges:-
The Pink Elephant 'girly girl' 9.3
Craft your Passion 'anything goes' 8.3
Quirky Crafts 'pretty in pink' 14.3
Penny's Paper-crafty Challenges 'female cards' 10.3
Crafting for all Seasons 'girly girls' 16.3
Crafter's Cafe 'charms' 11.3
Creative Inspirations 'something old' 10.3 (everything on this card is things that I've had in my stash for ages!)
In the Pink 'special lady' 18.3
Crafty Calendar 'add some metal' 3.4
This is another card made using the 'word collage' images on the Cricut Explore. It's a set of designs that I hadn't used and then fell completely in love with!
I started with the 6x6 base card and a sheet of pink star print backing paper also in 6x6. I used the Cricut to draw the princess lettering in gold ink and then trimmed the design down to fit onto the card. I added a small brush of gold metallic acrylic paint around the edges of the card and to highlight some aspects of the design such as the crown. I then used a pale pink ranger alcohol ink to colour a silver key charm which I then tied into a large gold bow down the spine of the card. To finish it, I added a double layered flower secured with a gold glittery brad.
I am entering this card into the following challenges:-
The Pink Elephant 'girly girl' 9.3
Craft your Passion 'anything goes' 8.3
Quirky Crafts 'pretty in pink' 14.3
Penny's Paper-crafty Challenges 'female cards' 10.3
Crafting for all Seasons 'girly girls' 16.3
Crafter's Cafe 'charms' 11.3
Creative Inspirations 'something old' 10.3 (everything on this card is things that I've had in my stash for ages!)
In the Pink 'special lady' 18.3
Crafty Calendar 'add some metal' 3.4
Labels:
Acrylic Paint,
Alcohol Inks,
Brads,
Charms,
Cricut,
Dovecraft,
Flowers,
Ribbon
Tuesday, March 3, 2015
Spring Swim
I've been busy again this weekend, and here is the second of the 2 cards I made. It's a really fun spring/summery Polkadoodles card.
This isn't as CAS as my usual card style but I really love it- it's lots of fun. I recently made a Polkadoodles Work & Play Pinterest board to collate some ideas. I found a really great idea using the swimmer image that was my inspiration for this card, You can find the original here.
I started by looking through my Polkadoodles Work & Play 4 kit and printed off the waves background paper and the swimmer and bunting toppers. The cloud paper came from another Work & Play kit (1, 2 or 3- I can't remember which), as did the spotty paper used on the beach huts. The beach huts are a digi stamp I found on Etsy here for only 50p!
I started by covering an 8x8 card blank with the cloud paper. I cut the wave paper to the same size as the clouds and then cut a square aperture from the centre leaving 3cm on each side. I used my Cricut Explore to create the beach huts, importing the png. image into the Design Space software and then using the print then cut feature. I actually cut them out myself as I only wanted 2 of the 3 beach huts but using the Cricut meant that I could very accurately resize the image which I can't do in a Windows Print. I hand cut the bunting and the pre-coloured swimmer digi too.
Once everything was cut out, I was ready to start to build the card. I layered the beach huts on top of the cloud background, attaching them with a double sided tape. I then used a thin 3d foam to attach the wave frame and then used my thickest foam pads to attach the swimmer and the bunting to the card. It has lots of layers and different things to keep the eye interested but is still quite simple as all the cuts are square.
I am entering this card into the following challenges:-
Digi Choosday 'spring pastels' 3.3
Digi Choosday 'anything goes' 10.3
Crafters Cafe 'lots of layers' 4.3
Penny's Papercrafty Challenges 'lots of layers' 3.3
Paper Shelter 'make it digital' 3.3
Daring Cardmakers 'yellow' 6.3
Crafty Hazlenut Patterned Paper Challenge 'anything goes' 31.3
This isn't as CAS as my usual card style but I really love it- it's lots of fun. I recently made a Polkadoodles Work & Play Pinterest board to collate some ideas. I found a really great idea using the swimmer image that was my inspiration for this card, You can find the original here.
I started by looking through my Polkadoodles Work & Play 4 kit and printed off the waves background paper and the swimmer and bunting toppers. The cloud paper came from another Work & Play kit (1, 2 or 3- I can't remember which), as did the spotty paper used on the beach huts. The beach huts are a digi stamp I found on Etsy here for only 50p!
I started by covering an 8x8 card blank with the cloud paper. I cut the wave paper to the same size as the clouds and then cut a square aperture from the centre leaving 3cm on each side. I used my Cricut Explore to create the beach huts, importing the png. image into the Design Space software and then using the print then cut feature. I actually cut them out myself as I only wanted 2 of the 3 beach huts but using the Cricut meant that I could very accurately resize the image which I can't do in a Windows Print. I hand cut the bunting and the pre-coloured swimmer digi too.
Once everything was cut out, I was ready to start to build the card. I layered the beach huts on top of the cloud background, attaching them with a double sided tape. I then used a thin 3d foam to attach the wave frame and then used my thickest foam pads to attach the swimmer and the bunting to the card. It has lots of layers and different things to keep the eye interested but is still quite simple as all the cuts are square.
I am entering this card into the following challenges:-
Digi Choosday 'spring pastels' 3.3
Digi Choosday 'anything goes' 10.3
Crafters Cafe 'lots of layers' 4.3
Penny's Papercrafty Challenges 'lots of layers' 3.3
Paper Shelter 'make it digital' 3.3
Daring Cardmakers 'yellow' 6.3
Crafty Hazlenut Patterned Paper Challenge 'anything goes' 31.3
Labels:
Cricut,
Digi Papers,
Digi Stamps,
Polkadoodles,
Work & Play
Thursday, February 19, 2015
Congratulations
I've been busy crafting today making a card to celebrate an engagement of 2 people I work with. It's a bit of a different card style for me but I really like it and think I will be making more like this. It was super quick too.
I started with a 6x6 white card blank and a circle clarity stencil. I placed the stencil onto the edge of the card and secured it with low-tack tape, making sure to cover the other parts of the stencil so I didn't accidentally get ink on other parts. The danger with this very simple kind of card is that any mistake would be really obvious!
I inked the circle using 'squeezed lemonade' distress ink and then inked only the edges using 'worn lipstick'. Where the 2 colours have blended, a really nice orange colour has been made. I used a Clarity Stamps 'Wee Folk' stamp to stamp the couple silhouette into the circle. I then used my Cricut Explore to cut the message from black card and stuck it onto the base card.
I am entering this card into the following challenges:-
CRAFT 'CAS' 25.2
That Craft Place 'film inspired' 28.2 (the focus colour around the couple reminds me of the end of a rom-com just as the screen goes to the credits and turns black)
Craft Your Passion 'anything goes' 22.2
Daring Cardmakers 'L.O.V.E.' 20.2 (One Layer for a Valentines Engagement- O.L.V.E- spelling never is my strong point!)
I started with a 6x6 white card blank and a circle clarity stencil. I placed the stencil onto the edge of the card and secured it with low-tack tape, making sure to cover the other parts of the stencil so I didn't accidentally get ink on other parts. The danger with this very simple kind of card is that any mistake would be really obvious!
I inked the circle using 'squeezed lemonade' distress ink and then inked only the edges using 'worn lipstick'. Where the 2 colours have blended, a really nice orange colour has been made. I used a Clarity Stamps 'Wee Folk' stamp to stamp the couple silhouette into the circle. I then used my Cricut Explore to cut the message from black card and stuck it onto the base card.
I am entering this card into the following challenges:-
CRAFT 'CAS' 25.2
That Craft Place 'film inspired' 28.2 (the focus colour around the couple reminds me of the end of a rom-com just as the screen goes to the credits and turns black)
Craft Your Passion 'anything goes' 22.2
Daring Cardmakers 'L.O.V.E.' 20.2 (One Layer for a Valentines Engagement- O.L.V.E- spelling never is my strong point!)
Labels:
CAS,
Clarity Stamps & Stencils,
Cricut,
Distress Inks,
Stencils
Sunday, February 8, 2015
Why Mr Darcy...
I've not had too much time for card making this weekend as I've had sewing projects for work to start but I've managed to make another card using one of the brilliant 'word collage' designs from the Cricut Explore!
This one uses the Jane Austen themed words which matched perfectly to a Pride & Prejudice themed decoupage topper that I've had for years (no exaggeration!).
I started with an 8x8 base card and a sheet of new Papermania 'Eau de nil' paper. I got the cricut to draw with a silver marker straight onto the backing paper which was surprisingly easy to line up. I trimmed the backing paper to size and mounted it onto the card. The topper I had already decoupaged so I simply attached this to the card with double sided tape. The two extra toppers came with the main decoupage so I added these with 3d foam to finish the card.
I am entering this card into the following challenges:-
Catch the Bug 'anything goes' 14.2
Crafty Calendar 'anything goes' 1.3
CRAFT 'decoupage' 11.2
Creative Inspirations 'love is in the air' 10.2
Paper Shelter 'be my valentine' 10.2
Cute Card Thursday 'crazy in love' 11.2
Clear it Out 'anything goes' 10.2
Papertake Weekly 'anything goes' 10.2
This one uses the Jane Austen themed words which matched perfectly to a Pride & Prejudice themed decoupage topper that I've had for years (no exaggeration!).
I started with an 8x8 base card and a sheet of new Papermania 'Eau de nil' paper. I got the cricut to draw with a silver marker straight onto the backing paper which was surprisingly easy to line up. I trimmed the backing paper to size and mounted it onto the card. The topper I had already decoupaged so I simply attached this to the card with double sided tape. The two extra toppers came with the main decoupage so I added these with 3d foam to finish the card.
I am entering this card into the following challenges:-
Catch the Bug 'anything goes' 14.2
Crafty Calendar 'anything goes' 1.3
CRAFT 'decoupage' 11.2
Creative Inspirations 'love is in the air' 10.2
Paper Shelter 'be my valentine' 10.2
Cute Card Thursday 'crazy in love' 11.2
Clear it Out 'anything goes' 10.2
Papertake Weekly 'anything goes' 10.2
Labels:
CAS,
Cricut,
Decoupage,
Paper Nation,
Papermania
Sunday, January 25, 2015
Read, Know, Learn, Go
I'm always finding things on Pinterest and Create & Craft that inspire me to try something new and today's make is no different.
The original idea was shown on Create & Craft ages ago when they had a new show with lots of beautiful papers and large stencils/masks (can't remember the brand name but there were American). The guest took a canvas and covered it with paper, masked words and then painted over the top. When the mask is removed, the words are revealed in the base design. I've wanted to try it since I saw it and I've finally found an excuse!
In my school, I am the literacy co-ordinator and one of the projects I want to work on is improving the use of our library. I've found lots of nice ideas on Pinterest that I will be doing but my first project has been to make something arty to brighten up the room a bit.
This is what I've made
I started with a canvas that I've had for ages (but they are on offer in The Works at the moment) and covered it using PVA glue with pages torn from a spare copy of Harry Potter and the Philosophers Stone that I have for crafting purposes! I used the glue over the top of the papers also and then left to dry.
I then used the Cricut Explore to cut my lettering out of sticky back plastic- I used 3 different fonts all included in the Cricut Design Space subscription package. I laid the letters out onto the canvas (with the backing still on) so that I could place them accurately and then carefully stuck them onto the dry canvas.
When I had attached all the letters, I painted over the whole canvas with purple emulsion paint from a tester pot (Wilko's new 'magic' colour) and them dry brushed some hints of dark grey emulsion (Wilko's 'barely black') on top.
When the paint was dry, I used my pokey tool to carefully remove the sticky back plastic letter masks to reveal the text underneath. It was actually kind of fun too to see which words would be revealed. When one of the small letters revealed 'Professor Weasley' I had to smile (maybe Charlie teaching Care of Magical Creatures?).
I now want to try one for my own classroom with a fab quote I've seen on Pinterest that says "excuse the mess but we're learning in here", although this could work just as well for my craft room!
I am entering this project into the following challenges:-
CRAFT 'recycling' (old canvas)- 28.1
A Blog named Hero 'personalise' 29.1
Craft your Passion 'anything goes' 25.1
Ooh, la, la, 'once upon a time' (pages used from a book & it's for a library) 1.2
Polkadoodles 'case it' (idea seen on Pinterest and C&C) 30.1
Penny's paper-crafty challenges 'anything goes' 27.1
The original idea was shown on Create & Craft ages ago when they had a new show with lots of beautiful papers and large stencils/masks (can't remember the brand name but there were American). The guest took a canvas and covered it with paper, masked words and then painted over the top. When the mask is removed, the words are revealed in the base design. I've wanted to try it since I saw it and I've finally found an excuse!
In my school, I am the literacy co-ordinator and one of the projects I want to work on is improving the use of our library. I've found lots of nice ideas on Pinterest that I will be doing but my first project has been to make something arty to brighten up the room a bit.
This is what I've made
I started with a canvas that I've had for ages (but they are on offer in The Works at the moment) and covered it using PVA glue with pages torn from a spare copy of Harry Potter and the Philosophers Stone that I have for crafting purposes! I used the glue over the top of the papers also and then left to dry.
I then used the Cricut Explore to cut my lettering out of sticky back plastic- I used 3 different fonts all included in the Cricut Design Space subscription package. I laid the letters out onto the canvas (with the backing still on) so that I could place them accurately and then carefully stuck them onto the dry canvas.
When I had attached all the letters, I painted over the whole canvas with purple emulsion paint from a tester pot (Wilko's new 'magic' colour) and them dry brushed some hints of dark grey emulsion (Wilko's 'barely black') on top.
I now want to try one for my own classroom with a fab quote I've seen on Pinterest that says "excuse the mess but we're learning in here", although this could work just as well for my craft room!
I am entering this project into the following challenges:-
CRAFT 'recycling' (old canvas)- 28.1
A Blog named Hero 'personalise' 29.1
Craft your Passion 'anything goes' 25.1
Ooh, la, la, 'once upon a time' (pages used from a book & it's for a library) 1.2
Polkadoodles 'case it' (idea seen on Pinterest and C&C) 30.1
Penny's paper-crafty challenges 'anything goes' 27.1
Labels:
canvas art,
Cricut,
Harry Potter,
paint
Sunday, July 6, 2014
Flying high...
Now that I've discovered the wonderful world of box cards, I keep coming up with loads of ideas that I want to try- so far this is definitely my favourite!
My colouring is not the greatest so I have signed up to a Skin & Hair class at Kit & Clowder. They ask you to colour an image before you start the class to compare to later on so I decided to colour a Mary Poppins digi that I love. I chose this because I had a great idea for a card so even though the colouring isn't brilliant, I think the card is.
Here it is...
I used a sheet of pale blue A4 cardstock to cut the box card base and then trimmed the flaps to just 5cm to show the base a little more. I used docrafts London dies to cut out 3 layers of London skyline and scored these to match the base of the box. I then attached them with plenty of double sided tape.
I cut DCWV blue cardstock (as it has a white core) to fit as mats for the flaps and back panel and then embossed them with a Clarity Stencils cloud design. I sanded back the card to show the white core through for the clouds and then edged each piece with white ink before adding to the card.
I then used scraps of blue card (from 2 card bases that didn't quite work) to make my interior supports for some clouds cut using the Cricut from some glitter card. I chose slightly different clouds from 3 different cartridges included in my subscription (Nate's ABC, The first few years & Groovy Times). I attached one cloud to the inside front of the box, 2 onto the 2 supports and one onto the back panel before adding the Mary Poppins digi, coloured with Spectrum Noirs & Promarkers, using foam pads.
I'm loving the fact that she's actually flying over the London skyline! :-)
I am entering this card into the following challenges:-
Fantabulous Cricut 'anything goes'
Crafts Galore 'stamp/digi' 31/7
Creative Inspirations 'anything goes' 8/7
A Blog Named Hero 'colour it in' 14/7
Catch the Bug 'anything goes' 19/7
Graph'It 'anything with an alcohol marker' 11/7
My colouring is not the greatest so I have signed up to a Skin & Hair class at Kit & Clowder. They ask you to colour an image before you start the class to compare to later on so I decided to colour a Mary Poppins digi that I love. I chose this because I had a great idea for a card so even though the colouring isn't brilliant, I think the card is.
Here it is...
I used a sheet of pale blue A4 cardstock to cut the box card base and then trimmed the flaps to just 5cm to show the base a little more. I used docrafts London dies to cut out 3 layers of London skyline and scored these to match the base of the box. I then attached them with plenty of double sided tape.
I cut DCWV blue cardstock (as it has a white core) to fit as mats for the flaps and back panel and then embossed them with a Clarity Stencils cloud design. I sanded back the card to show the white core through for the clouds and then edged each piece with white ink before adding to the card.
I then used scraps of blue card (from 2 card bases that didn't quite work) to make my interior supports for some clouds cut using the Cricut from some glitter card. I chose slightly different clouds from 3 different cartridges included in my subscription (Nate's ABC, The first few years & Groovy Times). I attached one cloud to the inside front of the box, 2 onto the 2 supports and one onto the back panel before adding the Mary Poppins digi, coloured with Spectrum Noirs & Promarkers, using foam pads.
I am entering this card into the following challenges:-
Fantabulous Cricut 'anything goes'
Crafts Galore 'stamp/digi' 31/7
Creative Inspirations 'anything goes' 8/7
A Blog Named Hero 'colour it in' 14/7
Catch the Bug 'anything goes' 19/7
Graph'It 'anything with an alcohol marker' 11/7
Labels:
Box Card,
Clarity Stamps & Stencils,
Colouring,
Cricut,
DCWV,
Digi Stamps,
Dry Embossing,
Promarkers,
Sanding,
Spectrum Noirs,
Stencils
Tuesday, July 1, 2014
Super Sunflowers
I've been looking at 'pop up box cards' for a while and I really like the look of them however it wasn't until this week that I realised that they folded flat to go into an envelope. Now that I know that vital information (!) I thought I'd have a go at making one. I couldn't see the point before as how would anyone send it?
I've seen lots of people making them on the Cricut Explore Facebook page I'm a member of so I went back to those posts and looked at them a bit more closely. Everyone seemed to be recommending the templates at svgcuts.com so I went there. They have some brilliant designs for great prices and I got a set of 5 complete designs and 4 plain ones for less than £5. I started by making one of their set designs (floral box card) which I'm sure will get posted eventually but once I had the idea, I wanted to make my own design.
This is what I came up with
It uses DCWV papers, a sheet of 12x12 yellow cardstock and sunflower toppers (fake fabric flowers & chipboard). All of the small squares of patterned paper came from one striped 12x12 sheet that I cut down making the most of the different patterns. The taller front and back patterns came from another co-ordinating design. The different papers can be seen better in this photo.
The file from svgcuts cut out the card base and 2 inner topper holders. I used scraps of matching yellow card to create sticks for the flowers to stand out on.
I have made this card as a gift for the head teacher at my school. It has been a rough few weeks/month/year (!) and while some of us only have to deal with bits of it, she gets it all. She loves sunflowers so this will hopefully give her at least 1 smile tomorrow!
I am also entering this card into the following challenges:-
Crafting for All Seasons 'whatever the weather' 7/7 (sunflowers can make you feel sunny even on the wettest day!)
CRAFT challenge 'thank you' 2/7
The Pink Elephant 'anything goes' 7/7
Papertake Weekly 'anything goes' 8/7
Love to Create '3+ papers' 6/7
That Craft Place 'anything goes' 5/7
I've seen lots of people making them on the Cricut Explore Facebook page I'm a member of so I went back to those posts and looked at them a bit more closely. Everyone seemed to be recommending the templates at svgcuts.com so I went there. They have some brilliant designs for great prices and I got a set of 5 complete designs and 4 plain ones for less than £5. I started by making one of their set designs (floral box card) which I'm sure will get posted eventually but once I had the idea, I wanted to make my own design.
This is what I came up with
I have made this card as a gift for the head teacher at my school. It has been a rough few weeks/month/year (!) and while some of us only have to deal with bits of it, she gets it all. She loves sunflowers so this will hopefully give her at least 1 smile tomorrow!
I am also entering this card into the following challenges:-
Crafting for All Seasons 'whatever the weather' 7/7 (sunflowers can make you feel sunny even on the wettest day!)
CRAFT challenge 'thank you' 2/7
The Pink Elephant 'anything goes' 7/7
Papertake Weekly 'anything goes' 8/7
Love to Create '3+ papers' 6/7
That Craft Place 'anything goes' 5/7
Labels:
Box Card,
Cricut,
DCWV,
Flowers,
svgcuts.com
Monday, June 30, 2014
T.A.R.D.I.S.
Since I got my Cricut Explore, I have been a member of a fab Facebook group dedicated to helping each other out with any issues or good ideas we find. It's called 'let's learn cricut explore' and is well worth a look if you haven't found it.
A while ago, someone posted a photo of a brilliant doctor who card they had made using some svg's bought from a website I hadn't heard of before. The site is called Pretty Paper Pretty Ribbons and has a wide range of svg's available at great prices. I got 2 sets (the doctors and the doctors enemies) for less than £4 when converted via PayPal. They are quite complicated designs but the Cricut made it so easy.
The first thing I've made is this TARDIS shaped card. I have made one of these in the past but it took ages to work put all the sizes and cut everything by hand. This way was much quicker and neater.
I started by sizing the layered TARDIS to fit onto an A5 piece of card. I then copied the image, deleting all layers except the white base. I flipped this and then welded it to the base of the first image to make a shaped card base that would fit onto an A4 piece of card. I cut the other pieces from 3 different shades of blue as shown on both the image and the Cricut. I used double sided tape to layer up the different pieces.
The white windows are part of the design but the sign is not so I used one of the cut out sections as a template and drew onto some white card, cutting it slightly smaller to fit the aperture. I have left this blank as it would be perfect for a message. I also had to add the POLICE BOX label at the top by hand but I was lucky enough to win a Graph'It white marker a while ago and it was brilliant for this finishing touch.
I am entering this card into the following challenges:-
Paper Shelter 'travel the world' 1/7 (I can't think of any other way to travel the world than in the TARDIS but please delete if it does not match your theme enough!)
A while ago, someone posted a photo of a brilliant doctor who card they had made using some svg's bought from a website I hadn't heard of before. The site is called Pretty Paper Pretty Ribbons and has a wide range of svg's available at great prices. I got 2 sets (the doctors and the doctors enemies) for less than £4 when converted via PayPal. They are quite complicated designs but the Cricut made it so easy.
The first thing I've made is this TARDIS shaped card. I have made one of these in the past but it took ages to work put all the sizes and cut everything by hand. This way was much quicker and neater.
I started by sizing the layered TARDIS to fit onto an A5 piece of card. I then copied the image, deleting all layers except the white base. I flipped this and then welded it to the base of the first image to make a shaped card base that would fit onto an A4 piece of card. I cut the other pieces from 3 different shades of blue as shown on both the image and the Cricut. I used double sided tape to layer up the different pieces.
The white windows are part of the design but the sign is not so I used one of the cut out sections as a template and drew onto some white card, cutting it slightly smaller to fit the aperture. I have left this blank as it would be perfect for a message. I also had to add the POLICE BOX label at the top by hand but I was lucky enough to win a Graph'It white marker a while ago and it was brilliant for this finishing touch.
I am entering this card into the following challenges:-
Paper Shelter 'travel the world' 1/7 (I can't think of any other way to travel the world than in the TARDIS but please delete if it does not match your theme enough!)
Daring Cardmakers 'no scissors' 4/7 (everything done on my die cutting machine)
Labels:
Cricut,
Doctor Who,
Graph'It,
PPPR,
Shaped Card
Monday, June 9, 2014
Na x 16
BATMAN!!!
Here's my latest card and it's again using the brilliant Cricut Explore. I spent some time this week having a look at the Cricut website to see what's included in the subscription package and found a fab set of designs in a cartridge called 'word collage'. It's got lots of different themes and is great with the drawing function of the Cricut. For this card I've used the superhero version on the right hand side of my wardrobe card.
I simply drew the design onto black card with a gold metallic marker (well the cricut did) and then mounted it onto my base card. The base was made out of a piece of A4 yellow cardstock folded at 6cm on one side and 9cm on the other to make an uneven wardrobe. On the left hand side of the card I used a topper cut from a 12x12 paper that's been in my stash for ages and the Batman logo which was a tag on a pair of pyjamas I got recently from Primarni.
A really simple card, using a mix of old and new. I sense this may be the start of something with these word collage designs...
I am entering this card into the following challenges:-
Fantabulous Cricut Challenges 'male' 16/6 (not sure if this card fits the rules or not as it uses a Cricut draw rather than cut-please delete if it is not allowed)
Cutie Pie 'cute dad' 21/6
Labels:
Cricut,
Decoupage,
Found Objects,
Superheroes
Wednesday, June 4, 2014
Beautiful butterfly
I've set myself a challenge to try and make at least one card using items from each of the boxes in my craft room. I've made a list of the boxes and there are 41 so, my challenge is to make 1 card from each box. Here's the first,
It's in my usual CAS style and was nice and quick to make. It uses papers and a topper that have been in my stash for ages and a butterfly cut from the new Cricut Explore.
I started by choosing the topper and then finding a backing paper and cardstock to match it. The backing paper is from a DCWV 'blossoms and butterflies' stack. I chose a dusky pink cardstock that matched the colours in the topper and used it for the base card and to mount the topper. I then cut an intricate butterfly from pale yellow card and attached the body to the card leaving the wings free to fly!
I am entering this card into the following challenges:-
Craft Room Challenge 'things with wings' 9/6
Crafty Catz 'anything goes' 5/6
Love to Create 'happy birthday' 8/6
It's in my usual CAS style and was nice and quick to make. It uses papers and a topper that have been in my stash for ages and a butterfly cut from the new Cricut Explore.
I started by choosing the topper and then finding a backing paper and cardstock to match it. The backing paper is from a DCWV 'blossoms and butterflies' stack. I chose a dusky pink cardstock that matched the colours in the topper and used it for the base card and to mount the topper. I then cut an intricate butterfly from pale yellow card and attached the body to the card leaving the wings free to fly!
I am entering this card into the following challenges:-
Craft Room Challenge 'things with wings' 9/6
Crafty Catz 'anything goes' 5/6
Love to Create 'happy birthday' 8/6
Labels:
CAS,
Cricut,
DCWV,
Papermania,
Toppers
Tuesday, June 3, 2014
Land Ahoy!
Here's a new card using words from the Cricut Explore and the 'word collage' designs.
It's an offset wardrobe card with a slightly larger panel on the left hand side. On the left hand side, I used a DCWV printed pirate theme paper and used the Cricut to draw onto it with copper metallic ink. I mounted the paper onto copper mirror card and then attached it to the pale blue base. I added the pirate topper which actually came from a room decor set onto the panel.
On the right hand side, I used a different design of DCWV paper and a swimming shark topper.
It's an offset wardrobe card with a slightly larger panel on the left hand side. On the left hand side, I used a DCWV printed pirate theme paper and used the Cricut to draw onto it with copper metallic ink. I mounted the paper onto copper mirror card and then attached it to the pale blue base. I added the pirate topper which actually came from a room decor set onto the panel.
I am entering this card into the following challenges:-
Monday, May 26, 2014
Things with Wings
200th post!!!
I've been in the craft room again today busy playing with some more new goodies I got at the Newark Sincerely Yours show (and mixing them up with some old favourites!). I've also used my new Cricut explore again.
I'm really happy with how this card turned out and it's a bit different to my usual style.
I started with a card blank roughly 8x8 in size with a fancy edge. I wanted to create a layer for the card so I imported the shape into the Cricut and made my own cut file for it. I cut a mat from DCWV Latte paper and then another, slightly smaller, from pale blue card. I used 3 Imagination Crafts products to decorate the pale blue layer- new 'allium' stencil, new glitter paste and old stencil paint. I mounted all of my layers onto the card using double sided tape.
The card looked nice but it just needed something extra so this is where the Cricut came in handy again! I wanted a butterfly but wanted it to be very delicate and not take away from the stencil design. I found an image I liked from the cricut image library and then cut it from acetate. To add just a little extra glitz, I sprayed the acetate butterfly with Crafters Companion silver glitter spray. I then used an 'orchid' promarker to add a little colour to the body of the butterfly.
I've been in the craft room again today busy playing with some more new goodies I got at the Newark Sincerely Yours show (and mixing them up with some old favourites!). I've also used my new Cricut explore again.
I'm really happy with how this card turned out and it's a bit different to my usual style.
I started with a card blank roughly 8x8 in size with a fancy edge. I wanted to create a layer for the card so I imported the shape into the Cricut and made my own cut file for it. I cut a mat from DCWV Latte paper and then another, slightly smaller, from pale blue card. I used 3 Imagination Crafts products to decorate the pale blue layer- new 'allium' stencil, new glitter paste and old stencil paint. I mounted all of my layers onto the card using double sided tape.
The card looked nice but it just needed something extra so this is where the Cricut came in handy again! I wanted a butterfly but wanted it to be very delicate and not take away from the stencil design. I found an image I liked from the cricut image library and then cut it from acetate. To add just a little extra glitz, I sprayed the acetate butterfly with Crafters Companion silver glitter spray. I then used an 'orchid' promarker to add a little colour to the body of the butterfly.
I attached the butterfly to the card with Stickles glitter glue, frosted lace, to make sure it didn't show through. It gives a delicate finish to the card and some extra dimension.
I am entering this card into the following challenges:-
Crafts Galore Encore 'anything goes' & DT call 30/5http://cardsgalorechallenges.blogspot.co.uk/2014/05/may-all-your-crafting-be-merry.html
Labels:
Cricut,
DCWV,
Die Cutting,
Distress Inks,
imagination crafts,
Stencils
Sunday, February 23, 2014
Kanban 'so feminine' toppers- Tea for Two
I have a huge selection of old Kanban kits that I don't use very often at the moment but I dipped back into one, of the many, boxes and found this lovely topper. It's called 'Tea for Two'. I also used a 6x6 scalloped card blank, Basic Grey 'sultry' papers and my new (ish) cricut Elegant Edges cartridge.
I started with a 6x6 craftwork cards scalloped card blank and used my new Elegant Edges cricut cartridge to cut an almost 6x6 decorative circle from a patterned 'sultry' paper. I then cut a matching shadow from a plain pale pink paper from the same 'sultry' pad. These were mounted onto the card with double sided tape.
I used 'spun sugar' distress ink to add a pale pink edge to the topper and message before mounting onto the card with 3d foam. I then made my own large card candi style decorations for the corners of the card.
I did this by punching 4 circles from the patterned paper and moulding them into a curved circle with my fingers. I placed 3d foam squares onto the back of each piece and then used this to help me hold the circle as I triple embossed it with clear embossing powder to make it shine. They were then ready to attach to the card.
I am entering this card into the following challenges:-
Paper Shelter 'punches & dies' (punched circles to make card candi, cricut die cutting) 25/2
Daring Cardmakers 'something old' (toppers) 28/2
Graph' It 'florals' 28/2
Labels:
Basic Grey,
Craftwork Cards,
Cricut,
Die Cutting,
Distress Inks,
Kanban,
Punches,
Toppers
Sunday, December 22, 2013
It's nearly here...
The Christmas holidays have finally arrived (YAY!) and I've already made myself a new years resolution! The Christmas crafting goodies will not be going away this year as I plan to make Christmas cards all year round (trying to make 14 cards in one night after a long day at work including a nativity play was not a great idea!)
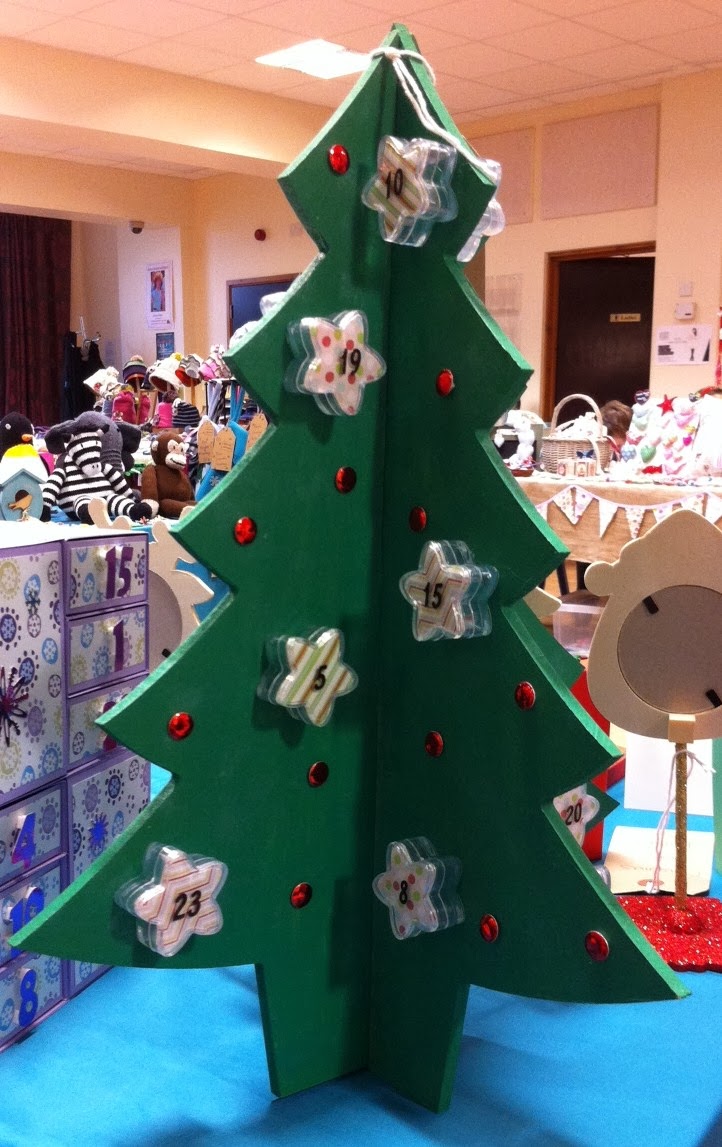
I haven't been able to post as much as I would like during November & December but I hope to make up for it now. Today's post is of 3 different advent calendars I've made- 2 using a 'House of Zandra' template I modified and 1 using a fab-u-lous wooden tree from the MDF man!
For the first two, I used the House of Zandra 'crafty drawers' template but made 2 of each piece so that rather than having 12 drawers, I had 24 (enough for a proper advent calendar). For the first one, I made half of the pieces in red card & half in green so that I could mix & match when I put the drawers together. The second one was made completely in lilac. It was a really easy template to use and rather than cutting all the pieces by hand, I measured each of the template pieces and then used my paper trimmer (I may spend some time making up all of the shapes into my Cricut craft room to make it even quicker next time). I put all of the pieces together with super sticky tape arranging the drawers into a red, green, red patten for the first one. I then used some 12x12 paper to decorate each panel before adding the mirror card numbers (cut using my cricut) & the decorations (Dawn Bibby stocking peel-offs using the waste to fill in and add the colour, peel-off snowflakes & mirror card snowflakes cut using the cricut).
The tree came about after I spotted the small star shaped pots in my local Carole's Crafts shop- they were having a 50% off everything sale so the pack of 24 pots was only £2.50 (bargain!). I have had them since the start of the year and wanted to make some kind of advent calendar with them. I was originally planning to mount them onto a circular shape to make a wreath but when I saw the 3d wooden tree from The MDF Man at the Lincoln Sincerely Yours show I knew it was perfect. I had taken the pots with me hoping to find a wooden circle but this was even better- the mdf tree was just £4 too!
I painted the pieces of the tree with a flat green paint and then sponged it with a metallic green paint over the top to add texture. I then attached the pots to the tree with a hot glue gun, putting 3 on each side (I did this with the tree put together to make sure that I didn't get any pots too close together). I then used the lids of the pots as a template to draw the star shape onto 3 different patterned papers to insert into the lids so that the goodies inside can't be seen. I used peel-off numbers in black to number each pot. I then finished the tree by simply adding some red mirror card candi as decorations.
I am entering the advent calendars into a new challenge blog I have just found:-
Crafting for all Seasons 'anything but a card'
Labels:
Card Candi,
Christmas,
Cricut,
Die Cutting,
House of Zandra,
Mirror Board,
Peel-Offs
Friday, August 2, 2013
Acceptance card
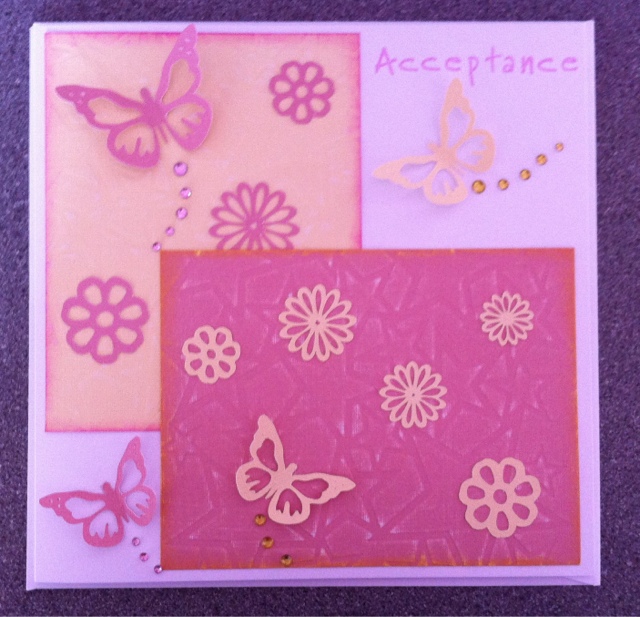
I recently made some invitations for some friends who are having a Naming Ceremony (non-religious Christening) for their baby girl. I also needed to make an acceptance card to say that I was going! I decided to make a card that matched the invitation in colour choice and theme but was completely different. The invitations used the same butterflies & flowers but they were die-cut from the card leaving a cut out design behind. This is my variation of the idea-
I started with an 8x8 white card blank and 4 sheets of pastel DCWV mat stack cardstock (2 yellow, 2 pink). I took one of each colour of card and embossed it with a star design using my Grand Callibur and then inked the edges in the opposite colourway using distress inks (squeezed lemonade on the pink card & picked raspberry on the yellow). I mounted these onto the card overlapping one corner. I then used my cricut to cut out the flower & butterfly toppers from the other piece of each colour of card. I arranged the toppers before sticking them down and then added the as the butterfly trails. I finished the card by stamping the 'acceptance' sentiment using Brilliance pearlescent pink ink and alphabet clear stamps.
I am entering this card into the following challenges:-
Labels:
Cricut,
DCWV,
Distress Inks,
Dry Embossing,
Gems,
Pastel,
Stamping
Sunday, June 30, 2013
Delightful Doggy
I recently found a new way of making shaped cards by taking 2 pieces in the same shape and joining them at the top and then creasing the back piece to create an easel style card. It's given me a great excuse to use my cricut machine a bit more which is one of those crafting things I absolutely love but don't use half as much as I should! This card is made using the 'Create a Critter' cartridge.
This was an incredibly simple card to make and I did it using the free cricut design studio software and the 'Create a Critter' cartridge. I cut 2 body pieces in the pale brown colour and then used scraps for the layers for the face & collar. It can be done with most of the animals on the cartridge and is great for using up those scraps of card that we all keep!
I am entering this card into the following challenges:-
Monday, June 3, 2013
Owl shaped card
A couple of weeks ago I went to the 'Sincerely Yours' show in Lincoln and was really impressed by the 'House of Zandra' stand. I've already bought the 'Fabulous Fashion' cd-rom from C&C so wanted to look at the ideas of how to use it. I ended up buying some brilliant templates that I can't wait to use- no time at the moment though! They did have a great idea for unusual shaped cards by cutting 2 pieces of card in the same shape and then folding the back piece at the top and attaching that to the front piece- certainly the easiest way I've seen of joining an unusual shaped card and great for using with the cricut (much easier than welding an image anyway). This is one of the first cards I've made...
I used my cricut 'Create a Critter' cartridge to cut the owl twice out of dark brown card. I creased a fold into the top of the back piece and used strong double sided tape to attach it to the front piece and make my card stand up. I then used papers from the DCWV 'Girlhood' stack to cut the decorative layers & a scrap of yellow card for the beak & claws. I used double sided tape to layer up the different aspects of the card.
I am entering this card into the following challenges:-
Songbird 'all creatures great & small'
Paper Shelter 'shape it up'
I used my cricut 'Create a Critter' cartridge to cut the owl twice out of dark brown card. I creased a fold into the top of the back piece and used strong double sided tape to attach it to the front piece and make my card stand up. I then used papers from the DCWV 'Girlhood' stack to cut the decorative layers & a scrap of yellow card for the beak & claws. I used double sided tape to layer up the different aspects of the card.
I am entering this card into the following challenges:-
Songbird 'all creatures great & small'
Paper Shelter 'shape it up'
Sunday, March 10, 2013
Magical Mermaid
This is my latest card for the Card Makin Mamas DT where our current challenge is 'spring'. We have been sponsered by 'Hobby Book' who have the lovely mermaid image I have used on my card.
This card starts with a 6x6 scalloped edge card blank that I have coloured using a range of blue & green shades of H20's. This has given the card a shimmer that doesn't really show up on the photo unfortunately. I used my cricut 'Elegant Edges' cartridge to cut a mat with a 'bubble' border from DCWV 12x12 patterned paper. I mounted this onto my card using double sided tape. I coloured the mermaid topper using a mix of both promarkers & spectrum noirs and then cut around the edge leaving a small white border. I then attached this to the card with 3d foam pads. The finishing touch was to add the real mini shells to the base of the card using some pva glue.
I am entering this card into the following challenges:-
Cutie Pie 'magical'
Creatilicious 'colour challenge- brights'
This card starts with a 6x6 scalloped edge card blank that I have coloured using a range of blue & green shades of H20's. This has given the card a shimmer that doesn't really show up on the photo unfortunately. I used my cricut 'Elegant Edges' cartridge to cut a mat with a 'bubble' border from DCWV 12x12 patterned paper. I mounted this onto my card using double sided tape. I coloured the mermaid topper using a mix of both promarkers & spectrum noirs and then cut around the edge leaving a small white border. I then attached this to the card with 3d foam pads. The finishing touch was to add the real mini shells to the base of the card using some pva glue.
I am entering this card into the following challenges:-
Cutie Pie 'magical'
Creatilicious 'colour challenge- brights'
Labels:
Colouring,
Cosmic Shimmer,
Cricut,
DCWV,
Digi Stamps
Subscribe to:
Posts (Atom)