Tuesday, December 30, 2014

Back to crafting- finally!

I haven't posted (or crafted for that matter) for about 6 months as work has been manic! Things have finally slowed down a bit so I'm back to crafting, posting & challenges- yay!

Thankfully, lots of the challenge blogs I take part in have 'anything goes' challenges at the moment which is great as a starter for me again.

I am posting a Christmas card that I made for someone at work-


It was a quick & simple card to make perfect as I was last minute (surprise surprise!).

I started with a 6x6 white card blank that I covered using Craftwork Cards paper from one of their recent Christmas packs that include papers & sentiments. After attaching the backing paper to the card using double sided tape, I used a Sheena Douglass stencil and gold Buff It paste to add extra detail to the background. I took one of the message toppers from the Craftwork Cards kit that matched the backing paper. I wanted to create a gold mirror border for the topper (to match the stencilled design) but didn't have the right shape so I used one of my die-cut shapes to firstly cut the topper and then to make a mat to match. I used foam pads to mount the message topper to add a little extra height and interest.

I am entering this card into the following challenges:-

Sunday, July 6, 2014

Flying high...

Now that I've discovered the wonderful world of box cards, I keep coming up with loads of ideas that I want to try- so far this is definitely my favourite!

My colouring is not the greatest so I have signed up to a Skin & Hair class at Kit & Clowder. They ask you to colour an image before you start the class to compare to later on so I decided to colour a Mary Poppins digi that I love. I chose this because I had a great idea for a card so even though the colouring isn't brilliant, I think the card is.

Here it is...

I used a sheet of pale blue A4 cardstock to cut the box card base and then trimmed the flaps to just 5cm to show the base a little more. I used docrafts London dies to cut out 3 layers of London skyline and scored these to match the base of the box. I then attached them with plenty of double sided tape.

I cut DCWV blue cardstock (as it has a white core) to fit as mats for the flaps and back panel and then embossed them with a Clarity Stencils cloud design. I sanded back the card to show the white core through for the clouds and then edged each piece with white ink before adding to the card.

I then used scraps of blue card (from 2 card bases that didn't quite work) to make my interior supports for some clouds cut using the Cricut from some glitter card. I chose slightly different clouds from 3 different cartridges included in my subscription (Nate's ABC, The first few years & Groovy Times). I attached one cloud to the inside front of the box, 2 onto the 2 supports and one onto the back panel before adding the Mary Poppins digi, coloured with Spectrum Noirs & Promarkers, using foam pads.


I'm loving the fact that she's actually flying over the London skyline! :-)

I am entering this card into the following challenges:-
Fantabulous Cricut 'anything goes'
Crafts Galore 'stamp/digi' 31/7
Creative Inspirations 'anything goes' 8/7
A Blog Named Hero 'colour it in' 14/7
Catch the Bug 'anything goes' 19/7
Graph'It 'anything with an alcohol marker' 11/7

Tuesday, July 1, 2014

Super Sunflowers

I've been looking at 'pop up box cards' for a while and I really like the look of them however it wasn't until this week that I realised that they folded flat to go into an envelope. Now that I know that vital information (!) I thought I'd have a go at making one. I couldn't see the point before as how would anyone send it?

I've seen lots of people making them on the Cricut Explore Facebook page I'm a member of so I went back to those posts and looked at them a bit more closely. Everyone seemed to be recommending the templates at svgcuts.com so I went there. They have some brilliant designs for great prices and I got a set of 5 complete designs and 4 plain ones for less than £5. I started by making one of their set designs (floral box card) which I'm sure will get posted eventually but once I had the idea, I wanted to make my own design.

This is what I came up with


It uses DCWV papers, a sheet of 12x12 yellow cardstock and sunflower toppers (fake fabric flowers & chipboard). All of the small squares of patterned paper came from one striped 12x12 sheet that I cut down making the most of the different patterns. The taller front and back patterns came from another co-ordinating design. The different papers can be seen better in this photo.


The file from svgcuts cut out the card base and 2 inner topper holders. I used scraps of matching yellow card to create sticks for the flowers to stand out on.

I have made this card as a gift for the head teacher at my school. It has been a rough few weeks/month/year (!) and while some of us only have to deal with bits of it, she gets it all. She loves sunflowers so this will hopefully give her at least 1 smile tomorrow!

I am also entering this card into the following challenges:-
Crafting for All Seasons 'whatever the weather' 7/7 (sunflowers can make you feel sunny even on the wettest day!)
CRAFT challenge 'thank you' 2/7
The Pink Elephant 'anything goes' 7/7
Papertake Weekly 'anything goes' 8/7
Love to Create '3+ papers' 6/7
That Craft Place 'anything goes' 5/7

Monday, June 30, 2014

T.A.R.D.I.S.

Since I got my Cricut Explore, I have been a member of a fab Facebook group dedicated to helping each other out with any issues or good ideas we find. It's called 'let's learn cricut explore' and is well worth a look if you haven't found it.

A while ago, someone posted a photo of a brilliant doctor who card they had made using some svg's bought from a website I hadn't heard of before. The site is called Pretty Paper Pretty Ribbons and has a wide range of svg's available at great prices. I got 2 sets (the doctors and the doctors enemies) for less than £4 when converted via PayPal. They are quite complicated designs but the Cricut made it so easy.

The first thing I've made is this TARDIS shaped card. I have made one of these in the past but it took ages to work put all the sizes and cut everything by hand. This way was much quicker and neater.


I started by sizing the layered TARDIS to fit onto an A5 piece of card. I then copied the image, deleting all layers except the white base. I flipped this and then welded it to the base of the first image to make a shaped card base that would fit onto an A4 piece of card. I cut the other pieces from 3 different shades of blue as shown on both the image and the Cricut. I used double sided tape to layer up the different pieces.

The white windows are part of the design but the sign is not so I used one of the cut out sections as a template and drew onto some white card, cutting it slightly smaller to fit the aperture. I have left this blank as it would be perfect for a message. I also had to add the POLICE BOX label at the top by hand but I was lucky enough to win a Graph'It white marker a while ago and it was brilliant for this finishing touch.

I am entering this card into the following challenges:-
Paper Shelter 'travel the world' 1/7 (I can't think of any other way to travel the world than in the TARDIS but please delete if it does not match your theme enough!)
Daring Cardmakers 'no scissors' 4/7 (everything done on my die cutting machine)

Sunday, June 22, 2014

Caravan Holiday

I've been busy today making cards with some new goodies I got this week. I've been looking at the Polkadoodles Work and Play collections for a while so when there was a discount code on the Digi Choosday website this week I had to get them. Set 4 isn't yet available as a download so I just got sets 1, 2 and 3.

I made this card using elements from set 3


I really like these collections as they have pre-coloured digis as well as images that I can colour. I've used the pre-coloured option to make this card super quick. I printed the caravan to A5 size and the characters 9 to a page. I cut out the elements I wanted leaving a white border around the characters to help them stand out.

I then took a piece of A4 pale blue card and made a small stepper card using roughly 2/3 of the sheet. I attached some DCWV grass paper to the front step and then placed the deck chair man onto this step. I attached the caravan to the back step with double sided tape and used 3d foam on the lady.

I am entering this card into the following challenges:-
Craft Room Challenge 'sun, sand & surf' 23/6
Crafting for all seasons 'no squares' 23/6
Graph' It 'blonde hair' 27/6
Digi Choosday 'pink' 1/7
Clear it out 'anything goes' 24/6
Cute card Thursday 'seaside' 25/6
Crafts Galore 'stamp or digi' 30/6
Crafting Musketeers 'stamp or digi' 30/6

Monday, June 16, 2014

Quad bike

I haven't had much time for crafting this weekend as I've been selling a few goodies at a local Vintage Rally. I made some tractor, train and car themed cards and they went down really well. I did manage to get in the craft room for a few minutes though and make this card.


It's a continuation on my plan to make at least 1card from each of my topper boxes (I think I've managed about 5 boxes now!)

I started with the circle Kanban topper of the quad bike, mounting it onto a mat I die-cut from a tread plate pattern DCWV paper. I wanted a background that reflected the muddyness of the topper but I didn't have anything suitable in my stash so I made my own. I cut a square of green card to just smaller than the 8x8 base card and then put some Walnut Stain distress ink onto my blending mat. I sprayed the ink with water and then laid the green card onto it to pick up the splattered ink. The damp ink caused the card to warp so I let it dry and then sprayed my table with a small amount of water and placed the back of my green card into the water. When it was slightly damp, I moved it to a dry spot and weighted it down with some paper pads. After a couple of minutes, it was flat again.

I attached everything to my base card, finishing with the speedo topper.

I am entering this card into the following challenges:-
Crafty Cardmakers 'circles' 22/6
Digi Choosday '2 papers' 24/6
Papertake Weekly 'boys' 17/6
Cute Card Thursday 'so macho' 18/6
Penny's Paper Crafty Challenges 'anything goes' 17/6
Totally Gorjuss 'dad' 21/6
Love to Create 'anything goes' 22/6

and also the Creatalicious CT call which closes on July 15th- check it out here.

Saturday, June 14, 2014

Potions class

Regular blog readers will know that I love anything Harry Potter and I've recently been crafting something for myself!

When I visited the Making of Harry Potter at Leavesden studios last year, I got hold of 3 house pennants (unfortunately the Gryffindor ones were sold out- good excuse to go back though!) and I've been looking for a way to display them ever since. I eventually found some large bottles in IKEA for just £1 each that were perfect. They looked a bit dull so I've Potterfied them a bit!


 The Skele-Gro bottle is an IKEA one, the 2 ribbed jars are from QD (the bigger one being only £2 which I thought was a bargain) and the smallest one was in a pack from The Range.

I started by using both acrylic and emulsion paints to coat the inside of the bottles. When dry, I added the labels which I found on Pinterest. The smallest bottle is ready for Felix Felicis (liquid luck) but doesn't quite have a label yet as I need to print out a super small version. I'm now on the lookout for more unusual jars and bottles and a box for a Bezoar!

I am entering this project into the following challenges:-
A Blog Named Hero 'not a card' 14/6

Tuesday, June 10, 2014

Fancy frills

This is most definitely a move away from my usual style of card and, to be honest, not something I'll probably repeat too often! I recently ordered 2 crafters companion die'sire embossing and cutting dies which is the first time I've bought such an item. I haven't had much time to play yet but it was perfect for the current Graph'It challenge entitled 'frills & fancy'. It can be good to take on a challenge and try something new but you won't see many cards like this on my blog! (I'm also not sure how the camera has made the central heart look pink as it's exactly the same card as the surround but...)


It was a pretty simple card to make with the die doing most of the work!

I took a piece of A4 pearlescent card and placed the die carefully at the top of what would become the front. I used my Grand Callibur to both cut and emboss the design onto the card. I then cut a piece of lace to slightly wider than the card and attached it to the back of a length of ribbon (with a heart buckle already placed) using double sided tape. I overlapped the lace to create the ruched effect and then attached the 'skirt' to the card with more double sided tape.

To create the hanging heart, I took the die cut heart and attached a small loop of invisible thread to it. I then placed a pearl onto the top of the heart aperture and used this as the hook for the heart to hang from. It is a very pretty card and I'm sure lots of people will like it, it's just a big departure for me!

I am entering this card into the following challenges:-
Graph'It 'frills & fancy' 13/6
Creative Inspirations 'anything goes' 10/6
Crafty Catz 'inspired by a song' 12/6- 'hanging onto your love' by Take That
Crafty Calendar 'petals and pearls' 4/7
Totally Gorjuss 'embossing' 14/6

Monday, June 9, 2014

Na x 16

BATMAN!!!


Here's my latest card and it's again using the brilliant Cricut Explore. I spent some time this week having a look at the Cricut website to see what's included in the subscription package and found a fab set of designs in a cartridge called 'word collage'. It's got lots of different themes and is great with the drawing function of the Cricut. For this card I've used the superhero version on the right hand side of my wardrobe card.


I simply drew the design onto black card with a gold metallic marker (well the cricut did) and then mounted it onto my base card. The base was made out of a piece of A4 yellow cardstock folded at 6cm on one side and 9cm on the other to make an uneven wardrobe. On the left hand side of the card I used a topper cut from a 12x12 paper that's been in my stash for ages and the Batman logo which was a tag on a pair of pyjamas I got recently from Primarni.


A really simple card, using a mix of old and new. I sense this may be the start of something with these word collage designs...

I am entering this card into the following challenges:-
Fantabulous Cricut Challenges 'male' 16/6 (not sure if this card fits the rules or not as it uses a Cricut draw rather than cut-please delete if it is not allowed)

Sunday, June 8, 2014

All aboard...

Over Father's Day weekend, I am going to a local 'Town & Country Fayre' with my cards, bags etc., hoping to make a few pennies to buy some more crafty goodies with! With that in mind, I've been busy making some cards that I think will suit the kind of people that would attend that sort of event. There are going to be people displaying their vintage cars and tractors so I've dug out the 'men' box and gone a bit mad.

This is one of the cards I've made-


I didn't want to make anything too simple but the obvious rules of chucking glitter at a card can't really work here, so I had to think outside the box.

I started with the pyramaged train topper which is from a Kanban set and then chose the other elements to go with it. The topper is quite large so I went for an 8x8 square card that I covered with a piece of kraft cardstock. Before attaching the kraft card to the base, I stamped 2 corners with a Kanban gear stamp in Walnut Stain distress ink. I took a piece of Papermania vintage travel inspired map paper (from a set I believe is called All Aboard) and ripped the edge to give it a vintage look. I then also inked the edge of the map paper using the Walnut Stain ink. I attached my various items to the card, completing it with an old cigarette card and a piece of Anita's sticky ribbon.

I am entering this card into the following challenges:-
Crafts Galore 'stamp/digi' 30/6
Craft Your Passion 'rip it' 9/6
Digi Choosday 'men' 17/6
Crafting Musketeers 'stamp/digi' 30/6
Crafters Cafe 'masculine' 11/6
CRAFT 'male' 11/6
Stampin' for the Weekend 'anything goes' 19/6

Wednesday, June 4, 2014

Beautiful butterfly

I've set myself a challenge to try and make at least one card using items from each of the boxes in my craft room. I've made a list of the boxes and there are 41 so, my challenge is to make 1 card from each box. Here's the first,


It's in my usual CAS style and was nice and quick to make. It uses papers and a topper that have been in my stash for ages and a butterfly cut from the new Cricut Explore.

I started by choosing the topper and then finding a backing paper and cardstock to match it. The backing paper is from a DCWV 'blossoms and butterflies' stack. I chose a dusky pink cardstock that matched the colours in the topper and used it for the base card and to mount the topper. I then cut an intricate butterfly from pale yellow card and attached the body to the card leaving the wings free to fly!

I am entering this card into the following challenges:-
Craft Room Challenge 'things with wings' 9/6
Crafty Catz 'anything goes' 5/6
Love to Create 'happy birthday' 8/6

Tuesday, June 3, 2014

Land Ahoy!

Here's a new card using words from the Cricut Explore and the 'word collage' designs.


It's an offset wardrobe card with a slightly larger panel on the left hand side. On the left hand side, I used a DCWV printed pirate theme paper and used the Cricut to draw onto it with copper metallic ink. I mounted the paper onto copper mirror card and then attached it to the pale blue base. I added the pirate topper which actually came from a room decor set onto the panel.


On the right hand side, I used a different design of DCWV paper and a swimming shark topper.


I am entering this card into the following challenges:-

Tuesday, May 27, 2014

Scruffy Little Cat

Another new product I've bought in the last few weeks is another new cd from Crafters Companion. It's called Scruffy Little Cat and has some modern female designs. It was a pick of the week on C&C but I got it straight from the Crafters Companion website after joining their Inspire club which gives you a 5% discount on every product. I also found a voucher code online so I also ordered some SLC acrylic stamps that weren't available on C&C too.

This card is made using a topper from the cd as well as some Primarni wrapping paper, card candi and a craftwork cards paper bow.


I started by folding a beige piece of A4 card into an easel card and covering both the base and front panel with metallic leopard print wrapping paper. I then took the topper from the cd and mounted it onto pink 'bling' cardstock. I attached my mounted topper onto the front of the easel and embellished it with a paper bow. I then used 6 pink leopard print card candis to act as the stopper for the easel.

I am entering this card into the following challenges:-
Graph'It 'anything goes' 31/5
Creative Inspirations 'birthday' 27/5 (I've left a space for the birthday message as it may need to be in Polish as I sell a lot of cards to Eastern European friends)
Crafters Cafe 'girly' 28/5
Totally Gorjuss 'buttons &/or bows' 31/5

Monday, May 26, 2014

Muddy Mess

I made another card today using lots of old goodies but some of them haven't been used very much!


It's a card in my usual CAS style and was quite quick to create (apart from the colouring of the digi stamp). The digi image comes from an Angelica & Adam crafters companion cd-rom that I've had for a while but not used all that much. I coloured the image with a mix of promarkers and spectrum noirs. I then used walnut stain distress ink to dirty up the edges of the topper. I took two different colours of camouflage print paper from DCWV 'boys'A4 stack and cut them to mat the topper. I used a Sheena Douglass embossing folder to add muddy splats to the green paper and then inked it with the same walnut stain distress ink as the topper. I scrunched up the brown paper before teaching it to the card to add the dirty scruffy look and add another texture. I layered everything up onto a khaki green A5 card blank folded from a sheet of A4 card.

I am entering this card into the following challenges:-
A blog named hero 'embossing' 28/5
Catch the Bug 'photo inspiration' 31/5
Challenges 4 Everybody 'anything goes' 30/5
Crafty Catz 'embossing' 29/5
Digi Choosday 'day out' 3/6
Papertake Weekly 'cute' 27/5
Cutie Pie 'embossing' 7/6

Things with Wings

200th post!!!

I've been in the craft room again today busy playing with some more new goodies I got at the Newark Sincerely Yours show (and mixing them up with some old favourites!). I've also used my new Cricut explore again.

I'm really happy with how this card turned out and it's a bit different to my usual style.


I started with a card blank roughly 8x8 in size with a fancy edge. I wanted to create a layer for the card so I imported the shape into the Cricut and made my own cut file for it. I cut a mat from DCWV Latte paper and then another, slightly smaller, from pale blue card. I used 3 Imagination Crafts products to decorate the pale blue layer- new 'allium' stencil, new glitter paste and old stencil paint. I mounted all of my layers onto the card using double sided tape.

The card looked nice but it just needed something extra so this is where the Cricut came in handy again! I wanted a butterfly but wanted it to be very delicate and not take away from the stencil design. I found an image I liked from the cricut image library and then cut it from acetate. To add just a little extra glitz, I sprayed the acetate butterfly with Crafters Companion silver glitter spray. I then used an 'orchid' promarker to add a little colour to the body of the butterfly.


I attached the butterfly to the card with Stickles glitter glue, frosted lace, to make sure it didn't show through. It gives a delicate finish to the card and some extra dimension.

I am entering this card into the following challenges:-

Sunday, May 25, 2014

Cricut Explore

Wow! It's been ages since I've had the time to blog (or craft for that matter). Not sure what happened?

But, I'm back and I have a super exciting new crafting toy to play with- the Cricut Explore. I've been desperately wanting/needing this since I saw it launched in the USA and it's finally made it here via Create & Craft. I've always loved Cricut machines but this one is soooooooo good!

I've made 2 projects this afternoon, 1 that was super quick and another that took most of the afternoon- but was well worth it.

I'll start with the simple one:-

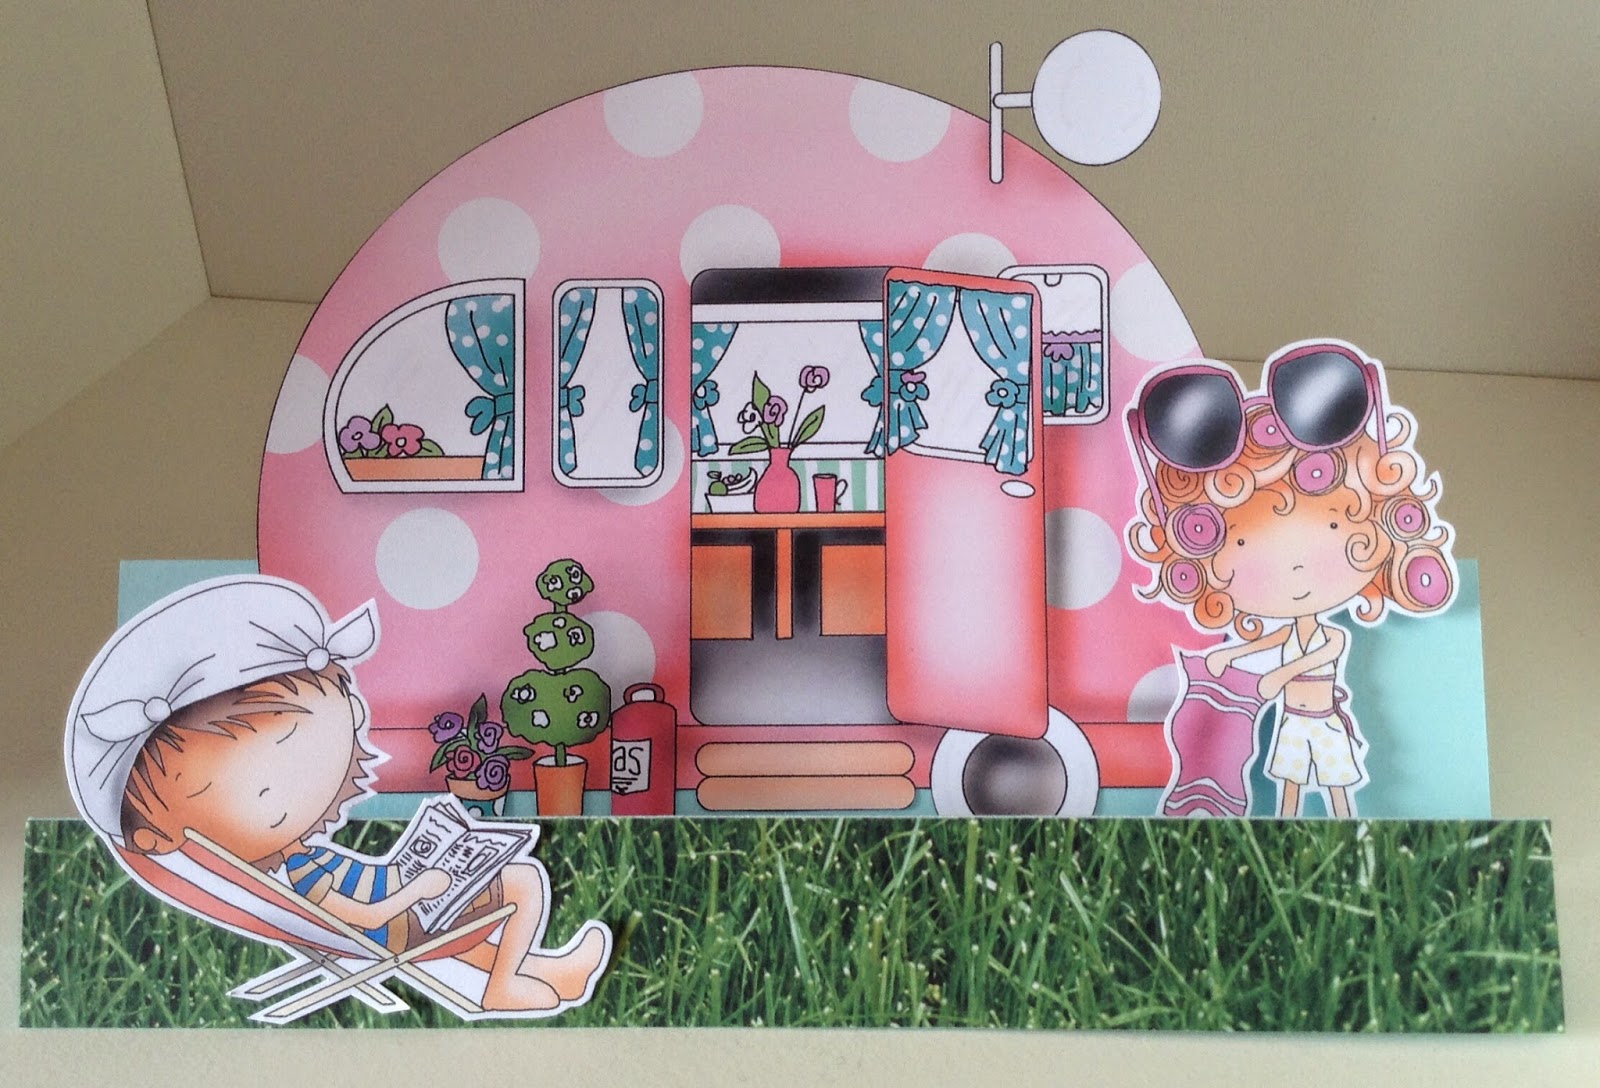
I wanted to use one of the materials included in the kit for my first project as I knew the new material selector dial would be matched exactly to that material and would give me a great cut. I decided to decorate my machine using the silver vinyl sample.

I used a star design that was already in the Design Space software, cut it from the vinyl and then attached it to the machine- it was so easy and looks fab!


The second project took considerably longer but looks great too.


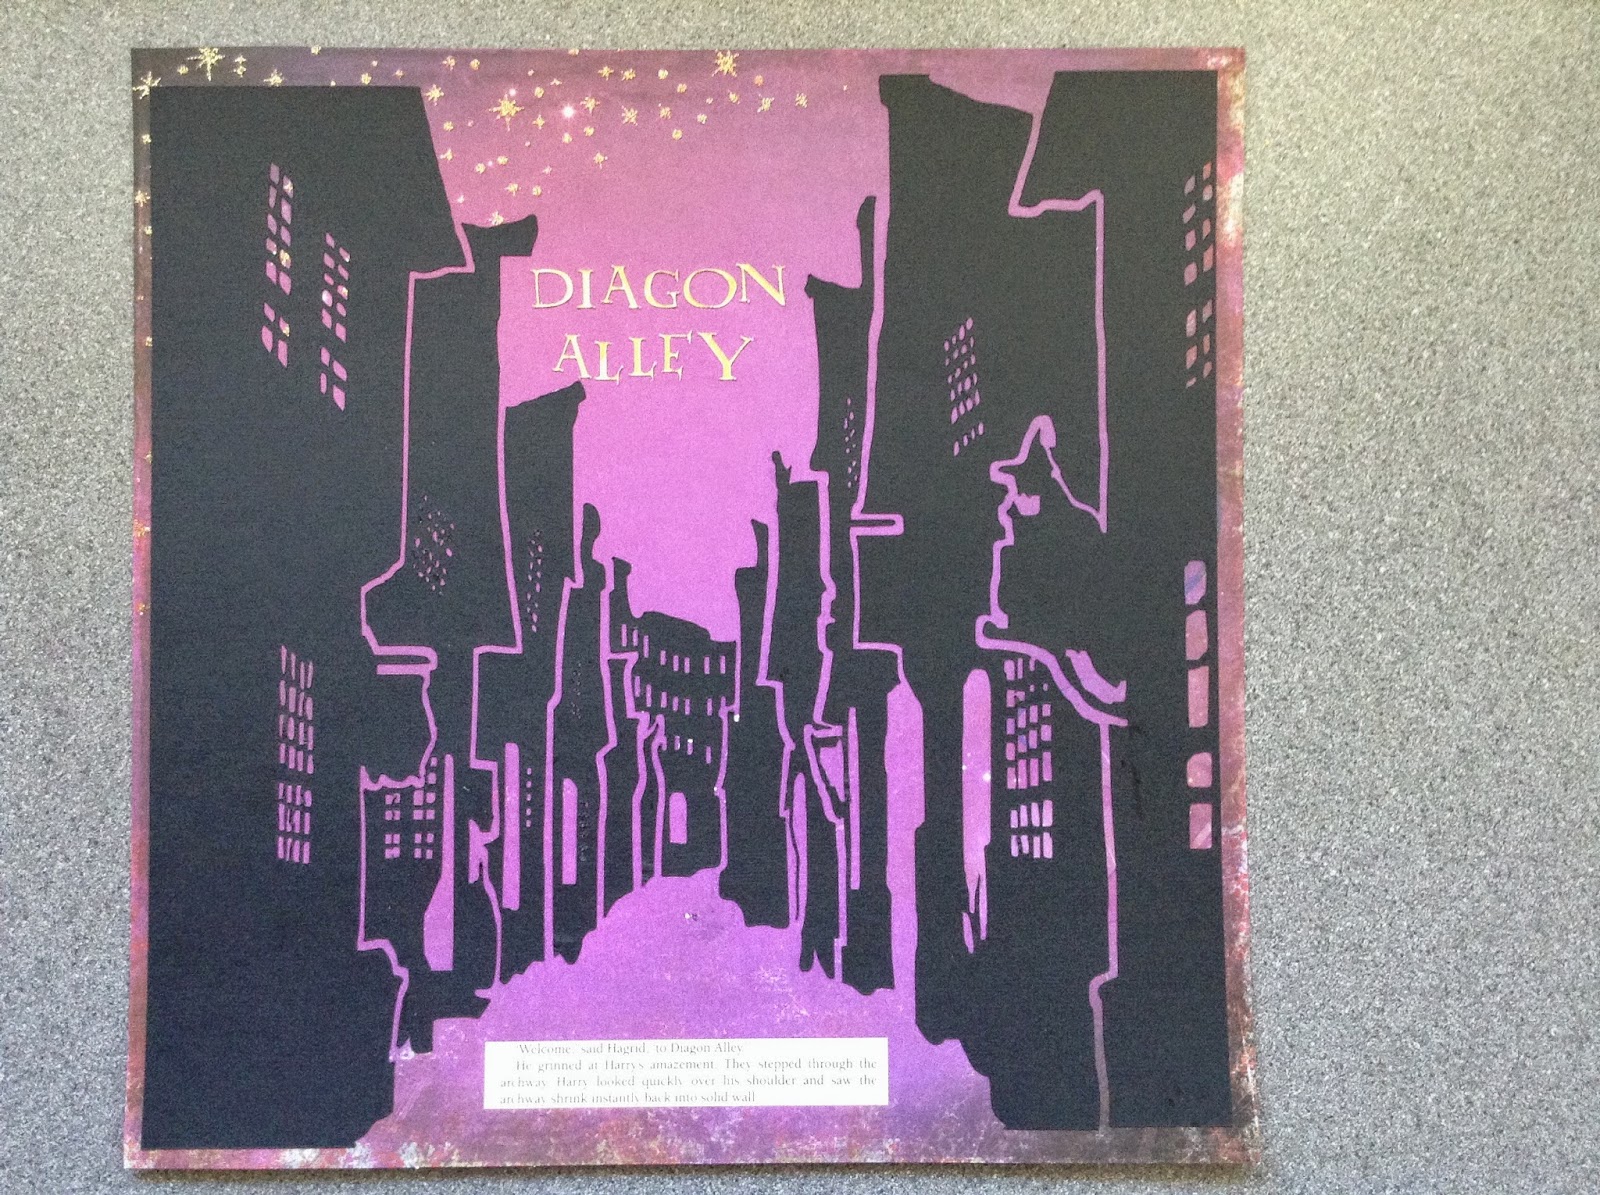
I've finally started work on my Harry Potter scrapbook and this is the title page for my photos of Diagon Alley. I wanted a silhouette  of the street on the page but couldn't find anything suitable in the  Cricut design library so I made my own! I found a photograph of Diagon Alley and imported it into the paint programme on my computer. I used the fill and eraser tools to remove the background of the photo and draw a white line around each of the shops to define them. I did the same with the windows, doors and other highlights. I then changed the colour to black and white leaving the silhouette. I saved this image and then opened it in the Cricut Design Space software. I then simply resized the image and then cut it. It isn't perfect but some of the windows panes didn't have very big gaps between them so it was my error and not the machines. It still looks great though.

The title Diagon Alley was also cut using the Cricut but with a font from my computer (it does that too!).

I love it and it's exactly what I wanted. It sounds a cliche but this Cricut Explore is definitely only limited by your own imagination and I certainly have plenty of ideas!!!

Sunday, March 9, 2014

DJ love

Only 1 card made this weekend as I've finally started my Harry Potter scrapbook and while I seem to be in the mood, I want to get as much done as possible!

Here it is...

A nice simple card using a fab Saturated Canary digi stamp.

I started by colouring my digi aiming to use the colours to emphasise what I see in the image- a very confidant woman and a shy man. I used very bright colours for her and quite muted tones for him. When I had finished the colouring of the digi, I mounted it onto some silver mirror card just to help it stand out.

I chose a piece of bright orange A4 card to make into the A5 base card that matched the orange colour used on the digi. I then took a piece of turquoise chevron patterned paper from DCWV Girlhood Stack and embossed it with Sheena Douglass 'splat' embossing folder. I then inked the paper with Spiced Marmalade distress ink to highlight the embossing.

I used double sided tape and 3d foam tape to attach all of the pieces together before finishing off with the turquoise jems.

I am entering this card into the following challenges:-
cards galore 'use a digi/stamp' 30/3
Daring Cardmakers 'colour challenge' 14/3
Graph'It 'male colours' 21/3
Paper Shelter 'DT call' 20/3
Penny's paper crafty challenges 'not square' 11/3
Paper shelter 'anything goes' 11/3
Creative Inspirations 'anything goes' 11/3
Craft room challenges '20th Century' 17/3 (records being used on the turntable)
Challenges 4 Everybody 'anything goes' 4/4

Sunday, March 2, 2014

Rising from the ashes...

Back in November, at the Lincoln Sincerely Yours show, I bought a brilliant Sweet Poppy stencil of a Phoenix- they had done a demo card where the Phoenix had been zen-tangled and it was fab. I had to get the stencil so I could make my own Fawkes inspired cards (and possibly use it in my Harry Potter scrapbook if I ever get it started!).

This is the first time I've used it so I've gone for quite a simple design


I started with a sheet of golden yellow A4 cardstock that I folded to make an A5 base card. I inked the edges of the card with Barn Door (Red) distress ink. I then used a Versamark pen to draw the phoenix design through the stencil onto a piece of white card. I did small parts of the design at a time, heat embossing with gold embossing powder. After I had embossed the entire phoenix, I went around the edge of the design firstly with a red promarker and then orange and yellow, blending the colours together. I also used my black promarker to colour the embossing on the eye- just to help it stand out a bit. I then trimmed down my phoenix topper and mounted it onto red mirror card.

I wanted to add a layer of texture to the background of the card so I cut a piece of orange net fabric, slightly smaller than the card, and then attached it using double sided tape.

I am entering this card into the following challenges:-
Challenges 4 Everybody 'anything goes' 4/4
That Craft Place 'anything goes' 15/3
Blog named Hero 'stencil' 14/3
Catch the Bug 'anything goes' 8/3
Crafty Calendar 'animal' 2/4
Crafty Catz 'anything goes' 6/3
Paper Shelter 'animal magic' 4/3
Creative Inspirations 'boy thing' 4/3
Love to Create 'anything goes' 2/3

Sunday, February 23, 2014

Kanban 'so feminine' toppers- Tea for Two

I have a huge selection of old Kanban kits that I don't use very often at the moment but I dipped back into one, of the many, boxes and found this lovely topper. It's called 'Tea for Two'. I also used a 6x6 scalloped card blank, Basic Grey 'sultry' papers and my new (ish) cricut Elegant Edges cartridge.


I started with a 6x6 craftwork cards scalloped card blank and used my new Elegant Edges cricut cartridge to cut an almost 6x6 decorative circle from a patterned 'sultry' paper. I then cut a matching shadow from a plain pale pink paper from the same 'sultry' pad. These were mounted onto the card with double sided tape.


I used 'spun sugar' distress ink to add a pale pink edge to the topper and message before mounting onto the card with 3d foam. I then made my own large card candi style decorations for the corners of the card.


I did this by punching 4 circles from the patterned paper and moulding them into a curved circle with my fingers. I placed 3d foam squares onto the back of each piece and then used this to help me hold the circle as I triple embossed it with clear embossing powder to make it shine. They were then ready to attach to the card.

I am entering this card into the following challenges:-
Paper Shelter 'punches & dies' (punched circles to make card candi, cricut die cutting) 25/2

Wednesday, February 19, 2014

Angelica giggles

Just this morning, I had a delivery of the beautiful new Crafters Companion 'Angelica & Adam' double cd-rom that I ordered from C&C on Monday morning. It has some brilliant boy friendly images and cute girly ones too. This is the first card I've made using the digi stamps that are on cd 2. I'm really pleased with how it turned out although I'm not sure if I used enough pink! :-)


I started by printing the digi stamp from the cd to roughly half a sheet of A4 (the option that puts 2 photos on one sheet but slightly smaller because of not fitting to frame). I then coloured the image using my Spectrum Noirs but (for me) using a very limited selection. I tried not to blend the colours too much, particularly on the skirt, as after watching Leann from Crafters Companion doing her demos, I think I probably blend my colours together a little too much and lose the shading- I like how this has turned out anyway.

When I had finished colouring the image, I used an old Kanban mat as a stencil to mark out and hand cut the image to the finished shape. I did the same with a slightly larger mat onto some Kanban pink dot embossed card which I matted my topper onto. I then chose a piece of pink A4 card stock and folded it in half to make an A5 card blank. I wanted to add an extra something to the background but not too much to take away from the main image. In the end, I decided on some stamping. I used my Inkadinkado rectangle stamping gear and simple heart stamp to create the simple background design.

I mounted my topper up onto the base card and then added 4 small pink buttons in the corners. The final touch was to add some 'crystal' Stickles glitter glue to the girls dress and bows. You can't have a pink girly card without glitter on it somewhere, can you?

Close up of the new colouring style...


I am entering this card into the following challenges:-
Catch the Bug 'bingo challenge' buttons, pink/red, embossing
Craft your Passion 'girly' 24/2
Cutie Pie challenge blog 'spots' 1/3
Creative Inspirations 'buttons' 25/2
Crafters Companion 'Clean & Simple'

Crafters Companion are also having a DT call. I've entered, if you want more info there's a link here.

Tuesday, February 18, 2014

prickly on the outside...

Another SWALK cd card today and I really love the topper image & the sentiment that goes with it. I've given the card a kind of dirty look using my distress inks.


I started with a dark green A4 sheet of card that I folded in half to make an A5 card base. The backing paper is from the SWALK cd but didn't stand out enough from the card so I inked it with a 'walnut stain' distress ink. I used the same ink to colour the edge of the message and then laid it onto my inking mat to pick up some of the other ink. I think the almost finger print look works really well. I attached the backing paper and the message to the card and then mounted the topper onto some brown mirror card. I finished the card by tying the raffia around the spine of the card.

I am entering this card into the following challenges:-
Digi Choosday 'anything goes' 25/2
Crafters Cafe 'vintage/shabby' 24/2
Kaboodles Doodles 'twine' 23/2

Sunday, February 2, 2014

Sunny Sunflowers

This is my final card of the weekend and one that I'm really pleased with. It uses some new stash and some new ideas that I've not tried before but now I know it works, I'll definitely be using it again.


This card is made using another new Sheena Douglass embossing folder.

I wanted to create a distressed background but didn't have a core'dinations cardstock in the colour palette I needed- so I made my own!!! I started with a piece of brown A4 card that I painted with yellow emulsion from a tester pot (it even had its own brush so no mess!). I then embossed it using the sunflower embossing folder and then used fine sand paper to sand back the paint to reveal the brown paper underneath. It works really well and I'vegot hundreds of tester pot colours that now have a new use!


I trimmed down my backing paper, tied a brown organza ribbon around the spine and attached it to an 8x8 white base card. I then embossed the same sunflower design onto gold/yellow mirror card and then went over the top of the raised aspects of the design with a brown promarker. I cut them out and used various levels of 3d foam to mount them onto the card.


I finished the card by using the remainder of the painted cardstock to cut a small mat (using a Kanban one as a template) and then attaching it to the card backwards and adding the peel-off message.

I am entering this card into the following challenges:-
Country View Challenges 'paint' 28/2
Totally Gorjuss 'sunny colours' 7/2
Cute Card Thursday 'new' 5/2
A Blog Named Hero 'flowers' 14/2
Daring Cardmakers 'belt & braces' 7/2
Crafty Catz 'anything goes' 6/2
Crafters Cafe 'ribbon' 4/2

Christmas Post

This is my second card of the weekend, and another Christmas card. I think that makes about 5 so far this year!


It was an incredibly quick card to make that I put together while I was waiting for some paint to dry on another project. It uses Craftwork Cards 'Christmas Post' products.

I started with an 8x8 white card base, adding a dark red mat from cardstock. I then added the paper layer which was just trimmed down slightly to fit. I then added the message and card candi from the embellishment pack and then a paper bow from the co-ordinating set.


The paper already has lots of detail so I felt that it didn't need too much messing about with.


I am entering this card into the following challenges:-
Cards Galore Encore 'bling' 28/2
Crafty Hazlenuts Christmas 'stripes &/or spots' 7/2
Crafty Hazlenuts Christmas Extra 'anything goes' 28/2
Penny's Paper Crafty Challenges 'spots & dots' 4/2
Craft Your Passion 'spots & stripes' 3/2
Paper Shelter 'all wrapped up' 4/2
Christmas Card Challenge 'anything goes' 9/2

Flower Power

I've been busy crafting again this weekend and have managed to make a few cards. Here's the first...


I've used all manner of new things on this card today- some of which are completely new (as in arrived on Thursday from C&C) and some which are new as in had for ages but not used yet!

This card started with the flower design embossing folder which is from the Sheena Douglass range which was a Pick of the Week/4 day deal on C&C last week. I inked one piece of white card using both Picked Raspberry & Peacock Feathers distress ink and then embossed it with the folder. I then sanded back the top of the card to make the flower design stand out as white against the coloured background. I had to join the design as it is an A5 folder so I placed a purple ribbon across the join and attached the 2 pieces to the outside panels of the card. To provide contrast, I wanted the middle panel to be embossed in the opposite way so I embossed it first and then inked it using the same distress ink colours, so that the debossed side was used.


I then coloured the Ebony digi stamp (from The Greeting Farm) using a similar colour palette of pink, turquoise & purple and some gems for her headband. I cut out the digi leaving a small white border and then attached her to the central panel of the card with 3d foam pads. I then added the peel-off message.


To complete the card, I used the same floral embossing folder and three different colours of black core'dinations cardstock to emboss more flowers which I sanded back before cutting out and using as toppers across the card.

This is the first time that I've made a card in this 3 panel style but I really like it and it was quick to put together (although the sanding took ages and made a lot of mess!)

I am entering this card into the following challenges:-
Catch the Bug 'anything goes' 8/2
Polkadoodles 'anything goes/oriental' 9/2
Cards Galore 'bling' 28/2
Graph'It 'anything goes/different colour hair' 9/2
Cute Card Thursday 'something new' 5/2
TGF Farm Fresh Friday 'layers' 7/2
Creative Inspirations 'stamping' 4/2
Digi Choosday 'anything goes/in the pink' 3/2
Challenges 4 Everybody 'anything goes' 28/2
Daring Cardmakers 'belt & braces' 7/2

Tuesday, January 28, 2014

Christmas Camper

I was having a look round the Polkadoodles website a few days ago when I spotted a brilliant digi stamp of a Christmas Campervan. It's basically a vw camper with a Christmas tree on top. It's great. It was only something daft like £2 so I ordered it and being a digi, it arrived instantly. This is the first card I've made using it and I absolutely love it!


I started by printing the digi image twice onto a normal sheet of copier paper. I then decided which pieces I wanted to paper piece and used low tack tape to attach my chosen papers onto the print out. I then put the paper (with patterned paper on top) back into the printer and printed again so that the design was on the patterned paper. I did this for the tree, the body of the camper & the windows. I cut out the pieces and laid them onto a plain version printed on thin card.

I used my Promarkers to colour the parts of the design that were not to be paper pieced and then used small amounts of glue to attach the paper pieces. I carefully trimmed out the design leaving a small white border.

I then chose a 12x12 DCWV patterned paper that graduates from dark to light- I think it's perfect as the bottom looks like snow for the camper to sit on. I cut it down to mat onto the 8x8 card base and attached with double sided tape. I then used a double layer of foam pads to attach the camper van. The finishing touches were to add the 3 die-cut snowflakes (with a single layer of 3d foam) to the card, embellishing them with large gems. I then added the peel off message and then used Stickles glitter glue to highlight the fairy lights on the tree.

I am entering this card into the following challenges:-
Polkadoodles 'anything goes' 2/2
Digi Choosday 'anything goes' 30/1
Crafting for all Seasons 'for the girls' 3/2

Sunday, January 26, 2014

one in a million

Another SWALK card today using toppers from the cd and a message I've created myself using the verse writer. I'm really loving the designs from this cd at the moment- I've been colouring my own images and using the pre-coloured ones from the 'Pawfect Pals' cd.


For this card, I inked the edge of the topper & the message with 'picked raspberry' distress ink and then mounted them onto silver mirror board. I chose a piece of A4 pink card, and folded it to make an A5 card blank and then used a piece of Kanban patterned card as the background. I added my toppers and then placed some small holographic circle stickers into the centre of the flowers to add extra sparkle.

I am entering this card into the following challenges:-
Totally Gorjuss 'furry friends' 31/1
Cute Card Thursday 'so sweet' 29/1
Paper Shelter 'digit image & sentiment' 28/1
Crafting for all Seasons 'for the girls' 3/2
The Pink Elephant 'pink &/or red' 27/1

Loud Music

Before Christmas, I was lucky enough to win a £100 voucher to spend at Create & Craft. It was surprisingly difficult to find things to spend that much money on, even though I never seem to struggle when I don't have a voucher!

One of the things I bought was a brilliant Indigo Blu A5 stamp set called 'Loud Music'. It has a wide range of stamps fitting many different music styles e.g. flowing notes, a guitar, a tape & some fun sentiments. I've already used the set once to make a birthday card for a musical man at work and thought it was about time I did another.

It's a mix between chalkboard & grunge...


I started with a piece of A4 white card which I folded to make an A5 card blank. I cut a piece of black card 2.5cm smaller on each side than the base card and stamped it with the Indigo Blu stamps using white Brilliance Ink. Before the ink had a chance to dry, I rubbed each image gently with some distress ink foam to blur the edges and look like the chalk had rubbed off slightly. When I had finished stamping, I mounted the black card onto some silver mirror board.

I then used 2 off cuts of black stripe paper (left over from my 'pretty grunge' card) in 2 opposite corners of the card and used Black Soot distress ink in the other 2. To finish the card I then used black memento ink and an Inkadinkado star stamp over the top of the distress ink.

I am entering this card into the following challenges:-
Craft Your Passion 'music' 27/1
Crafty Cardmakers 'black & white' 2/2
Crafty Catz 'monochrome' 30/1
Daring Cardmakers 'stripes' 31/1

Present time!

I'm still doing quite well in my Christmas Card quest for 2014 and have managed to make another one today. It's a CAS style card and was very quick to make.


I started with the topper (pre-coloured image from Lili of the Valley) and mounted it onto silver mirror card. I then chose a blue snowflake pattern paper from the Forever Friends Kraft Notes range and mounted them all onto a white 6x6 card blank. To finish the card, I used a bow and 3 buttons, all from the Papermania Festive Spots & Stripes collection.

I am entering this card into the following challenges:-
Christmas Card Challenges 'anything goes' 1/2
Catch the Bug 'photo challenge- penguins' 1/2
Crafty Hazlenut's Christmas Challenges ' trees' 31/1
Craft Room Challenge 'water' 3/2 (ice is just frozen water after all)
Cutie Pie Challenges 'cute blue' 1/2
Love to Create 'buttons' 26/1
Creative Inspirations 'ribbon' 28/1

Tuesday, January 21, 2014

Christmas sparkle

I've managed to make another Christmas card today. That makes 3 so far for January- it won't last!

Here it is...

I started with a 6x6 white card blank and to make sure my topper matched perfectly colour-wise, I cut down another card blank to make the layer (I'd saved one that I'd messed up the embossing on ages ago so I used the back of that). I chose my stencil (Imagination Crafts) and used double sided tape to stop it moving. I firstly, inked the branch using 'gathered twigs' distress ink and then used an embossing pen to ink the snowflakes. I used 4 different shades of blue mica powders (also Imagination Crafts) to colour them. I also used the mica powders to dust all over the background.

Finishing touches were to add the gems and then mount it onto a blue mirror card mat and then onto the card. I will probably add a message before I send it though. Unfortunately, the beautiful shine of the mica doesn't show up very well on the photo but this one does show the blingyness (good word!) of the gems I've used...


I am entering this card into the following challenges:
Crafty Hazlenut's Christmas 'shades of blue' 24/1
Paper Shelter 'winter blues' 21/1
Crafters Cafe 'bling' 22/1
Christmas Cards '1 layer' 26/1
Imagination Crafts 'anything goes' 31/1

Sunday, January 19, 2014

Rock God!

Today's card uses a few old favourites that I always know I'll use at some point and one of those things that I should use more often but just don't seem to!


The background card is an 8x8 base card, inked with 'tea stain' distress ink. The 2 backing papers are both from DCWV 'Rockstar' 8x8 & matstack pads. Rockstar was my first DCWV stack and it is still my favourite. I use it for so many scrapbook pages too. The topper is printed from 'Just Ink'lined' best of 2012 cd-rom which is a disk I've has since the end of 2012 but don't use that often. This topper was perfect for what I wanted though.


I coloured it with mainly Spectrum Noirs today but with an odd bit of Promarker. I wanted to make the topper look as if the posters & drum kit were old & the guitar was the shiny new toy so after colouring the posters & drum kit using slightly subtle shades, I went over the top of it all with a light brown to tone down all of the colours and add that vintage look. I then coloured the guitar in a totally different colour palette and added some glossy accents to the body of the guitar.


I used 1 8x8 DCWV paper as the background and then trimmed down a matstack piece for the element in the corner. I wanted to pick out the 'rock and roll' part of the paper so I glued it with a quickie glue pen and then foiled it. This is something I've tried before on a scrapbook page and it worked really well.

I tore the edge of the topper and inked it with 'tea stain' distress ink too before using 3d foam to add it to the card.

I am entering this card into the following challenges:-
Polkadoodles Digi Choosday 'for the boys' 23/1
Clear It Out '2+ papers' 21/1
Creative Inspirations 'anything goes' 21/1