I went to Peterborough for a bit of Christmas shopping last weekend and, of course, visited some craft shops whilst I was there!
Colemans stationers have a shop in Peterborough city centre and they have a decent selection of crafting items including docrafts ranges, painting products, rubber stamps etc. Worth a look if you're there but not really worth a special journey.
I then went to visit the Sir Stampalot store which is located out of the city in the Werrington business park area. I have visited the store quite a few times but recently have been disappointed by the stock they have. It almost looks like the shop is not actually open when you visit, but if you buzz, they will let you in. I have bought from their website before and have received very good service so, if I was you, I'd spend my time browsing their website and ordering that way rather than making a special visit to the shop.
I also went to Hobbycraft that has recently opened at the Peterborough Garden Park, just outside the city. It is a large store and has a good selection of different crafting products, as Hobbycrafts do. There were no particular bargains there this time but when I visited after Christmas last year, I managed to pick up beautiful bright coloured A4 envelopes for 10p each of 15 for £1 which was a pretty amazing bargain, so I will definitely be visiting again after the weekend!!!
Thursday, December 22, 2011
Tuesday, December 6, 2011
My Chemical Romance & Green Day photo albums
I go to lots of gigs/concerts and take millions of photos!!! As I don't always want to properly scrapbook them all, I have started to make some shaped chipboard mini albums to put my photos into without too much effort being needed!
I usually use my cricut to cut myself a template and then use 8x8 chipboard, bought from the NEC, and plain A4 card to make up the album pages. The rings also came from the NEC and work out at something daft like 25p each. I have seen similar albums online for around £10 but they only hold a small number of photos, and they are not as good (even if I do say so myself!!!)


I usually use my cricut to cut myself a template and then use 8x8 chipboard, bought from the NEC, and plain A4 card to make up the album pages. The rings also came from the NEC and work out at something daft like 25p each. I have seen similar albums online for around £10 but they only hold a small number of photos, and they are not as good (even if I do say so myself!!!)


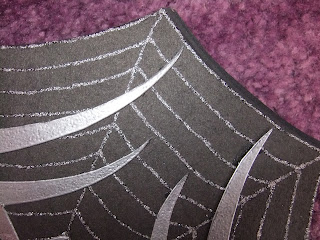
This 'My Chemical Romance' album is a simple octagonal shape with each side curved inwards to give the spiders web effect and then 'stardust stickles' glitter glue for the web detail. The large spider decoration was cut from thin card using the cricut 'Indie Art' cartridge and then embossed with silver embossing powder to give it a slightly distressed look. This was then simply glued to the chipboard cover.

This album is for my photos of 'Green Day' and was even simpler to make than the MCR one above. I again used my cricut 'Indie Art' cartridge to create a template and cut out the 2 chipboard covers and about 40 pages for the inside of the album. The covers were then coloured using a Tim Holtz distress ink (stormy sky) applied directly to the chipboard. The eyes and nose of the skull were cut from spare chipboard, inked to match the base, and then also inked with a 'platinum planet' brilliance inkpad and then attached with some Anita's pva glue.
SIMPLE!!!
Monday, November 28, 2011
Rustic Christmas Tree & Reindeer

This card is one of my latest creations using some Kanban toppers and a Tim Holtz embossing folder that I bought from the NEC.
I started with a brown/gold pearlescent A4 card that came from my local Papermill shop (before it closed), which I folded in half to make an A5 base card. The topper was started with a 6x6 core'dinations card which is actually black with a green back. I used the green side and started by using my new Tim Holtz embossing folder to put the trees onto one side. I don't actually have an embossing machine but with a small wooden rolling pin (less than 50p from Wilko's) and a bit of brute force, you can create the same effect without the expensive machinery!

The reindeer topper and message topper came from a Kanban kit bought from Ideal World/Create & Craft. Both pieces were originally white with the gold embossing and were from a kit that contained toppers you could colour yourselves. I used my 'Walnut Stain' distress ink to colour both of the toppers and also to create a border on the green embossed card. The final element was the ribbon which was from an Anita's sticky ribbon set. The topper and the message were then simply mounted with 3d foam.
A simple card but an effective one I think, fitting in with a modern country/rustic feel.
Sunday, November 20, 2011
Distress inks & stamps xmas scene
This is one of the cards that I made this afternoon, ready for my schools christmas fair next month.

The inspiration came from the stamps used which are from Kanban from a kit I got from QVC. The idea was on the inspiration sheet but I have adapted it slightly. I started with a pale blue A4 card which was simply folded in half to make the A5 card. I used a Kanban fancy snowflake stamp with the 'chipped saphire' Tim Holtz distress ink to stamp the background of the card and also added the dark blue organze ribbon around the edge.

The topper was started by again using the chipped saphire ink to stamp the frame aspect which is again from the Kanban stamp set. I used my xcut trimmer to cut a small border and used my xcut scissors to trim out the centre of the frame leaving a small white border. The background was made using pearlescent printable paper from anna marie designs http://www.annamariedesigns.com/, stormy sky distress inks, black memento ink, some more Kanban stamps, frosted lace stickles and plenty of post-its!
So that I didn't get any ink on the edge of the paper which would be visible as the mat, I started by sticking some large post-its around each edge to stop the ink getting to those parts. I then used my foam tape roll to provide a stencil to cut a circle from another post-it. This circle provided the mask for the moon. I then took one last large post-it and carefully tore it along the sticky edge to create a rough border. I stuck the 'moon' mask onto the card and the rough edge a little further down at a slight angle. I then used my 'stormy sky' distress ink to ink the top section of the topper. I then moved the 'rough border' post-it, slightly further down and, this time, just inked close to the edge of the post-it creating the snow scene. After the ink had had a few seconds to dry, I used the Kanban tree stamp with the black memento ink to stamp the trees on the snow layers. I just inked the stamp once so that the background trees were fainter than the foreground. The 2 deer stamps were also from the Kanban set but after I had stamped them with the memento ink, I went over the top with my black promarker just to make it a little darker. I then used 3d foam to mount the frame onto the topper and then put that onto the card.
The final aspect was the silver message peel-off by Anita's which I got from the NEC. The pearlescent aspect of the topper looks particulalry good when the light shines on it and I think it has worked really well.
Wednesday, November 9, 2011
NEC goodies!!!
Just a quick post about the lovely new stuff I bought from the NEC at the weekend and some new recommendations of people to buy that stash from!!!
ENVELOPES!!!
I always get most of my envelopes from the NEC as you get a wide selection and usually some special offer prices too! 'A Touch of Craft' is always my first choice as you can mix and match all of their envelope packs and get 5 for £5. They usually have a good selection of colours but really excelled themselves this year with some beautiful pearlescent envelopes that match perfectly to the card I am using for some wedding invitations. 30 for £2 was a bargain too!
Embossing Powders!!!
The WOW! embossing stand http://www.wowembossingpowder.co.uk/ also had a proper bargain! 12 christmas coloured embossing powders in a case £5. They sell for £15 on their website!

RIBBON!!!
The 'PolkaDoodles' stand http://www.polkadoodles.co.uk/ had some truly beautiful ribbon this year with one inparticular being very punk inspired and just my sort of thing. At £2.75 for 2 metres it's pretty expensive but a-may-zing! Black background, red, white & blue stars, tattoo style hearts & skulls!!! It's available on the 'woven ribbon' section of their website if you want to take a look!

DCWV stacks!!!
These are my ultimate weakness but a bit difficult to find at the show. Not many people seem to stock them now and unfortunately I have no idea who I actually bought it from but it is beautiful. Foiled, glittered, spiders, ravens, haunted houses... It is going to be perfect for my zombie cards when I finally get round to making some more!
La Pashe!!!
I also picked up a brilliant cd-rom called 'The Big One' which contains pretty much all of the 'La Pashe' designs available e.g. flippin', trinitage, framin; and wacky wheels designs. It also has some that are exclusive to the cd too e.g. flippin' men santa claus. It was only £8.99 and means that I can print as many as I need of each of their designs. Major Bargain!!!
HARRY POTTER!!!
I love Harry Potter (esp. Ron!) and was so excited to see (and buy!) a fabulous stamp set by a brand called 'IndigoBlu' www.indigoblu.com/?p=330 They are called 'Hocus Pocus' and include a beautiful owl in front of a castle design, a raven on a pile of books, a hooded figure looking out of a gothic style arch and a spider hanging from it's web, as well as 2 phrase/messages. They are unmounted stamps and in total are about A5 size. They cost £12.99 and are incredibly strokeable!
Templates/Stencils!
I really wanted to buy some nice 6x6 stencils at the show but luck was not with me- don't go to the NEC on a Sunday! Unfortunately the 2 designs I really wanted from the A1 crafts http://www.a1crafts.co.uk/ stand had already sold out but I will hopefully be ordering them from their website soon, so will then blog to let you all know what sort of service they provide!
The only disappointment of the day was the Create & Craft stand where big signs advertised cricut cartridges for £15- none left by Sunday!
I suppose I can't have everything!!!
ENVELOPES!!!
I always get most of my envelopes from the NEC as you get a wide selection and usually some special offer prices too! 'A Touch of Craft' is always my first choice as you can mix and match all of their envelope packs and get 5 for £5. They usually have a good selection of colours but really excelled themselves this year with some beautiful pearlescent envelopes that match perfectly to the card I am using for some wedding invitations. 30 for £2 was a bargain too!
Embossing Powders!!!
The WOW! embossing stand http://www.wowembossingpowder.co.uk/ also had a proper bargain! 12 christmas coloured embossing powders in a case £5. They sell for £15 on their website!
RIBBON!!!
The 'PolkaDoodles' stand http://www.polkadoodles.co.uk/ had some truly beautiful ribbon this year with one inparticular being very punk inspired and just my sort of thing. At £2.75 for 2 metres it's pretty expensive but a-may-zing! Black background, red, white & blue stars, tattoo style hearts & skulls!!! It's available on the 'woven ribbon' section of their website if you want to take a look!
DCWV stacks!!!
These are my ultimate weakness but a bit difficult to find at the show. Not many people seem to stock them now and unfortunately I have no idea who I actually bought it from but it is beautiful. Foiled, glittered, spiders, ravens, haunted houses... It is going to be perfect for my zombie cards when I finally get round to making some more!
La Pashe!!!
I also picked up a brilliant cd-rom called 'The Big One' which contains pretty much all of the 'La Pashe' designs available e.g. flippin', trinitage, framin; and wacky wheels designs. It also has some that are exclusive to the cd too e.g. flippin' men santa claus. It was only £8.99 and means that I can print as many as I need of each of their designs. Major Bargain!!!
HARRY POTTER!!!
I love Harry Potter (esp. Ron!) and was so excited to see (and buy!) a fabulous stamp set by a brand called 'IndigoBlu' www.indigoblu.com/?p=330 They are called 'Hocus Pocus' and include a beautiful owl in front of a castle design, a raven on a pile of books, a hooded figure looking out of a gothic style arch and a spider hanging from it's web, as well as 2 phrase/messages. They are unmounted stamps and in total are about A5 size. They cost £12.99 and are incredibly strokeable!
Templates/Stencils!
I really wanted to buy some nice 6x6 stencils at the show but luck was not with me- don't go to the NEC on a Sunday! Unfortunately the 2 designs I really wanted from the A1 crafts http://www.a1crafts.co.uk/ stand had already sold out but I will hopefully be ordering them from their website soon, so will then blog to let you all know what sort of service they provide!
The only disappointment of the day was the Create & Craft stand where big signs advertised cricut cartridges for £15- none left by Sunday!
I suppose I can't have everything!!!
Friday, November 4, 2011
NEC Birmingham
I'm off to the NEC this weekend for bargains galore & lots of exciting new products (hopefully)!!!
Just thought i'd blog about HOW i approach a big show like the NEC so that some of you can find the bargains too...
The key is to not get carried away- difficult i know!
I start with a blank notebook and a good selection of pens (spares are essential because if one stopped working i'd be screwed!) and also a couple of highlighters. The first few hours are spent looking carefully at every stand in the place and writing down anything I like the look of. I write down the stall number and the product including price. The system sometimes has to be changed if a product is rare or you definitely know it is only available on one stand e.g. lily of the valley toppers or DCWV stacks. They can be bought straight away!!!
I then spend lunchtime looking through all my notes and comparing the prices of each item that i want to buy. I then highlight each one and return to the stalls in question. If the cheapest stall has sold out, I can check my notes and go to the next one on the list.
It works really well for me and means that I don't buy something and then see it cheaper on another stall- that would really annoy me as i'd be thinking that i could have got something else with that money!!!
If there are certain items that i definitely need e.g. envelopes then i will write all of the stall names & prices for them onto one sheet as i see them just to save a bit of sorting over lunch.
hope this helps anyone who goes to a big show and doesn't really know where to start!
Thursday, October 27, 2011
'Thriller' zombie card
I had a shopping trip to Lincoln on Monday, and although I was very disappointed at the lack of shoes and nice clothes, I did get 2 very fabulous books from Waterstones' halloween range! They both gave me some great card inspiration.
One of them is a book called 'Zombie Felties' and gives you templates for making your own zombie soft toys. The templates are, of course, also perfect for using with paper & card. My favourite design is a Michael Jackson 'thriller' zombie, so I used this as my inspiration for my first zombie card.


One of them is a book called 'Zombie Felties' and gives you templates for making your own zombie soft toys. The templates are, of course, also perfect for using with paper & card. My favourite design is a Michael Jackson 'thriller' zombie, so I used this as my inspiration for my first zombie card.

The backing paper came from 12x12 sheet made up of 4 6x6 panels and was called 'Thriller' by Rusty Pickle. Both zombie characters were made using the templates from the book and a collection of scrap card pieces, beads, sequins and some Ikea string coloured with a black promarker. I also used my new promarker 'fine-tips' for the first time today to add detail to my zombies and it worked really well.

On a recent visit to Hobbycraft, I picked up a halloween 'confetti' bag consisting of embossed and die-cut skulls and ravens. They were just 99p for a large bag and the raven added a perfect spooky touch, sitting on top of the gravestone.

When it came to putting the topper onto the card, I chose to use an 8x8 scalloped card and added the star stamping just to create that extra bit of detail. I used a 'black soot' distress ink to keep that vintage/gothic type of look.
Wednesday, October 26, 2011
Cute nativity card


I started with the topper idea and the background design is from a Joanna Sheen 'Messy Rabbit' paper pad bought from the NEC craft show a few years ago. The nativity scene toppers are cut from the 'Winter Frolic' cricut cartridge. I have previously used a cricut 'Paper Doll' cartridge to create nativity scenes but these ones have a cuter feel, which I really like. I've had the cartridge a while but this is the first time I've used it. It was a purchase from Create & Craft with my £10 club members discount from joining so was a good price. The toppers were easy to construct although you did have to cut some pieces that you didn't actually need to get the colours right, especially on my 'Joseph'.


I mounted the topper element onto some gold, matte, mirror card to provide some stability for the easel style card. The final aspect was to create the barrier to stop the card from closing and I really wanted to use a Christmas message peel-off by Little Claire designs bought from the Lincoln Craft show. I wanted to use the peel-off saying 'Jesus is the Reason for the Season' to fit with the nativity card but I only had it in silver. THANK GOD FOR PRO-MARKERS!!! I used my new 'indigo' promarker to colour the peel-off and then cut a circle mat, in the same gold mirror card as the topper mat, to mount it onto.

It was a little fiddly, placing the central elements back into the peel-off but a good pokey tool & a steady hand saved the day!

Sunday, October 23, 2011
Floral cards


These are 2 floral themed cards that I made for some people I work with. I am in charge of providing the birthday cards for the staff birthdays and I really enjoy trying to make something for a specific person, thinking about what they will like best.
The card on the left was inspired by the background paper which is a 12x12 by Cosmo Cricket that I got from Sir Stampalot in Peterborough. After looking at the shape of the flowers on the paper, I knew that I had some white fabric flowers in that shape (I think that they came from Wilko's in their home decoration range- I tend to get them in their bargain section when they change colour themes as the season changes). I found a selection of pro-markers that matched the colours of the background paper and then coloured the edges and centres of the flowers to match the background. I then used some papermania brads as the centres of the flowers, and glued them onto the card in a L shape.
The card on the right gave me the perfect excuse to use my new 'Flower Shoppe' cricut cartridge, bought from Oyster Stamps at the Lincoln Showground, Sincerely Yours show, the other weekend. The lady that this card is for, is what I would describe as 'edgy' (tatoos, red hair) and I wanted to make something feminine but a little bit different too. I found some 12x12 papers that I have had for a while, originally bought for a Take That scrapbook before I changed my mind, that had a red, white & blue colour palette with a stars design. I used one of these papers for the background of the card, mounting it onto white, and then used the other parts to cut out the flowers. I also used a cream with navy stripes paper, as I felt this would add an unusual touch. The Flower Shoppe cartridge allows you to cut 4 layers for each flower design but I only used 2 layers for each of the flowers at the base of the card. Papermania & HOTP brads were used for the flower centres, alongside a metal flower charm on the largest design. The flower in the top, right hand corner, of the card was made from one of the Flower Shoppe centres. I rolled the paper strip, glueing it at the beginning and end, and then when dry, squashing the edges to show the pattern. A large red gem was added to the centre to complete the look.
'Bling' 21st Birthday card

This is a card that I was commissioned to make for someone I work with, for her daughter's 21st birthday. The brief was simply 'Blingy' and maybe 'pinky' but she wasn't looking for anything flowery or themed in that way.
I started with a plain black card that came from Papermill, which I think provides a contemporary look to the finished card.
I instantly knew that I wanted to use the heart mat that came from a Kanban kit sold on QVC. It is a kit they sold as a summer surprise, so p&p was free, and was a serious bargain (even without the free p&p, it's well worth buying though). The kit contains 96 sheets of die cut mats in various shapes e.g. circles, squares, hearts, flowers and decorative edged mats too. They come in black, white, cream, red, lilac, blue and pink and are foiled with gold & silver. Some of the black mats are also printed with a matte white design. There are at least 6 different mats on each sheet and they are designed to go with the plain cardstock mats that Kanban produce. I personally think that some of them are far too nice to cover up such as the foiled heart I used on this card. The kit worked out to be 20p per sheet of die-cuts which I think is exceptional value.
To create the 'bling' 21 in the middle of the heart, I started by trying to form a good shape with the plain stones but did struggle slightly. I ended up looking through my stash of number peel-offs and finding some that were the perfect size. I carefully cut round the peel-off waste to create a stencil and then stuck this to the foiled heart to provide a guide. The gem stones were too wide to fit in the stencil gap so I had to draw the outline and then remove the peel-off, but it worked well. The stones were a clear diamond gem, so I used a 'hot pink' promarker to colour them. The easiest way to do this was to put a bit of blu-tack on the end of my pokey tool and then use this to hold the gem as I coloured it.
Beyond the heart, I didn't really know what else I wanted to put on the card, so spent a while looking through my paper stash. I couldn't find anything that was really what I wanted (craft room full of stuff but never got what I want!) and ended up looking through my stencil collection. The swirly stencil seemed like a good fit and had spots that I envisaged holding more gems in the hot pink colour. I didn't have any glitter that was a close match so decided to use the turquoise colour for contrast instead. I used a thin, ballpoint, sakura glue pen, through the stencil, and then glittered it. While waiting for the glue to dry, I coloured some papermania clear self-adhesive gems, to match the sizes of the dots in the stencil, and then applied these when the glue was dry.
The final aspect was to use some 3-d foam (I mainly use the 'Poundland special' where you get a roll and sheets of 3d foam for just £1. Large-ish squares so you need to cut it, but a definite money saver!) to mount the heart at the top of the card. I positioned it so that it, ever so slightly, overlapped the edge of the base card.
Tuesday, October 11, 2011
Sincerely Yours show, Lincoln
Last Sunday, I visited the Lincolnshire Showground, Lincoln for the twice yearly Sincerely Yours papercrafts show. All in all, it was a really good event and the third time I have been to one. There are around 20 different suppliers at each event and they offer a wide range of products between them. Some of the companies are local and others from further afield. There were also some good bargains to be had! Pre-booked tickets cost just £3 (p+p free) and include free tea & coffee all day. There was a good selection of stalls selling a wide range of stamp styles as well as inks, stickles, stencils & papers.
My favourite purchase was a new cricut cartridge from the Oyster Stamps http://www.oysterstamps.co.uk/ stand. It is called Flower Shoppe and is a cricut lite cartridge. It cost £25 and cuts out a wide range of beautiful flowers with instructions on how to 3d them. As soon as I find the time to make a card using it then I will, of course, post it here!
Top bargain most definitely came from the http://www.annamariedesigns.com/ stand and their beautiful printable pearlescent card. I have been commisioned to make some wedding invites and wanted to use some white pearlescent for the base card. They were selling packs of 30 sheets and you could buy 5 packs for £10! The best part was that you could mix and match with other products such as envelopes, card blanks & a large pack of gloss card, which I plan to use with my alcohol inks.
I got some new pastel colours of cosmic shimmer watercolour paints to add to the others I already have and some lovely new card candi in a metallic turquoise & also a silver holographic!!! 10 new promarker colours were also added to my crafting stash as well as a very nice Hunkydory Christmas kit that is shades of purple as well as silver and black and is gorgeous!
Lots of new things to play with and not a lot of time at the moment but it's soon half term so hopefully plenty of time to craft then and plenty of opportunites to show the world what I've been creating!
Saturday, October 8, 2011
The Craft Outlet, Springfields, Spalding
I visited the brand new craft shop that has opened at the Springfields outlet shopping centre in Spalding, Lincolnshire today and was overall pleasantly surprised.
The store is situated right at the bottom of the outlet and could be missed if you're not careful. It is actually nearer to the 'Festival Gardens' and 'Play Barn'. It is a large store that has taken over the space previously used as a Fens visitor centre and as well as the craft shop, there is a cafe.
The large posters in the window display slogans of 'up to 70% off' and the prices definitely reflect this. They had already sold out of a few things when I visited today, after only opening yesterday, so I think it's one of those places that you have to visit every couple of weeks to not miss out on anything...
My initial thoughts on entering the shop were:-
1- "ooh this is a bit like paper mill" (lots of different papers and cards stocked in a pick & mix style)
2- "look at that! look at that! look at that!" (as I spotted all the exciting things)
3- *CALM!* (as I realised that I had raced round the shop twice in the first 5 minutes but hadn't actually looked at anything!)
I'll start with the card-
lots of racks (a la paper mill) with various colours of paper & cardstock. Wide range of printable pearlescent papers, pearlescent card, plain colour card, white card & a range of recycled cardstock in really nice muted colours. There are prices for individual sheets e.g. printable peralescent paper 10p per sheet but it's mostly sold by weight. I asked for an idea of how much it would cost but wasn't given a definitive answer. I ended up buying 15 sheets of the printable pearlescent paper (in a beautiful purple colour) & 1 sheet of plain purple cardstock as a bit of a test and that weighed in at about 100g and cost me £1.02.
They also currently stock a selection of ex-QVC kits (one of which had already sold out) including a large stack of K&Co papers that retailed on QVC for almost £40 and they were selling them for £10. It seems that the QVC stuff will be something that they regularly stock.
There was a wide selection of both wooden backed and clear rubber stamps with some sheets containing around 5 clear stamps for as little as £1.99. There was a small selection of 12x12 papers all at well reduced prices e.g. RRP £1.25, their price 29p plus extra discount if you bought in bulk. There were also peel-offs, ink pads, embossing powders, K&Co matstacks and toppers all at discounted prices.
They also stock a wide selection of wool in a range of colours as well as general sewing supplies such as needles. There were also some home decoration products such as clocks and boxes that you could customise.
The only negative aspects were the lack of clarity in the pricing of the card/paper (although I'm assuming that the prices quoted per sheet are always more expensive than the actual weight price) and one of the members of staff (I'm assuming the manager) who seemed to think he was Gods gift to crafting and unlike many helpful craft shop retailers, spoke to me as if I was a bit thick. He gave me a full explanation of the Italian paper printing process, including the fact that the mill runs on hydroelectricity, when I asked the simple (!) question of whether or not they would always have the same card or if the stock/colours would change?
Definitely worth a visit and a welcome addition to the local area. In the interests of blogging(!), I will visit again and keep updating how/when their stock changes. Hopefully lots & often!!!
Thursday, October 6, 2011
Busy weekend ahead!
This next weekend is very much going to be a crafty one so i'll have lots to report next week!
A new craft shop is opening, this Friday, at the Springfields outlet shopping centre in Spalding. I will pop in and have a look on Saturday and then report back.
On Sunday there is a craft fair at the Lincolnshire Showground so after a visit to that, a quick look round The Range in Lincoln too, I think!
Saturday, October 1, 2011
Take That scrapbook pages- Sgt. Pepper


Only 56 more pages to go!!!
Sunday, September 25, 2011
Eastern England- Spalding
Yesterday I visited the Springfields outlet shopping centre in Spalding, Lincolnshire and found a proper bargain in one of the shops there. I'm not sure what the name of the shop is but it is situated opposite the 'Whittards' tea & coffee shop, near to the main entrance of the garden centre. The shop sells lots of items that would usually be available in catalogues sent out to schools (ESPO, TTS, NES Arnold etc.). Some of their things are nice and cheap and some of them are pretty expensive but it's the sort of place that you have to have a look in because you never know what they will have. At the moment they have packs of coloured foil paper (50x76cm) at £4 for 5 packs. Each pack contains 25 large sheets so I got 125 sheets for only £4! They have red, green, blue, gold & silver. It is only paper thickness but I have already tried it with an embossing folder and it has worked really well. Definitely worth a trip if you live anywhere nearby!
I also went to Carole's Crafts which is at the Baytree Garden Centre just outside of Spalding in Weston. This shop used to be a Craft Central before they went into liquidation but is now Carole's Crafts. When it was still Craft Central, it was always worth a look as they had new stuff every week but now the stock very rarely changes and whenever I pop in, I seem to be the only person in there. They do have a good selection of core'dinations 12x12 papers stocking a wide range of the colours available including the Tim Holtz range. They also stock things like ribbon, ink pads, glitter, peel-offs etc but nothing that is particularly new or exciting. They do also stock cricut cartridges and can order in ones that are not in stock but these are about double the price of other places such as http://www.craftsulove.co.uk/ website.
I also went to Carole's Crafts which is at the Baytree Garden Centre just outside of Spalding in Weston. This shop used to be a Craft Central before they went into liquidation but is now Carole's Crafts. When it was still Craft Central, it was always worth a look as they had new stuff every week but now the stock very rarely changes and whenever I pop in, I seem to be the only person in there. They do have a good selection of core'dinations 12x12 papers stocking a wide range of the colours available including the Tim Holtz range. They also stock things like ribbon, ink pads, glitter, peel-offs etc but nothing that is particularly new or exciting. They do also stock cricut cartridges and can order in ones that are not in stock but these are about double the price of other places such as http://www.craftsulove.co.uk/ website.
Sunday, September 11, 2011
Boston, Lincolnshire
I went to the small town of Boston in Lincolnshire yesterday and was plesantly surprised by the craft supplies on offer there. There is a Dunelm fabric shop which sells quite a large range of crafting materials including dovecraft templates & stamps, 12x12 & 8x8 paper stacks, packs of cards & envelopes, a wide selection of crafttime products and also art materials such as acrylics and mount board. The prices were standard but they did seem to have quite a good selection of sale materials too.
I also visited the Oldrids department store in the centre of Boston where on their second floor, they also have a crafting department. They mainly stock the docrafts range and currently have the new christmas offerings such as the 'me to you winter wonderland' & 'at christmas time' ranges. They also have the very nice large 5x7 stamps that are new from docrafts (I was very tempted by the christmas tree one but didn't buy it just yet...). With the docrafts range, they do seem to round up the prices when the docrafts rrp ends in a 5p e.g. the 5x7 stamps retail at £6.95 but are £7 in this store. Not a huge amount, I know, but if you're buying a lot it can make a difference. They also stock a selection of ink pads e.g. distress inks, brillance inks & memento, as well as essentials like promarkers, pearlescent card & peel offs. They also stock a selection of decoupage from different companies and quite a few rubber stamps, both wood mounted & acrylic. I have visited this store before and their craft range changes quite quickly and they always have a selection of sale items including cricut cartridges & the cricut gypsy at the moment.
For such a small place, both of the shops stock a good range and between them cover a lot of different products.
Wednesday, September 7, 2011
Take That Scrapbook pages details
The 3 Take That 'Shine' scrapbook pages are a bit of a departure for me as i usually like to go for a very clean simple style. The entire feel of the song as they perfomed it just didn't fit with that style so it was time for me to try something new. I'm glad i did and i am pleased with how it's turned out.
I wanted a really bright coloured floral 12x12 paper to use for the base of the page but couldn't find that paper that was "just right", so in the end i started with a dcwv 12x12 plain sky blue cardstock that has a slight texture to it. To get that mad floral feel, I used my new alcohol inks and (of course) my promarkers to dye some plain white paper flowers into a wide range of colours. I then added some card candi to the centre of each flower in a contrasting colour. I already had a selection of bug themed peel-offs that had come from an old qvc kit and they worked really well too. I used my alcohol inks to add a bit of colour to the butterfly peel-offs and stuck them onto some ironed angelina fibres before cutting them out. The colours and iridescence matched the dancers in the photographs really well. I put the caterpillar peel-off onto some bright pink card as during the song, Mark Owen actually rode on the back of a giant pink caterpillar- it had to be recalled somewhere in the pages!
I'm not usually a big fan of journalling and i know its something that i should do more of and, as it was a new style of scrapbook page for me, now seemed like a good time. I wanted to incorporate the Take That logo in my pages, so I made myself an acetate stencil and then used this as a guide for my journalling shape. It did take quite a lot of careful planning of what to write, but i think the end result was worth it.
As the pages were so well packed with detail i kept the photos quite simple just matting onto a contrast colour card and then attaching to the pages at straight angles to make them stand out against the 'busy' background.
The pages took me ages and as i've now got 57 others to do i can see that the scrapbook isn't going to be completely finished for quite a while!!!
(we'll not mention the million other 'projects' that are in the pipeline too!!!)
Monday, August 29, 2011


Thursday, August 25, 2011
Winter trees alcohol ink technique card

Wednesday, August 24, 2011
My first alcohol ink card
This is the first card I made having received my alcohol inks from the papercrafts.tv website.


I started by using a beautiful Kanban snowflake stamp (from a previous qvc t.s.v.), inking with a dazzle versamark ink and then clear silver pearl embossing powder over the top. I then used a mix of blue shades of the alcohol inks and the blending solution to create the distressed style pale blue background. The gorjuss girls decoupage (hobbycraft sale- january 2011) matched perfectly and I then used my black promarker to make the peel-off message black rather than silver. When I placed the message on the card it wasn't quite central so I used the star peel-off to make it look a little more even. I am going to need to put an insert inside the card as the alcohol inks have bled through the front of the card quite a lot. Next time I'll probably do it on seperate card and mount it to my blank to avoid this.
Tuesday, August 23, 2011
www.papercraftstv.com
A couple of weeks ago I was watching the regular Tuesday afternoon crafting slot on QVC looking forward to what they were calling 'Steam Punk' and imagining something really fab! I was a bit disappointed with the QVC offerings but they did start with the Tim Holtz/Ranger alcohol inks which I've been wanting for ages.
As I was already online, I thought I'd do a quick internet price comparison and that's when I came across Papercrafts.tv and I'm really glad that I did!!! It took me a while to compare the prices because they sold all of the inks individually which is obviously really good if you just want to buy a few. I ended up selecting all of the inks available on QVC plus a colour called 'purple twilight' which I couldn't resist. Even with p+p it worked out cheaper than the QVC price so I ended up adding the blending solution and some felt applicators to my order. As it was my first order I also found a 10% discount code and ended up with free p+p too! All in all, I ended up paying less than would have done at QVC but getting more.
I'm not great at waiting for deliveries to arrive and they always seem to take forever where I live, especially if it's coming by Royal Mail, but having ordered on the Tuesday, they were delivered on the Friday of the same week and by Friday afternoon I'd already used them all! They kept me updated all the way through the delivery process letting me know by e-mail when my parcel had been packed and then when it shipped which was great for my impatience. They were well packed when they arrived and everything was as I'd ordered.
The delivery note also points out that they offer discounts on your next purchase if you review your purchase or upload photos of what you've done with it, which I think is a really nice touch. It's obviously a new website as some of the product categories don't have anything in them yet but DEFINITELY WORTH A LOOK!!!
Monday, August 22, 2011
North West England- Morecambe
The 'Little Shop Of Hobbies' http://www.littleshopofhobbies.co.uk/ is to be found just off the main promenade of Morecambe, close to the statue of Eric Morcambe. The shop was large and as the name suggests, caters for a wide range of different hobbies selling wools, cross stitch materials, model making kits & paints as well as card making items. The shop was busy which would normally be a good sign but the card making supplies were limited. Not really worth a special journey but I suppose worth a look if you're in Morecambe anyway.
There was a very nice pub not far from the shop on the other side of the road that did very good meals at reasonable prices. It was very busy with both tourists and locals but was definitely worth a short wait for a table.
There was a very nice pub not far from the shop on the other side of the road that did very good meals at reasonable prices. It was very busy with both tourists and locals but was definitely worth a short wait for a table.
North West England- Southport
The 2 shops I visited in Southport were situated on Lord Street which was a really nice area with lots of little cafes, coffee shops & restaurants with outdoor seating as well as other larger chain and smaller independent stores. In particular, there was a very nice small corner stand selling a wide range of fabulous looking ice creams e.g. snickers, bounty, liquorice, cherry & raspberry ripple (amongst others)!
Anyway, back to the craft shops...
'Crafts A Plenty' www.craftsaplenty.co.uk was situated in the Wayfarers Arcade which was full of unusual and individual stores selling a wide range of products. the craft shop itself was not huge and mainly stocked the Papermania range but did include the most recent product launches. they also stocked a small selection of items such as ink pads and glitter glues. It was a pretty standard shop to be honest.
'Southport Craft Centre' was also quite a small shop but it seemed to stock a wide range of products again. the Papermania range again featured heavily but they also had Tim Holtz distress inks, Smirk 'goodie bags' and also jewellery making beads, findings etc. As with 'Crafts A Plenty', there was nothing that got me excited and yet again I left with nothing!!!
Sunday, August 21, 2011
North West England- Inspirations, Preston
o.k., having been many times to the Kanban outlet in Yorkshire, I have always hoped that Hunkydory would do something similar. Having checked their website (many times!) it seems that they do not but 'Inspirations' is advertised as their 'flagship' store. On the way back from Blackpool, we decided to pop in and have a look.
The place was pretty easy to find being just off the main A6 road although which way to get into the car park was a bit complicated. It certainly looked impressive from the outside being situated in a large warehouse style building.
On walking in, I was pleased to see that the interior was really neatly layed out and it was a bright, neutrally decorated shop. A few small sofas were there for the men folk to sit on and tea & coffee making facilities were at the back of the store if they were in for a long wait!
The stock was certainly comprehensive. As expected, there were many Hunkydory products in the store but also Cricut, Flowersoft, Tim Holtz/Ranger, Dreamweaver stencils & pastes, peel off stickers, Papermania, Polka Doodles cd-roms, wide range of 12x12 papers as well as basics like card, envelopes & cello bags. For those people who don't only make cards/scrapbook, there was also wool & jewellery making stuff. There was also a section of 'gifts'- ready made things as well as cards, wrapping paper etc.
The only negative I had about the place was the prices. I'm always on the look out for a bargain and want to pay the least I can for what I want (then I can buy something else!). Most of the things that they had, I had seen, or bought, cheaper elsewhere. We ended up leaving having not bought anything!!!
Maybe I've just got too much stuff already???
North West England
I recently spent some time up in Lancashire around the Southport area and (of course) took the time to visit a few craft shops while I was there!
I visited 'Inspirations' which is an out of town superstore at Capitol Centre in Preston, 'Crafts A Plenty' and 'Southport Craft Centre' both on Lord Street in Southport and also 'Little Shop of Hobbies' on Pedder Street in Morcambe.
Comprehensive reviews to follow...
I visited 'Inspirations' which is an out of town superstore at Capitol Centre in Preston, 'Crafts A Plenty' and 'Southport Craft Centre' both on Lord Street in Southport and also 'Little Shop of Hobbies' on Pedder Street in Morcambe.
Comprehensive reviews to follow...
Subscribe to:
Comments (Atom)