On Boxing Day, I received my weekly email from the DoCrafts website. I normally just flick through them to see if there are any exciting new products and then delete them but this one caught my eye- no surprise there as it involved a bargain!
They were/are having a sale where lots of items are priced at either 25p, 49p or £1.25. I had a look at the website and there were some proper bargains to be had. The p+p was quite expensive at almost £5 but I ending up spending about £25 on products and just know that when it arrives I'm going to have a major addition to my crafty stash. I can't exactly remember what I ordered as it was a bit manic and it hasn't arrived yet with the holidays, but when it does I'll post a picture of all the goodies.
I know that I've definitely got some urban stamps, peel-off folders and decoupage card kits on their way- and all for a seriously bargainous price!
Most of the goodies have probably gone now but it's obviously a website to keep an eye on and next time they have a sale get in fast- in fact, I probably shouldn't be sharing this information as next time all the good stuff might be gone before I get there! I've think I've probably got enough stuff anyway- just!
Happy New Year!
Sunday, December 30, 2012
Get down to Dunelm!
If you're a crafter and you have a Dunelm shop close to home then I suggest you get there as soon as you can or get on their website http://www.dunelm-mill.com/shop/sale/arts-crafts-sale/. I popped into my local one yesterday to see if they had any christmassy fabrics on offer (which they didn't) only to find that pretty much every card making & scrapbooking product they sell was half price! Proper bargains to be had. I ended up spending about £60 but got more than double that in product value. I bought too many things to show you them all but I do have some favourites...


Got loads of these paper flowers in every colour you can imagine for just 94p a pack
These beauties are made of felt and embellished with seed beads & a pearl centre. They were reduced to £1.49 and as well as this blue pack came in every other colour you can think of. The other style have a really pretty crocheted centre.
I also got some really nice paper roses, wool flowers, suede flowers, peel-offs, backing papers & chipboard toppers.
They had loads of really good stuff and I'm guessing not many people know about it so get there as soon as you can and get some bargins of your own!
Friday, December 28, 2012
New cricut, papermania & card candi goodies
Can't believe that it's been nearly a month since I last posted- December has obviously been a manic month. But it's almost done and I've thankfully got a bit of free time. Tried to get some crafting bargains when I visited the sales yesterday but was a bit disappointed- the Hobbycraft tills were down so they couldn't reduce the prices of most things- luckily some other goodies lifted my spirits.
The 'cricut craft room' system has replaced the old 'design studio' software and is a really good tool for making the most of your cartridges and doing new things with them. I've only just started using it properly and keep finding new things each time I have a go. You can download cartridges straight from the website rather than buying an actual physical cartridge- this is obviously great for those people that don't have much space (that's pretty much every crafter, anywhere, then!) but you can also link the cartridges you already own. They've got a 25% off promotion at the moment so it seemed like a good time to try it out. I've now got the Disney Pixar Cars, Elegant Edges, Fontopia Crests & Cards and Create a Critter cartridges. They came to about £66 all together which is very good value for 4 cartridges, especially a branded Disney one too.
I also picked up some 6x6 papers from the new Papermania 'spots and stripes' capsule collection for just £4 which are in a really nice selection of pastel springy colours and these match today's delivery perfectly! The lovely post-lady bought me the final part of my Card Candi TSV which contains 12 mini packs of Candi including spots, flower print & gingham patterns in lilac, green, orange, turquoise & yellow.
I've used all of my new stash to make this card (but also some old favourites that I haven't used for ages...)
 I started with a 6x6 craftwork cards scalloped edge card blank, that I inked with 'Squeezed Lemonade' distress ink and just a little 'Shaded Lilac' on the real edges. I used the cricut 'elegant edges' cartridges that I downloaded, to cut a 6x6 papermania spotty paper into a fancy edge circle. I cut this in half and attached 1 half to the folded edge of the card. The flowers were cut using an xcut flower punch and DCWV textured white cardstock. 9 of the flowers were arranged randomly in the bottom right hand corner and the other 1 in the top left corner. I then added spotty green, orange & purple card candi to the middle of the flowers. The blue ribbon came from my crafty stash and was tied simply into a large bow and attached with glue. The finishing touch was a white square tag that has a silver metal edge that I've had for at least 5 years, and a blue button, threaded with the same ribbon as the bow. As the card is not for a specific occasion, I have added a generic 'Have A Great Day' silver peel-off message and star embellishment.
Proof, if ever it were needed, that we HAVE to buy new things otherwise we might never use the old stuff!
The 'cricut craft room' system has replaced the old 'design studio' software and is a really good tool for making the most of your cartridges and doing new things with them. I've only just started using it properly and keep finding new things each time I have a go. You can download cartridges straight from the website rather than buying an actual physical cartridge- this is obviously great for those people that don't have much space (that's pretty much every crafter, anywhere, then!) but you can also link the cartridges you already own. They've got a 25% off promotion at the moment so it seemed like a good time to try it out. I've now got the Disney Pixar Cars, Elegant Edges, Fontopia Crests & Cards and Create a Critter cartridges. They came to about £66 all together which is very good value for 4 cartridges, especially a branded Disney one too.
I also picked up some 6x6 papers from the new Papermania 'spots and stripes' capsule collection for just £4 which are in a really nice selection of pastel springy colours and these match today's delivery perfectly! The lovely post-lady bought me the final part of my Card Candi TSV which contains 12 mini packs of Candi including spots, flower print & gingham patterns in lilac, green, orange, turquoise & yellow.
I've used all of my new stash to make this card (but also some old favourites that I haven't used for ages...)

Proof, if ever it were needed, that we HAVE to buy new things otherwise we might never use the old stuff!
Tuesday, December 4, 2012
Hunkydory- A Sparkling Season
Haven't had the chance to post for a while as I've been really busy sewing & selling at some local Christmas craft fairs so I'm going to try and make up for it a bit with more posts than usual for a while (hopefully).
Months ago, I got the Hunkydory 'A Sparkling Season' kit from C&C. There was a topper kit with shaped cards as the main pick of the day, but I also bought the inserts set & 6x6 papers. So far, I've only used elements from the inserts and topper kit but I haven't used them exactly as expected (of course). I've got much better value out of them!


Months ago, I got the Hunkydory 'A Sparkling Season' kit from C&C. There was a topper kit with shaped cards as the main pick of the day, but I also bought the inserts set & 6x6 papers. So far, I've only used elements from the inserts and topper kit but I haven't used them exactly as expected (of course). I've got much better value out of them!
I've made about 6 cards so far-


All of them are made using the inserts which I have cut in half with my paper trimmer. The left hand side of the insert has been trimmed and then mounted onto mirror paper/card before being placed onto an A5 card blank. This has created my own backing paper which I have embellished with glitter, foil & pearlescent glue drops (to look like snow). I've then added toppers from the main kit and peel-offs (coloured with promarkers) from my crafty stash. The first card has some stamped houses added to the bottom of the card which are from a Kanban mini stamp set that was part of an old qvc kit.
I then used the right hand side of each insert (the side with the message on) as an inner for each card. I again trimmed the paper insert, mounted it onto mirror paper/card and then layered onto the inside of the card. This meant that both the inner and the outer of the card was made with just one insert and they co-ordinate perfectly.

This is the outside (left) and inside (right) of the pink fairy/angel card,

and this is the same for the Santa & Rudolph card.
The pack of inserts had about 40 in it for about £10 which is great when I'll be able to make at least 40 cards out of it just by adding a few toppers from the main kit. I haven't even started on the 6x6 papers yet but they have some beautifully foiled designs that can almost just be stuck straight onto a card, add a message & it's done.
A great kit, that's a little bit different in style and a bargain (my 2 favourite things!)
Sunday, November 25, 2012
I LOVE HOBBYCRAFT!!! (grand calibur)
A couple of months ago, I came to the conclusion that I should just give in and get a Grand Calibur- mainly for the embossing capabilities.
This is where I need to say a big thank you to Create & Craft because they haven't had one in stock since I started wanting one and also when I went to the NEC, no-one there had one either! C&C have just got one in stock and with my club discount it's about £84 (incl. p&p) but they won't be dispatched until 7th Dec so I thought I'd try waiting for a deal.
At the time, this wasn't a good thing but after yesterday I'm glad that I had to wait!
In the Sun newspaper on Friday, there was a 25% off voucher so I thought that was worth going for a look round my local store. They had a whole stack of Grand Caliburs by the entrance but the price label was nowhere to be seen. I asked one of the assistants how much they were and when he scanned it, it came up as £110. I worked out that with my discount voucher, it would be about £3 more than the C&C one but I'd obviously be able to take it straight home.
Imagine my excitement (it was almost jumping up and down level) when I got to the aisle where the Grand Caliburs usually live to see a special offer sign saying that 'whilst stocks last' there was £40 off!!! That meant that with the offer and my voucher, the Grand Calibur cost me £52.50!!! WOO-HOO!!!
If you want one, get down there fast- even without another voucher, it's a great deal.
Friday, November 16, 2012
another Hobbycraft voucher!
Quick post about another fab Hobbycraft voucher for this coming weekend (17th & 18th November). Just follow the link below, print it off & save!!!
http://www.hobbycraft.co.uk/ControlPanel/uploads/bounce-back.pdf?utm_campaign=20121116+Friends+and+Family+25+percent+voucher&utm_source=emailCampaign&utm_medium=email&utm_content
http://www.hobbycraft.co.uk/ControlPanel/uploads/bounce-back.pdf?utm_campaign=20121116+Friends+and+Family+25+percent+voucher&utm_source=emailCampaign&utm_medium=email&utm_content
Thursday, November 8, 2012
Cheap Promarker & Spectrum Noir storage
Over the past few years, I've built up quite a collection of both Spectrum Noir & Promarker alcohol pens. Trying to keep them stored flat has always been a bit of an issue, espically when it comes to finding the pen I actually want to use. When C&C had on their special storage unit the other week I thought my prayers had been answered. The storage system was great but there was no way that I was willing to pay about £80 to have enough space for my Spectrum Noirs and still have to struggle with my Promarkers. That set my mind to thinking and I have come up with, what I think, is a pretty good solution. Most importantly, it cost less that £15 in total.
It started with a simple Billy bookcase from Ikea that cost £10-

Ikea at Nottingham have a section near the tills where they sell some furniture that is cheap because it has been on display, they also sell various pieces of wood that have come from broken goods. I managed to get a large piece of hardboard that would originally have been for the backboard of a bookcase for just 70p! It's big enough to cut 10 shelves out of with lots left over. I got 40 shelf supports from Wilko's for about £3. The bookcase has lots of extra holes drilled so you can put the shelves where you like but these are perfect. I have put a shelf in each of the spaces and that has given me the perfect amount of space for all of my pens and an extra space at the top and bottom for other stuff.
Considerably cheaper than the proper version, not quite as fancy but the £65 that I saved makes up for that!
It started with a simple Billy bookcase from Ikea that cost £10-
Ikea at Nottingham have a section near the tills where they sell some furniture that is cheap because it has been on display, they also sell various pieces of wood that have come from broken goods. I managed to get a large piece of hardboard that would originally have been for the backboard of a bookcase for just 70p! It's big enough to cut 10 shelves out of with lots left over. I got 40 shelf supports from Wilko's for about £3. The bookcase has lots of extra holes drilled so you can put the shelves where you like but these are perfect. I have put a shelf in each of the spaces and that has given me the perfect amount of space for all of my pens and an extra space at the top and bottom for other stuff.
Considerably cheaper than the proper version, not quite as fancy but the £65 that I saved makes up for that!
Sunday, November 4, 2012
Kanban 'so feminine' toppers- fashionista
This is another card I made from the fab C&C blockbuster that still seems to be available on the website. I keep getting that feeling that I want to order another set even though I've hardly used much of this one- resisting so far though (waiting for Tuesday's Spellbinders pick of the day!).
This card uses toppers from the 'Fashionista' topper sheet as well as some DCWV cardstock and large prima flowers which I've had for years-
 I started with an A4 sheet of turquoise card which I folded off centre to create a card that is roughly 8.5" square (haven't found any envelopes for this size yet though-NEC next week hopefully!). I used DCWV cardstock on the left hand side of the card before adding the toppers using 3d foam. The flower is layered up and secured with a glitter brad- this acts as a closure to the card also. I finished the card with 3 self-adhesive gems.
It's a simple card but very pretty and quick to make too.
This card uses toppers from the 'Fashionista' topper sheet as well as some DCWV cardstock and large prima flowers which I've had for years-

It's a simple card but very pretty and quick to make too.
Wednesday, October 24, 2012
Sincerely Yours, Lincoln- Oct 2012
I went to the Lincoln Sincerely Yours show at the weekend (again) and, as usual, for the very small £3 pre-booked entry fee, it was a great show. Not as many stands there this time as there was apparently another show in Doncaster on the same day where lots of the bigger companies were. I still managed to buy quite a few things though and have finally given in to the fact that I NEED a grand calibur.
I got the chance to see a Sizzix Big Shot at work and it was able to do most of the things I'm looking for. I don't need a machine that cuts as i have the cricut but want something to emboss with so that I can get more use out of my stencils (both brass & plastic). The Big Shot did this but because of the small plate size, I would only be able to emboss on my 6x6 cards. This is why I've now decided that a grand calibur is the way forward.
So, I get home and check out the C&C website only to find that, for the first time ever, they don't actually have a grand calibur in stock! I'm hoping that there will be some in soon (at a great deal of course) or if not, hopefully I can get a bargain when I go to the NEC next month. If anyone knows of a great grand calibur deal, let me know!
I did get 5 new distress inks in the new colours- gathered twigs (woody brown), peacock feathers (a beautiful turquoise), squeezed lemonade (pale yellow), seedless preserve (plumy purple) & shaded lilac (lilac/pale blue). Not had the chance to use any yet but half term is almost here!
Also added a few more plastic 6x6 stencils to my ever growing collection- some pretty flowers, a fab owl on a tree, snowflakes, poinsettia, santa in his sleigh & a nativity scene with the 3 kings on camels & the stable. This is why I now need a grand calibur!
Also picked up some good ideas for using card candi which was handy as I got a nice e-mail from QVC today telling me that my next instalment of the card candi goody box auto delivery is on the way! I will post some pictures when I finally get round to making something with them!
NEC is only a couple of weeks away so I'm hoping to pick up some more great ideas, as well as a few new products, there too!
Thursday, October 18, 2012
Kanban 'so feminine' toppers- 'More Funny Business'
Here's another card made from the Kanban 'so feminine' kit using the 'More Funny Business' topper sheet.

I started with an A4 white card sheet that I folded in half to make an A5 card front. The backing paper was from a Kanban 'House of Kanban' kit and has quite a vintage feel to it. I cut it slightly smaller than the base card and attached with double sided tape. I then simply put the main topper onto the card with more double sided tape and attached the sentiment with 3d foam to raise it off the card slightly.
The card was then finished with 2 groups of Papermania pink gemstones, putting 3 in the top left corner of the card and 1 in the bottom right. A very quick card to put together and something a bit unusual too.
Sunday, October 14, 2012
Strictly Party 2
Here's the second of the cards I've made from the 'Strictly Party' products I bought a while ago.
 This card uses both the decoupage and one of the backing papers from the 'Ultimate Die-Cut Pack'. I have layered the decoupage onto some silver mirror card and edged the backing paper with Black Soot distress ink before putting it onto the plain white A5 base card. I finished the card with a black grosgrain ribbon knotted around the spine of the card and 3 Kanban aurora borealis gemstones that I placed onto aspects of the backing paper that looked like they were supposed to shine!

Thursday, October 11, 2012
Step by Step Cardmaking- Lesson 7- easel card
This is one of my favourite card folds as it is simple to create but makes your card a bit different. I've also found that when selling cards, this style is really popular as people have not seen it before and they are great to display.
An easel card looks like this when displayed
 and like this from the side view

To create this style of card you start by folding the A4 card down the centre and then again down the A4 gatefold line (fold the front half in half again). The bottom front of the card has something added to act as a stopper for the top easel part. You can use a strip of card, gems, card candi or anything alse that can be raised with 3d foam. I like to use a whole piece of decorative paper raised up on the 3d foam.
The easel section displays your toppers and they can go above the height of the easel section- it is best to lay the easel section down as you attach the toppers so that they do not go above the entire height of the card (it will not fit in the envelope). Just remember to only put the double sided tape/3d foam on the bottom part of the toppers.
An easel card looks like this when displayed


To create this style of card you start by folding the A4 card down the centre and then again down the A4 gatefold line (fold the front half in half again). The bottom front of the card has something added to act as a stopper for the top easel part. You can use a strip of card, gems, card candi or anything alse that can be raised with 3d foam. I like to use a whole piece of decorative paper raised up on the 3d foam.
The easel section displays your toppers and they can go above the height of the easel section- it is best to lay the easel section down as you attach the toppers so that they do not go above the entire height of the card (it will not fit in the envelope). Just remember to only put the double sided tape/3d foam on the bottom part of the toppers.
Sunday, October 7, 2012
Kanban 'so feminine' toppers- 'Funny Business'
Here's another card made from the Kanban 'so fenminine' kit which I've really enjoyed making cards from as the toppers are a bit different to other things out there and also very much my style.

This card was made using one of the 2 topper sheets called 'Funny Business' & 'More Funny Business'. Each sheet has 3 large toppers that are perfect for an A5 card front. I started with a white sheet of A4 card that I folded down the centre to create an A5 card front. I then cut some Kanban backing paper (from an old 'House of Kanban' kit) to leave a slight white border and mounted this onto my card with double sided tape.
The topper already has a silver mirror edge to it so I simply attached this to my card again using double sided tape. I then took the matching sentiment and put this onto the card with 3d foam. I finished the card with some small paper roses that I've had forever and were a Poundland/QD £1 bargain. There were at least 30 in the pack and they are all slightly different, giving them the look of being handmade. I've had them so long that they've fallen off their 3d foam pads so I simply attached them with a good blob of PVA glue.
Wednesday, October 3, 2012
HOBBYCRAFT 20% OFF VOUCHER- 4th October 2012
Very quick post just to say that ALL HOBBYCRAFT stores have a 20% off day tomorrow (Thursday 4th October 2012). Most stores are open later with it being a Thursday too.
All you have to do is follow the link and print off the voucher.
http://www.hobbycraft.co.uk/ControlPanel/uploads/2482_1_20_percent_off%20Voucher_EMAILv2.pdf?utm_campaign=20120925+-+20%25+Off+Everything+In-Store+at+Hobbycraft&utm_source=emailCampaign&utm_medium=email&utm_content=
Enjoy!
All you have to do is follow the link and print off the voucher.
http://www.hobbycraft.co.uk/ControlPanel/uploads/2482_1_20_percent_off%20Voucher_EMAILv2.pdf?utm_campaign=20120925+-+20%25+Off+Everything+In-Store+at+Hobbycraft&utm_source=emailCampaign&utm_medium=email&utm_content=
Enjoy!
Sunday, September 30, 2012
Step by Step Cardmaking- Lesson 6- invertage
Last time, my lesson was all about pyramage, so I felt that now would be a good time to talk about 'invertage' too. It should be a relatively quick lesson though as there's not too much new info today!
We learnt, last week, that pyramage involves layering up an image in the style of a pyramid using a range of basic shapes. Invertage is very similar in that it uses basic shapes but the images appears to layer inwards rather than outwards. I unfortunately do not have an example to show as it is not a technique I use very often but that doesn't mean that you won't want to.
You again start with 3/4 of the same image, but to prepare them, you cut out the middle of the image rather than cutting away the outside. Each time you make the centre gap smaller- you are essentially creating frames of the image of different thicknesses. You must leave 1 layer complete though to act as the base.
This style of decoupage is good for an image that has a natural frame or where the central image appears to be further back.
For further info on the basics of layering, refer to lessons 4 or 5 on decoupage or pyramage respectively.
Thursday, September 27, 2012
Kanban 'so feminine' toppers- 'Rock Chick'
Kanban recently bought a fabulous blockbuster to Create & Craft/Ideal World that has some great toppers & backing cards in it. The Blockbuster contains 2 sets- 'so feminine' & 'so macho' (that has to be sung by the way) and may still be available if you check the website. With club discount (& voucher codes in the back of the club magazine) I got the kit and the new autumn 2012 promarker set for less than £35- bargain. It even arrived just 2 days after I ordered it- a-may-zing!
This is the first card that I've made from my favourite topper sheet entitled 'Rock Chick'

This is the first card that I've made from my favourite topper sheet entitled 'Rock Chick'

This topper sheet has 6 different music themed toppers all in black & white (with a hint of pink). As you can see, I have used just 1 topper to create this card.
I started with an A4 sheet of black card that I folded using the 12cm line on my ScorPal score board. This has given me a slightly off square card with a smaller front flap. I used 2 papers from the DCWV 'Rockstar' 8x8 stack as a mat onto each side of the card. I then mounted the topper onto some Black/Pink Core'dinations 'Black Magic' cardstock that I had distressed the edges of and attached it to the front flap of the card with 3d foam.
I finished the card by placing the 3 black gemstones on the bottom right hand side of the card, tying a black organza bow around the spine and finally attaching the 'Rock & Roll' badge. This is something I've had in my stash for ages and came from Paperchase in a set of 9. I cut the safety pin off the back of the badge using wire cutters so that the badge would lay flat when attached with 3d foam. They cost about £3 for the set and make a really nice bold accent to finish the card.
Sunday, September 23, 2012
Step by Step Cardmaking- Lesson 5- pyramage
Following on from the last lesson about decoupage, I thought that it would be a good idea to talk about pyramage today as it is a natural follow on and could cause confusion if we don't address it.
Pyramage is very similar to decoupage and the method is exactly the same. You need exactly the same tools (although a proper paper trimmer helps) and you will get a very similar result of a layered final image but as the name suggests, the finished style will be that of a pyramid.
The first picture, below, is the example I used to show decoupage in my previous lesson
.jpg) The layers are cut to match the shape of the image.
The layers are cut to match the shape of the image.
In pyramage, the shape of the image is not really important- a basic shape e.g. square, circle, triangle or rectangle is used instead (as shown below)
.jpg) Each layer starts off the same and is cut in a slightly smaller size for each layer used. They are again stacked using either 3d foam or silicone glue (see lesson 4).
Each layer starts off the same and is cut in a slightly smaller size for each layer used. They are again stacked using either 3d foam or silicone glue (see lesson 4).
Pyramage can be easier or harder than decoupage depending on the image used but I feel it is easier to create your own design as I did here starting from just 4 exactly the same images (printed from the Papermania 'Enchanted' cd-rom). You do have to be careful that when you cut the layers, take an even amount from each side though, otherwise the balance of the design will be off.
Pyramage is very similar to decoupage and the method is exactly the same. You need exactly the same tools (although a proper paper trimmer helps) and you will get a very similar result of a layered final image but as the name suggests, the finished style will be that of a pyramid.
The first picture, below, is the example I used to show decoupage in my previous lesson
.jpg)
In pyramage, the shape of the image is not really important- a basic shape e.g. square, circle, triangle or rectangle is used instead (as shown below)
.jpg)
Pyramage can be easier or harder than decoupage depending on the image used but I feel it is easier to create your own design as I did here starting from just 4 exactly the same images (printed from the Papermania 'Enchanted' cd-rom). You do have to be careful that when you cut the layers, take an even amount from each side though, otherwise the balance of the design will be off.
Sunday, September 16, 2012
The London Line 2
This is the second card I've made using the lovely Trimcraft 'The London Line' die-cut decoupage, ribbon and papers.
 I started with a bright red A4 sheet of card that I folded into what I call a 'fold back card'. Start by folding the card in half and then fold the front piece back on itself- if you have a scoreboard, score on the half fold and the A4 gatefold lines.
I then took one of the backing papers from the 8x8 paper pack (which is already the perfect height for a card this size) and cut it to layer onto the front panel leaving a small red border. The topper came from the die-cut decoupage pack and is already beautifully glittered. I simply mounted this onto the flap with 3d foam, making sure that I only put the foam onto the left hand side of the topper (as you look at it).
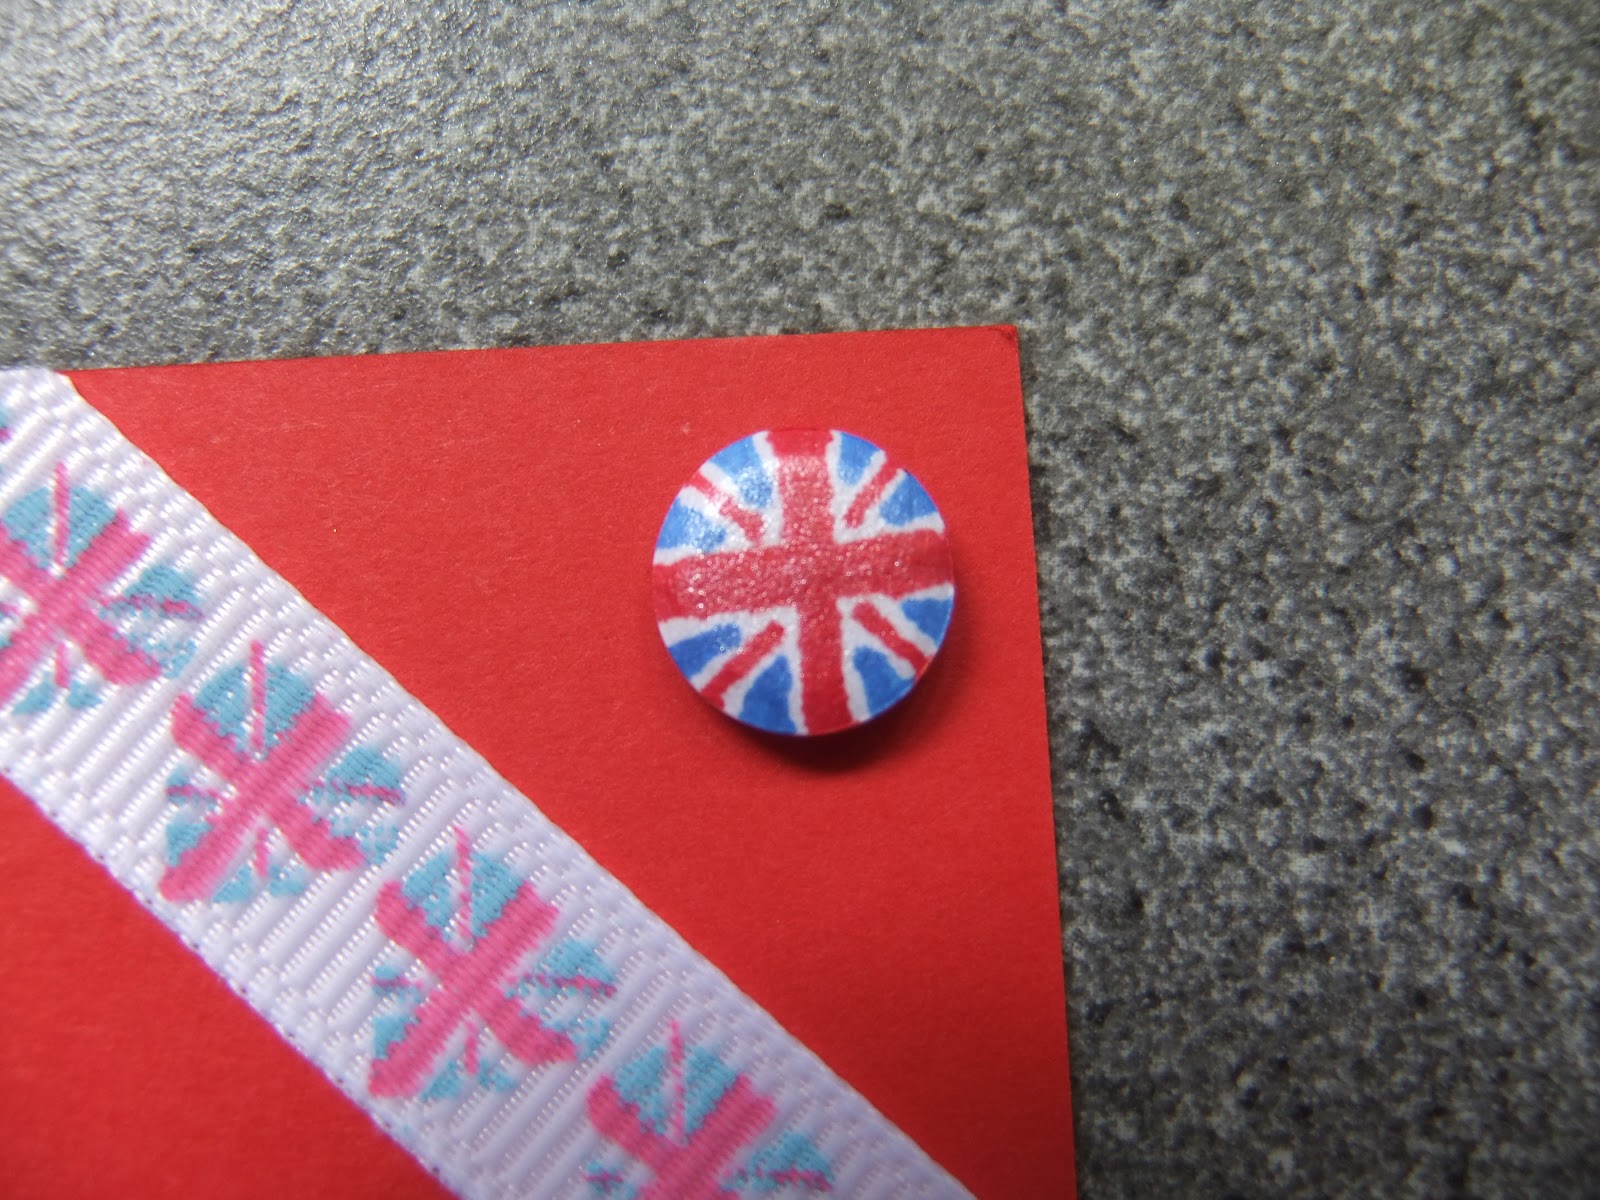
I then took a small piece of the Union Jack heart ribbon and stuck some double sided tape on the back of it to attach over the corner of the card. At this point, I knew that the card was almost finished but I felt that it just needed a finishing touch- Card Candi of course! Problem was that I couldn't decide which colour of candi to use to stand out on the card. Red wouldn't show up on the back, white was a but dull & the blue just didn't look right but a moment of inspiration later, I had the most fabulous card candi ever!!!
 Created very simply by starting with a white card candi and using my 'Poppy Red' & 'True Blue' promarkers (with fine point tips attached) to colour the design. It took a pretty steady hand but was worth it- and the pearlescence of the original colour shows through too!
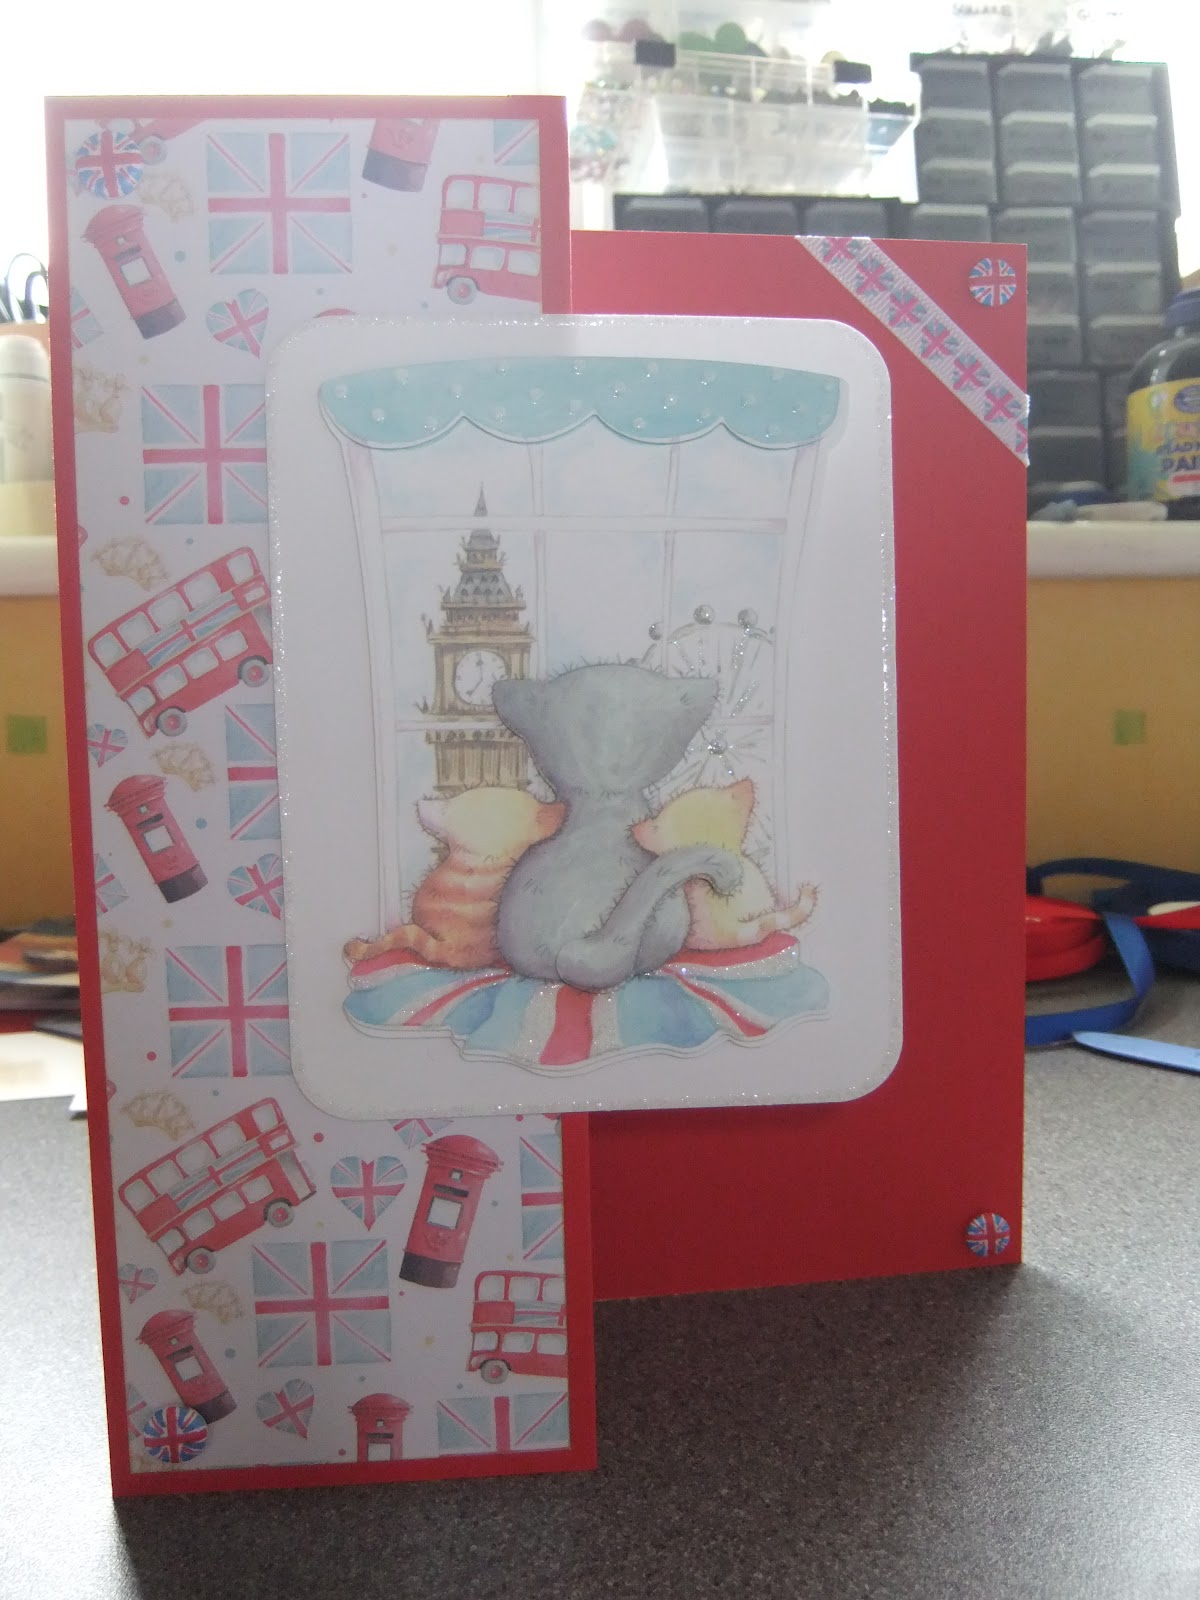
I then took one of the backing papers from the 8x8 paper pack (which is already the perfect height for a card this size) and cut it to layer onto the front panel leaving a small red border. The topper came from the die-cut decoupage pack and is already beautifully glittered. I simply mounted this onto the flap with 3d foam, making sure that I only put the foam onto the left hand side of the topper (as you look at it).
I then took a small piece of the Union Jack heart ribbon and stuck some double sided tape on the back of it to attach over the corner of the card. At this point, I knew that the card was almost finished but I felt that it just needed a finishing touch- Card Candi of course! Problem was that I couldn't decide which colour of candi to use to stand out on the card. Red wouldn't show up on the back, white was a but dull & the blue just didn't look right but a moment of inspiration later, I had the most fabulous card candi ever!!!
Thursday, September 13, 2012
Step by Step Cardmaking- Lesson 4- decoupage
Decoupage is one of the most common ways of creating toppers for cards and a great place to start as you can really use a wide range of unexpected things to make your cards.
Decoupage cards were the very first cards I started to make and all you really need is a good pair of sharp scissors (non-stick are best) and some 3-d foam (you can get this from poundland for £1!) or silicone glue, if you prefer. And of course the card that you are going to mount your topper onto (with or without matting & layering- see lesson 3).
Decoupage essentially means taking an image and layering it to create dimension. Each layer removes part of the image (usually the background). The card below shows this in detail.
.jpg)
The 1st layer (base layer/original image) shows the entire design. The 2nd layer brings forward the cats head, the right hand side balloon and the girls head & dress. The 3rd layer is just the girls head as this would be furthest forward in real life.
Decoupage can be bought in ready made sets where the different layers are already determined for you. Alternatively, you can buy sheets that have the same flat image 3 or 4 times for you to choose which aspects to cut away. It is easier to start with the pre-determined style until you are confident with how it works. You can also get some decoupage that is 'die-cut' (already cut out for you) which is, of course, even easier. These normally come in sheets where you just remove each piece from the sheet where it is held with small knicks of the card. It is best to cut these carefully with your scissors.
As you become more confident with how the images need to change then you can use lots of different things to create that decoupage.
- A large scale image on wrapping paper will work.
- You can print a copyright free image from the internet or from a special crafting cd-rom.
- You can use stamps to create your images (more about this in lesson 8)
- Calendars work really well but you'll need to buy at least 2/3. This is how I started and if you buy your calendars in February/March then you can get them cheap too. The cards below were made from calendars bought for just 50p. That means I got 12 decoupaged toppers for just £1!


When you have all of your images cut out, then you need to layer them up. Start with the largest/background image and place onto your table- decoupage works best when you can stand over your image and make sure you place the next layer accurately, so you don't want your workstation to be too high. Take your next layer and on the back apply the 3d foam or silicone glue- you may be thinking what's the difference? or which is best? well...
- 3d foam is quick, cheap and no mess. It is like a double sided tape but thick so it raises your image and creates dimension at a set level (the thickness of the foam- different thicknesses are available but I stick to the cheap poundland stuff). You do have to be accurate when sticking your image down as there in not much room for manoeuver once it's stuck.
- Silicone Glue is a thick glue that can create dimension at a range of levels depending on how much you put on. 'Blobs' (technical term) are used all around the back of the image and when you layer the image, you do not press it down fully, creating the dimension. It can be a bit messy and is nowhere near as cheap as the 3d foam. BUT- the glue takes a while to dry so if you place your image incorrectly, there is the chance to move it.
The choice is really up to you but as I said, I always use the 3d foam.
Anyway... put the 3d foam/silicone glue onto the back of the image and make sure that you apply it liberally- not every tiny space but don't leave big gaps- your image may sag! Remove the 3d foam backing (if using) and then carefully place the smaller image directly over the same image on the base card. Continue for each layer making sure that you start with the largest image and work through to the smallest each time.
Simple but very effective so give it a try! You'll never look back...
Tuesday, September 11, 2012
Mulberry Wood reindeers
I'm starting to build a bit of a collection of crafting cd-roms after initially not being such a big fan of them. I've been won over by the idea that once you've got them, you can print as many designs as you want and actually really make them great value for money. I recently got the new Crafters Companion 'Christmas in Mulberry Wood' cd-rom which is just £14.99 on their website http://www.crafterscompanion.co.uk/. It has all the usual Crafters Companion cd features including backing papers, inserts, decoupage, toppers, writing papers, envelopes & more and has lots of very cute woodland creatures getting ready for Chrismas.
I have used both the backing papers and the decoupage to create this card.
 I started with a piece of A4 white card that I cut to make into a square base card. After folding the card into a square, I then folded the front diagonally from bottom left, to top right, to create the twisted easel base card. The backing paper was printed from the cd and then cut into 2 matching squares one for the base of the card and one as the twisted easel topper. I decoupaged the topper and then mounted it onto silver mirror card before attaching to the centre of the topper. I then used some Stickles to add some extra detail to the image. I then used 5 holographic star Card Candi circles to act as the stopper for the card.
If you are making easel cards then Card Candi is a must have and don't forget that you can just buy a white set and colour them with your promarkers or spectrum noirs. Stamping them is also a great way to theme them to your project and there are special Candi Stamps available (I'll hopfullu soon have some pictures to post of the cards I've made with my new set!). You will want all the pre-coloured ones (and patterns, foils etc.) but they are great value anyway!
I have used both the backing papers and the decoupage to create this card.

If you are making easel cards then Card Candi is a must have and don't forget that you can just buy a white set and colour them with your promarkers or spectrum noirs. Stamping them is also a great way to theme them to your project and there are special Candi Stamps available (I'll hopfullu soon have some pictures to post of the cards I've made with my new set!). You will want all the pre-coloured ones (and patterns, foils etc.) but they are great value anyway!
Sunday, September 9, 2012
Step by Step Cardmaking- Lesson 3- matting & layering
Matting & Layering is one of the key techniques used in card making to add emphasis to your chosen toppers. It gives you a chance to use some of the beautiful patterned papers & cards that are available as well as speciality cardstock such as mirror card or glitter card.
Matting & Layering is simply the technique of using these different papers/cards to place a border around the main topper of your card. It can be used to make the topper stand out from the base card and provides a professional finish. It is one of the simplest techniques but very effective. Accurate measuring is important and a paper trimmer or guillotine can help although a pair of scissors and a ruler will do.
Start by measuring the topper you wish to layer and make a note of this measurement (it's always handy to have some scrap paper where you are working). When you have chosen your 'mat', cut this paper/card to either 0.5cm or 1cm extra on each side e.g. starting with a topper that is 10cm x 14cm, for a narrow border cut the mat at 11cm x 15cm or for a slightly wider border, cut the mat at 12cm x 16cm.
You can use more than 1 layer if you wish but I would not advise more than 2- it can be too much.
The examples below give an idea of how to choose the colours you will use for you matting & layering but the main advice is to try things out & use your own imagination.

This card has a mainly white base card and
a topper using shades of blue. To continue
the icy theme, I chose to mat the topper with
silver mirror card.

This card also has a white base card but the purple mirror card was chosen as the
mat to enhance the purple of the flowers
in the topper.

For this card, I chose a contrasting green
mat as both the backing paper & topper
were mainly pink. If I had used a pink mat,
it would not have made the topper stand
out as I wished.

For this card, I chose a contrasting turquoise foil
paper for the mat. I chose to use a turquoise mat
as this was one of the background colours in the
main topper.
Almost forgot to mention how to attach the layers together! D'oh! I usually use double sided tape but if you want to add extra dimension then you can use 3d foam. If you're going to use 3d foam, buy the really cheap stuff from poundland but I would advise spending a little more (not much) on your double sided tape. Poundland do sell it and if you're only using card then it's fine but if you use it on a thinner paper than the tape will start to show through after a while. I always stock up on my double sided tape when I go to the NEC as you get at least 10 rolls for £5 and there's lots on each roll too. I usually get it from the 1craft1 stand and I think they have a website so you could always have a look for it there but it may not be the same bargain. My advice- go to the NEC in November, you'll get lots of inspiration too, & you can use your Tesco clubcard vouchers on their triple deal to get your ticket!
Friday, September 7, 2012
Stamped Gorjuss Girl
In a previous post, I shared some photos of some 'Gorjuss Girls' cards that I had made using a couple of cheap calendars picked up earlier in the year. Well, always one for a bargain, a couple of weeks ago when I went to my local Hobbycraft store, I could be found rummaging through their bargain boxes! Much to my delight, I found some Gorjuss Girl stamps that were around half their RRP. Woo-Hoo! I picked up 3 different designs, 1 of which I have used so far. The card below is made using the 'Purrfect Friend' stamp which is available on www.bubblyfunk.co.uk (although my set had other smaller images as well as the large girl design).
 As well as the 'Gorjuss Girl' stamp, I have also used a multi-layered star stamp that is part of a range relatively new to Hobbycraft of their own small acrylic stamps. There are lots of different designs available and they are all just £1 each- they are particularly great for creating your own backgrounds.
I actually started this card by cutting down some white card to stamp the topper onto by measuring the stamp design and then adding a border all the way around. I stamped the design with a Versamark inkpad and then embossed it with a black 'Heat it up' powder. I did this as I wanted to watercolour my design so needed a permanent image and I find that if the image is embossed, then the watercolour does not run quite as much. I used my Anita's/Papermania watercolour pens, putting some of the ink onto an acrylic block and then using my waterbrush to transfer this to the image. This method stops you getting lines on your design as you would if you applied the ink directly to the paper and then tried to watercolour it.
When the image was dry, I used some Stickles glitter glue just to highlight the heart in the girls hair (you can't really see it in the photo though). After more drying time, I then used my 'Dusty Concord' distress ink to change the card from white to purple, while still leaving a white border around the stamped image. The purple stars were then stamped using a Hobbycraft stamp and a 'Grape Jelly' memento ink. I then mounted my topper onto some black glitter paper, using my scissors to scrape away some of the glitter so that my topper would stick more strongly.
The base card is an A4 white card, folded in half and then, again, inked with the 'Dusty Concord' distress ink. I used the same Hobbycraft star stamp to create a background design but this time used a black memento ink for a slight contrast. The card is finished with a small black bow that was originally white and I coloured using my black promarker. I used my heat gun to speed up the drying time of the ink and found that this did shrink and harden the ribbon slightly but it was still ok (could be a nice future effect though!). It just finished the card nicely. I have, however, recently managed to get some small black bows from the Marks & Spencer outlet at the Springfields shopping centre in Spalding, Lincolnshire. They were reduced to £1 for about 25- they are supposed to be as a wedding table decoration but are the perfect size for cards and saves you from spending ages trying to tie a very fiddly bow!
Sunday, September 2, 2012
Cricut- Paper Doll Teen Scene
A couple of weeks ago, I posted about a new cricut cartridge that I'd ordered from the Card Craft UK website. Well, here are my first 2 cards made from my lovely new Paper Doll-Teen Scene cartridge.
I've got the other 2 paper doll cartridges and have used them a lot for a long time but the one thing I would have liked from them was for the characters to be a bit more realistic. This is where the newer Paper Doll cartridge is great. There are 2 male & 3 female characters in different poses with about 10 different outfits, hairstyles & accessories per character.
The handbook is set out to try and make the creation of the characters easier by showing you an idea of the colour to use and the layers are recorded in order. This does mean that you have some card/paper waste through the layering but it is easier to follow. I found that paper worked better than card as you do end up with quite a few layers at the end and can have a very thick topper if you use card.

These are the 2 cards that I have made so far, both starting with a Craftwork Cards 8x8 scallop edge base card. The one on the left was inked with new 'Picked Raspberry' distress ink. Both cards were then layered with DCWV papers from 12x12 stacks (teenage dream & la creme). I then used Kanban stackable mats to create the layers behind the characters, inking the pink one, and using a mat as a template to create the blue one to exactly match the colour used in the dress. The card on the right was finished with silver mirror card candi.
Here are the characters in detail


I'll try to explain why some paper is wasted when you make them! You basically start by cutting the entire character (+ fringe) in your chosen hair colour. You then cut the whole body in white, the whole body with eye holes in black and then the whole body with larger eye holes in your chosen skin colour. This is done to create the effect of the fabulous eyelashes which look great, but I think could probably be done without also cutting the legs, arms etc. If I find a way to solve this, I'll blog about it but I am really happy with the results. You then choose your colours for clothes, shoes etc. and layer up the image as shown in the handbook, which is now much more detailed than the old versions.
I've already made up some other characters but just not got round to putting them on cards yet- I'll post them when I do.
Also, the variation of the characters is great and as well as generally girly cards, there are graduation outfits, wedding style dresses & sporty outfits. The male characters include skateboarders, guitarists & sports such as basketball as well as more general gym/weights. There is also a really good one with headphones & an ipod. They will make great cards for those famous 'awkward teenagers' that all crafting companies seem to be going for at the moment!
Thursday, August 30, 2012
Step by Step Cardmaking- Lesson 2- basic card fold
The basic card fold is the staple card fold for a new cardmaker. It's simple but classic. This style of card fold can be used to create a wide range of card sizes but I would start with an A4 sheet of card. I would advise using a bone folder (at the least) and a scoring board if you're serious about this.
If you have a score board, it will more than likely have a mark, showing where to score, for an A4 half fold card. Make sure that you put the short edge of the card right up to the score board barrier so that the card is scored correctly. If your score board does not have any markings, then simply measure the length of the piece of card and mark the card half way along at the top and the bottom. Align these lines to the score board ridge and then score. It's important to measure each piece of card as they can vary slightly each time.
Without a score board, you can still achieve good results but you will need to be a little more careful. It is possible to simply fold the cald in half and crease, but this can cause the edge of the card to crack and leave you with unprofessional results. You can buy a 'ball embossing tool' for a couple of pounds but if you've got an old, out of ink, biro then that will work just as well. Measure the long edge of the card and mark the centre line with a pencil at the top and the bottom. Line up the ruler with those two lines and then use the ball tool, or biro, to mark that line. It's best to go over it 3/4 times just to create a slight indentation.
When you have scored the card, turn it over so that the mountain of the indentation faces up and then crease towards you. This means that the valley aspect of the indentation you made, becomes the outside edge of the card- this gives you the crispest fold. This is where you use the bone folder to run down the edge of the card and make the fold extra crisp.
You can buy pre-scored cards that you simply have to fold but these are more expensive and not available in as many colours as the plain A4 card.
This is a very versatile card fold and below are some examples of cards that begin with that basic fold, in both portrait and landscape orientations.


Sunday, August 26, 2012
Kanban 'Winged Dress' card
When I visited the Kanban outlet a few months ago, I was seduced by a beautiful acrylic stamp set that featured 3 large images of outfits and smaller crowns, cogs & watches. They are in the 'steampunk' style that is very popular at the moment. At the time, I was reading the book 'The Night Circus' and the stamps really made me think of the style described, so well, in the book. The set was £10 and I couldn't resist. This is the first card that I have made using the stamps.

I started with a piece of white card, cutting it to a size that would fit my main stamp image once I had added the wings to the dress (they are 2 seperate stamps). I used my 'pumice stone' distress ink on that white card to give it a vintage look. I was desperate to use my Spectrum Noir alcohol inks so I started by stamping the dress in a brown memento ink so that it would not bleed when I used the pens. As I wanted to add the wings, from another Kanban stamp set bought at the outlet, I stamped the middle part of the dress onto a sticky/post-it note to act as a mask. I placed this mask onto my initial image and then stamped the wings over it again using the brown memento ink.
I then wanted to colour my image (using my spectrum noirs) and chose a deep green colour. I have been practising my shading with the pens but I didn't feel that I had a colour close enough to the original one I wanted to use. I therefore decided to just use the one pen and build up the layers to create the shading. I started by colouring the whole dress so it was a flat solid colour and then used the same pen to go over the lines provided by the stamp and the shadow areas underneath the folds of the dress. It created a very good shading effect. I repeated the same technique on the hat using a brown pen and the flower on the hat in the same green one.
I was keen to foil the wings just to add a different colour and texture to the card. I did this by picking out parts of the image with my quickie glue pen and then using some gilding flakes to add a range of colours to the image. This is a really simple technique and one that I've really got into since getting some bargainous rolls of foil again from the Kanban outlet. It's a great way to tart up a cheap topper! You can see that in detail below-

I then used the small crown stamp, from my clothes stamp set, with the 'pumice stone' distress ink just to start to add some detail to the background as it looked a but plain. I wanted some of the images to seem as if they were partly behind the dress so I again used my mask to create that effect. I then used the cog stamp with the brown memento ink to add a different shade to that background. I then used the same memento ink to edge the topper piece.
I mounted my topper onto a piece of dark, earthy green card showing a 0.5cm border on each side. I then attached this to a, once white, A5 card front that I had distressed using the same pumice stone ink and crown & cog stamps. The only addition on the card base is that I also added a few splashes of alcohol ink in a range of brown shades- this probably wasn't a great idea, in hindsight, as the alcohol ink does bleed through the card quite a lot so I'll need some sort of cover/insert on the inside. Not exactly a 'happy accident' so much as a mistake!
Crafting in Kent
I spent a couple of days in the lovely county of Kent last week and of course, made it my mission to hunt out all of those fabulous craft shops. We were focused mainly around the Dover area so my craft hunting was slightly limited as I didn't really realise that Kent was such a large county.
I, unfortunately, have just one craft shop to report on and that is Rainbow Crafts in Herne Bay (http://www.rainbow-craft.co.uk/). The shop was on the high street, which itself is just off the main sea front. and was BIG! Definitely worth a sneaky visit if you can convince the family that a day out at the seaside is a good idea. Large shop, with lots of goodies including docrafts, distress inks, scrapbooking papers & lots more. They looked to have an area for workshops too within the shop.
Not a place to make a special trip for, as the range was nothing out of the ordinary, but worth a look if you're nearby or there on your holidays.
Thursday, August 23, 2012
Kanban outlet
Whilst looking through my various blog posts, I realised that I've mentioned this place a few times in passing but for some, deeply unknown, reason have never given it a blog post of it's own. This is a huge mistake as anyone who has visited before will know.
I first visited on the way back from a wedding that was roughly in the Shipley area and now go back at least once a year even if it means a special trip. It is well worth the petrol it costs to get there.
For those people who have only been familiar with Kanban since they have been part of the Create & Craft family, you've not even seen 10% of what they have to offer. When Kanban were a large part of the QVC craft line-up, they bought out new products much more regularly and had a much wider range.
The outlet shop is a mecca for all Kanban fans!
It is in Shipley, West Yorkshire and is a little difficult to find (don't trust an AA route map) but it's worth the effort. It has changed every time I've been so it may be different to my description when you go (which you should) but it will still be awesome.
The shop is split into 2 rooms. The first houses the 'expensive' side of things- you'll see why that's ironic in a minute, and this leads through to the bargain bargain room! The second room is full of large shelving units that house all manner of 'seconds' which essentially means the start and end of a print run. This means that the topper sheets are not die-cut and not foiled or glittered. You do have to search through everything and pick out the good stuff but you will find some real treasures. Some of the items are printed on 2 sides but if you're cutting out a topper and sticking it onto a card then you'll never see it anyway. There are usually some good background cards and if you're really lucky envelopes & some foiled pre-scored cards. It is very much hit & miss and you'll never get the same things twice but I've never been disappointed. When I last went in May, this room had a 'fill a box' system with each box costing £9 and probably holding about 100 A4 sheets. If you bought 2 boxes though, the 3rd was free. that means you're getting around 300 sheets for £18. That makes each sheet just 6p! That is truly unbeatable. Even if you only manage to get 1 card out of 2 sheets then you all know that's a bargain- even by the time you've added your own glitter (or foiling as I'll explain in a minute!). This is why the first room seems 'expensive'! The major things I got this year were part of the new London themed images and I got way above the full kit amount for a lot less than it cost- yes I need to cut them out but that's worth the savings.
The first room starts with a counter that shows all of the acrylic stamp sets they sell. These are sold at retail price but they are still great value. This room also has topper sheets but these ones are perfect (die-cut, foiled & glittered) for 20p or 30p each. This is even cheaper than buying them in bulk set from a shopping channel and you only buy the designs you like. They are mostly older designs but the new designs are available to buy too (but for RRP). There are also out of season bargains to be had e.g. 10 Christmas decoupage sheets for just £1. You can sometimes get ex-QVC kits too at major reductions. My favourite part is the foil rolls though (this is what I meant about adding your own foiling). You can get a huge roll of coloured foil (probably close to 100m) for £2/£3. As long as you've got a quickie glue pen then you can foil the sheets from the 'fill a box' room for yourself. 1 roll will last for years but when you see all the different colours (much more than just gold & silver) then you'll end up with at least 5! You can also pick up background cards, printed acetates, glitters, envelopes & ribbons all for great prices.
No matter where you live in the UK (or Europe & maybe even the US) then you need to visit the Kanban outlet. You'll probably never use all the stuff you get but you'll still go back for more. It becomes an addiction!
Prepare to be there for at least 4 hours (if you're going to do it properly) and make sure that if you take a non-crafting person with you, they take a book/ipod/ipad to keep themselves entertained. There is a sofa and free tea/coffee making facilities provided!
Skater Boy
Back in May, I picked up a reduced price stamp from one of the stands at the Sincerely Yours papercraft show in Lincoln. It was in a design style that I'd not seen before but knew instantly was just my sort of thing. It is by a company called 'The Greeting Farm' who are US based but they are available on a few UK websites (unfortunately I have no idea who I bought it from). The stamp is called 'Skater Ian' and is part of a range called 'Anya & Ian'- a set of boy & girl stamps in various situations e.g. surfer, teacher, wild west etc.
This is the first card I've made with the stamp and found it a great design to decoupage and a great opportunity to use my Spectrum Noir pens properly. Decoupaging the design meant that I had some extra unseen pieces to practise on too!
 I stamped the image 4 times using a black Memento ink so that it would not run as I used my Spectrum Noir alcohol ink pens. I tried out various colour combinations and blending techniques on the lower hidden layers until I was happy to work on the layer that would be seen. I found it easiest to blend the colours by covering the whole area with the lightest colour first and then using the 1 or 2 darker shades to put in the shadow. After colouring, I cut out and layered up the image using foam pads (poundland special!).
The backing paper is from the 'Teenage Dream' stack by DCWV and already had a skater image inside the shield design, where I placed my topper. The backing paper was a flat design so I used my Sakura Clear Glaze pen (#800) to go over the multi-coloured shield image just to lift it slightly.
A simple card but the fabulous stamp makes it different to many other cards out there. Definitely a range of stamps I'll be looking out for again.
This is the first card I've made with the stamp and found it a great design to decoupage and a great opportunity to use my Spectrum Noir pens properly. Decoupaging the design meant that I had some extra unseen pieces to practise on too!

The backing paper is from the 'Teenage Dream' stack by DCWV and already had a skater image inside the shield design, where I placed my topper. The backing paper was a flat design so I used my Sakura Clear Glaze pen (#800) to go over the multi-coloured shield image just to lift it slightly.
A simple card but the fabulous stamp makes it different to many other cards out there. Definitely a range of stamps I'll be looking out for again.
Step by Step Cardmaking- Lesson 1- card
Okay, so I thought I'd start a little series of step by step instructions for any beginner card makers out there. Each lesson will take you through a different topic, hopefully giving you the information you need to start crafting, or the confidence to try something new. The lessons will follow on from each other, starting with the real basics. If you've got any questions feel free to leave a comment and I'll try to answer! Here goes...
If you are going to make cards then the first thing you'll need is card! There are lots of different types out there but I suggest you start with some basic A4 card in a range of colours you like. If you are making Christmas cards then get reds, greens & maybe some blues for a more modern look. If you're making cards for ladies then get pinks & purples and if it's men's cards you are aiming for then get blues, greens & browns. I also love working with a black base card but this can be a bit more challenging.
Unfortunately, all card is different so it will not be as simple as just finding the colours that you like. Paper & card is weighed in gsm (grams per square metre) so the thicker the card, the higher the gsm. I tend to work with card around 260gsm as if you choose a cardstock too thin, it will not make a solid base card strong enough to hold your topper. If the card is too thick, then it will be very difficult to fold precisely & crisply.
It is worth getting a cardstock that is slightly more expensive as the cheaper stuff tends to be of a poorer quality. So, get the card in ready for lesson 2!
Next lesson- how to fold your cards accurately...
Thursday, August 9, 2012
Once Upon A Stamp
Lot's of love here on my blog tonight for the 'Once Upon a Stamp' website. A craft company based in Mansfield, Nottinghamshire who I had not used until this week but they will definitely be added to my list of quality websites.
I've needed a new scoring board for a while but didn't really fancy one of those hougie boards that are on c&c. I'd seen a new product called the 'Scorpal' on the craft superstore website but it was out of stock. Lucky for me it was as I accidentally found one this week on the 'Once Upon a Stamp' website for cheaper than it was on craft superstore.
There are 3 different versions available:- a 6"x6" mini scorpal, a metric 30.5x30.5cm version or a 12"x12" one. The difference between the metric and imperial versions is important because all of the boards have multiple lines at regular intervals as well as for the key card folding techniques. All 3 versions are available on their site and I went for the metric version as I always work in cms (at least older crafters who are more comfortable with inches, have the option to go for that if they wish). All of the versions come with the folding tool and this is housed in a handy little clip section at the top of the board so it cannot fall out and you shouldn't be able to lose it!
They currently have an offer where you get the 6x6 board free when you buy the metric board so I got both for just £24.99. This is much cheaper than the craft superstore website (which I do love too) and, most importantly, they have some in stock. I placed my order on Tuesday afternoon and it was delivered this morning (Thursday) so that's great service too. They also have the option on their website to give them your credit/debit card details over the phone rather than over the internet if you are not keen on buying things online. Free p&p too!
I've not looked at the rest of their website as yet but I'm sure I will pretty soon!
Strictly Party
This is hopefully the start of my "at least one blog a week" challenge- I wonder how many I'll actually manage???
I recently bought the 'Ultimate die-cut pack' from the Papermania 'Strictly Party' range, and I have to say that I love it! RRP is £11.95 but with the voucher in the docrafts magazine, you get it for £10 and it's well worth double that. The pack contains backing papers, decoupage, flat toppers, ribbon borders, alphabets & sentiments in blues, greens, pinks & purples. There is a strong floral theme and the images are very girly but what I like best is that they have a younger feel than most floral themed images. I have so far used just 2 of the die-cut decoupage images with some of the backing papers to make 2 cards that I think are rather beautiful!
Here's the first of them in detail:-
 This card is in my prefered style of keeping it really simple and elegant and was therefore a quick card to produce (once I had made up the decoupage topper). I started with an A5 front scallop edge card that I inked with my lovely new 'Picked Raspberry' distress ink (why has it taken them so long to do a bright pink one?!?). The decoupage topper is from the 'Strictly Party' pack and I layered it onto some turquoise matt foil paper that I've had kicking around for years. I chose the flowers (prima) to compliment those on the dress (near the girls hand) and attached them with a deep turquoise brad. The card was finished with a couple of turquoise gems in opposite corners.
I recently bought the 'Ultimate die-cut pack' from the Papermania 'Strictly Party' range, and I have to say that I love it! RRP is £11.95 but with the voucher in the docrafts magazine, you get it for £10 and it's well worth double that. The pack contains backing papers, decoupage, flat toppers, ribbon borders, alphabets & sentiments in blues, greens, pinks & purples. There is a strong floral theme and the images are very girly but what I like best is that they have a younger feel than most floral themed images. I have so far used just 2 of the die-cut decoupage images with some of the backing papers to make 2 cards that I think are rather beautiful!
Here's the first of them in detail:-

Sunday, August 5, 2012
CardCraft-UK
Exciting news!!!
Just ordered a new cricut cartridge from the CardCraft-UK website http://www.cardcraft-uk.co.uk/ which has recently become my home for cricut cartridges! Their prices are good and their service great. One of my favourite aspects is that if the product you want is out of stock, just give them your email address and they'll let you know as soon as it's back in stock. I know that lots of sites offer this service but I've never found them to be quite as quick in that promise as this website is.
Can't wait for it to arrive and to start crafting with it. Blog posts to follow I'm sure!
Subscribe to:
Posts (Atom)