I posted a card a couple of weeks ago that I made for someone at work for Easter and here is the second one. She wanted cards with rabbits on them but apart from that, I was free to play!
It's another CAS card that was quick and easy to make. I started with an A5 scalloped edge card blank which I layered with some green paper, embossed with a leaf design using my Grand Callibur. I then used a circle die to cut the black circle for the rabbit hole and a slightly smaller white one for the bunny's bum! I hand cut the feet, using white and beige paper and then added a white pom-pom for the tail. I added the ribbon around the green paper before attaching it all to the base card. The finishing touch was the peel-off message.
I am entering this card into the following challenges:-
Creatalicious 'anything goes' 15.4
The Pink Elephant 'green' 23.3
Crafty Boots 'spring' 29.3
Craft Your Passion 'anything goes' 22.3
Papertake Weekly 'happy anything' 24.3
Clear it Out 'Easter & pastel' 24.3
Creative Card Crew 'Easter critters' 29.3
Penny's Paper-Crafty Challenges ' favourite embellishments'- ribbon 24.2
Crafters Cafe 'spring-my season' 25.3
The Paper Shelter 'spring' 24.3
Cute Card Thursday 'spring fever' 25.3
Crafty Catz 'no designer paper' 26.3
Catch the Bug 'bingo' (Easter & Die-Cut & my choice- ribbon) 28.3
I love to craft and I love to shop, particularly for crafty stash (and shoes). I'll blog about the shops I visit, the stuff I buy and what I've done with it all!
Showing posts with label Peel-Offs. Show all posts
Saturday, March 21, 2015
The Bunny's Bum
Labels:
Die Cutting,
Dry Embossing,
easter,
grand callibur,
Peel-Offs,
pom-poms,
Ribbon
Monday, February 23, 2015
Easter Bunny
I've been asked to make some Easter cards for someone at work and she wants them to have bunnies on them. This is my first one and super cute!
I started with the A5 scallop card and added a bright yellow background which I simply rounded the corners on using a punch, helping it to match the scallop base. I then hand-cut the shape of the rabbits ears but used a circle die to cut the face and glittery nose. The whiskers are made from raffia and the eyes are Card Candi. The pink paper bow is from a Craftwork Cards pad. I then added a simple message peel-off to the top corner.
I am entering this card into the following challenges:-
The Paper Shelter 'animal magic' 24.2
Crafting for all Seasons 'dies/punches' 28.2
Quirky Crafts 'best friends' 2.3
Daring Cardmakers 'inspired by a child's book' (Miffy the rabbit) 27.2
I started with the A5 scallop card and added a bright yellow background which I simply rounded the corners on using a punch, helping it to match the scallop base. I then hand-cut the shape of the rabbits ears but used a circle die to cut the face and glittery nose. The whiskers are made from raffia and the eyes are Card Candi. The pink paper bow is from a Craftwork Cards pad. I then added a simple message peel-off to the top corner.
I am entering this card into the following challenges:-
The Paper Shelter 'animal magic' 24.2
Crafting for all Seasons 'dies/punches' 28.2
Quirky Crafts 'best friends' 2.3
Daring Cardmakers 'inspired by a child's book' (Miffy the rabbit) 27.2
Labels:
Card Candi,
Craftwork Cards,
dies,
Glitter,
paper bows,
Peel-Offs,
Punches,
Raffia
Tuesday, January 27, 2015
you can leave your hat on!
I'm still trying hard with my Christmas Card challenge and here is my second one of this month. It was really quick and simple to make.
I started with a 6x6 white card blank. I took a piece of Dovecraft 6x6 Christmas paper and trimmed it to fit the card base leaving a small white border. I layered it using double sided tape. I then added a chipboard topper that has been in my stash for ages and finished the card with the peel-off message and peel-off stars. Done!
I am entering this card into the following challenges:-
Catch the Bug 'photo inspiration' (the robin with the hat on) 31.1
Crafty Hazlenut 'joy to the world' (there is nothing more joyful than building a snowman in my opinion!) 30.1
Sunday, January 18, 2015
Christmas in January
Last year, I had a plan to make at least 1 Christmas card each month so I didn't have a mad December rush. I think I managed about 3 months before it went pear shaped! Maybe this year will work better!
Here is my January Christmas card-
This card was really simple to make and uses some old stash and some new goodies too. I started with a 6x6 white blank card and added a Dovecraft patterned paper to the bottom half. The paper is from a monochrome set that included papers, ribbons buttons etc. from The Range and was a great deal. The snowflake dies are also new but the mirror card I used to cut them out of has been in my stash for years(no exaggeration!)
Before attaching the die cut snowflakes, I used double sided tape and glitter to add an extra sparkle to the join between the card base and the paper. I attached the snowflakes and then used a fine black pen to draw on the strings. I finished the card with a really simple peel-off greeting.
I am entering this card into the following challenges:-
Crafty Hazlenut's Extra 'xmas'- 31.1
Country View 'use something new'- 31.1
Crafty Cardmakers 'old and new'- 25.1
Love to Create 'snowflakes'- 18.1
Papertake Weekly 'all new'- 20.1
Penny's 'anything goes'- 20.1
Paper Shelter 'punches and/or dies'- 20.1
Creative Inspirations 'anything goes'- 20.1
CRAFT 'Xmas'- 21.1
Creatalicious 'winter'- 14.2
Crafty Catz 'new beginnings'- 22.1
Here is my January Christmas card-
Before attaching the die cut snowflakes, I used double sided tape and glitter to add an extra sparkle to the join between the card base and the paper. I attached the snowflakes and then used a fine black pen to draw on the strings. I finished the card with a really simple peel-off greeting.
I am entering this card into the following challenges:-
Crafty Hazlenut's Extra 'xmas'- 31.1
Country View 'use something new'- 31.1
Crafty Cardmakers 'old and new'- 25.1
Love to Create 'snowflakes'- 18.1
Papertake Weekly 'all new'- 20.1
Penny's 'anything goes'- 20.1
Paper Shelter 'punches and/or dies'- 20.1
Creative Inspirations 'anything goes'- 20.1
CRAFT 'Xmas'- 21.1
Creatalicious 'winter'- 14.2
Crafty Catz 'new beginnings'- 22.1
Labels:
CAS,
dies,
DoCrafts,
Dovecraft,
Glitter,
Papermania,
Peel-Offs,
snowflakes
Sunday, February 2, 2014
Sunny Sunflowers
This is my final card of the weekend and one that I'm really pleased with. It uses some new stash and some new ideas that I've not tried before but now I know it works, I'll definitely be using it again.
This card is made using another new Sheena Douglass embossing folder.
I wanted to create a distressed background but didn't have a core'dinations cardstock in the colour palette I needed- so I made my own!!! I started with a piece of brown A4 card that I painted with yellow emulsion from a tester pot (it even had its own brush so no mess!). I then embossed it using the sunflower embossing folder and then used fine sand paper to sand back the paint to reveal the brown paper underneath. It works really well and I'vegot hundreds of tester pot colours that now have a new use!
I trimmed down my backing paper, tied a brown organza ribbon around the spine and attached it to an 8x8 white base card. I then embossed the same sunflower design onto gold/yellow mirror card and then went over the top of the raised aspects of the design with a brown promarker. I cut them out and used various levels of 3d foam to mount them onto the card.
I finished the card by using the remainder of the painted cardstock to cut a small mat (using a Kanban one as a template) and then attaching it to the card backwards and adding the peel-off message.
I am entering this card into the following challenges:-
Country View Challenges 'paint' 28/2
Totally Gorjuss 'sunny colours' 7/2
Cute Card Thursday 'new' 5/2
A Blog Named Hero 'flowers' 14/2
Daring Cardmakers 'belt & braces' 7/2
Crafty Catz 'anything goes' 6/2
Crafters Cafe 'ribbon' 4/2
This card is made using another new Sheena Douglass embossing folder.
I wanted to create a distressed background but didn't have a core'dinations cardstock in the colour palette I needed- so I made my own!!! I started with a piece of brown A4 card that I painted with yellow emulsion from a tester pot (it even had its own brush so no mess!). I then embossed it using the sunflower embossing folder and then used fine sand paper to sand back the paint to reveal the brown paper underneath. It works really well and I'vegot hundreds of tester pot colours that now have a new use!
I am entering this card into the following challenges:-
Country View Challenges 'paint' 28/2
Totally Gorjuss 'sunny colours' 7/2
Cute Card Thursday 'new' 5/2
A Blog Named Hero 'flowers' 14/2
Daring Cardmakers 'belt & braces' 7/2
Crafty Catz 'anything goes' 6/2
Crafters Cafe 'ribbon' 4/2
Labels:
Dry Embossing,
Flowers,
Mirror Board,
Peel-Offs,
Promarkers,
Ribbon,
Sheena Douglass
Flower Power
I've been busy crafting again this weekend and have managed to make a few cards. Here's the first...
I've used all manner of new things on this card today- some of which are completely new (as in arrived on Thursday from C&C) and some which are new as in had for ages but not used yet!
This card started with the flower design embossing folder which is from the Sheena Douglass range which was a Pick of the Week/4 day deal on C&C last week. I inked one piece of white card using both Picked Raspberry & Peacock Feathers distress ink and then embossed it with the folder. I then sanded back the top of the card to make the flower design stand out as white against the coloured background. I had to join the design as it is an A5 folder so I placed a purple ribbon across the join and attached the 2 pieces to the outside panels of the card. To provide contrast, I wanted the middle panel to be embossed in the opposite way so I embossed it first and then inked it using the same distress ink colours, so that the debossed side was used.
I then coloured the Ebony digi stamp (from The Greeting Farm) using a similar colour palette of pink, turquoise & purple and some gems for her headband. I cut out the digi leaving a small white border and then attached her to the central panel of the card with 3d foam pads. I then added the peel-off message.
To complete the card, I used the same floral embossing folder and three different colours of black core'dinations cardstock to emboss more flowers which I sanded back before cutting out and using as toppers across the card.
This is the first time that I've made a card in this 3 panel style but I really like it and it was quick to put together (although the sanding took ages and made a lot of mess!)
I am entering this card into the following challenges:-
Catch the Bug 'anything goes' 8/2
Polkadoodles 'anything goes/oriental' 9/2
Cards Galore 'bling' 28/2
Graph'It 'anything goes/different colour hair' 9/2
Cute Card Thursday 'something new' 5/2
TGF Farm Fresh Friday 'layers' 7/2
Creative Inspirations 'stamping' 4/2
Digi Choosday 'anything goes/in the pink' 3/2
Challenges 4 Everybody 'anything goes' 28/2
Daring Cardmakers 'belt & braces' 7/2
I've used all manner of new things on this card today- some of which are completely new (as in arrived on Thursday from C&C) and some which are new as in had for ages but not used yet!
This card started with the flower design embossing folder which is from the Sheena Douglass range which was a Pick of the Week/4 day deal on C&C last week. I inked one piece of white card using both Picked Raspberry & Peacock Feathers distress ink and then embossed it with the folder. I then sanded back the top of the card to make the flower design stand out as white against the coloured background. I had to join the design as it is an A5 folder so I placed a purple ribbon across the join and attached the 2 pieces to the outside panels of the card. To provide contrast, I wanted the middle panel to be embossed in the opposite way so I embossed it first and then inked it using the same distress ink colours, so that the debossed side was used.
I then coloured the Ebony digi stamp (from The Greeting Farm) using a similar colour palette of pink, turquoise & purple and some gems for her headband. I cut out the digi leaving a small white border and then attached her to the central panel of the card with 3d foam pads. I then added the peel-off message.
To complete the card, I used the same floral embossing folder and three different colours of black core'dinations cardstock to emboss more flowers which I sanded back before cutting out and using as toppers across the card.
This is the first time that I've made a card in this 3 panel style but I really like it and it was quick to put together (although the sanding took ages and made a lot of mess!)
I am entering this card into the following challenges:-
Catch the Bug 'anything goes' 8/2
Polkadoodles 'anything goes/oriental' 9/2
Cards Galore 'bling' 28/2
Graph'It 'anything goes/different colour hair' 9/2
Cute Card Thursday 'something new' 5/2
TGF Farm Fresh Friday 'layers' 7/2
Creative Inspirations 'stamping' 4/2
Digi Choosday 'anything goes/in the pink' 3/2
Challenges 4 Everybody 'anything goes' 28/2
Daring Cardmakers 'belt & braces' 7/2
Labels:
Colouring,
core'dinations,
Digi Stamps,
Distress Inks,
Distressing,
Dry Embossing,
Flowers,
Peel-Offs,
Ribbon,
Shaped Card,
Sheena Douglass,
The Greeting Farm
Sunday, December 22, 2013
It's nearly here...
The Christmas holidays have finally arrived (YAY!) and I've already made myself a new years resolution! The Christmas crafting goodies will not be going away this year as I plan to make Christmas cards all year round (trying to make 14 cards in one night after a long day at work including a nativity play was not a great idea!)
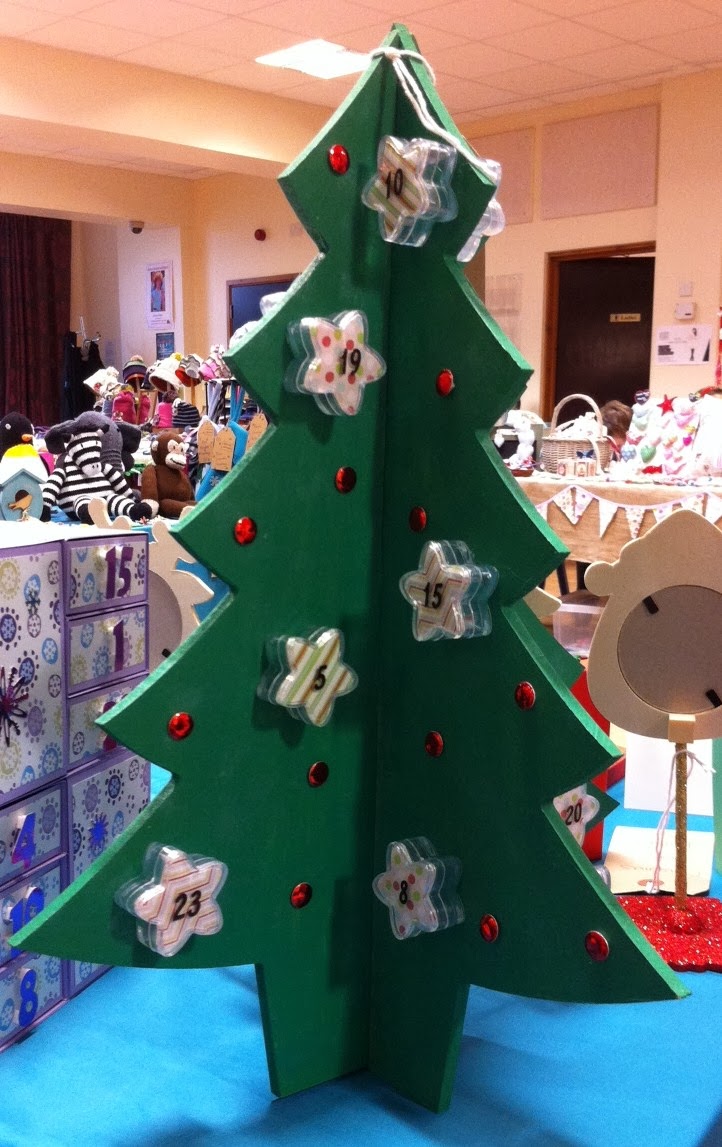
I haven't been able to post as much as I would like during November & December but I hope to make up for it now. Today's post is of 3 different advent calendars I've made- 2 using a 'House of Zandra' template I modified and 1 using a fab-u-lous wooden tree from the MDF man!
For the first two, I used the House of Zandra 'crafty drawers' template but made 2 of each piece so that rather than having 12 drawers, I had 24 (enough for a proper advent calendar). For the first one, I made half of the pieces in red card & half in green so that I could mix & match when I put the drawers together. The second one was made completely in lilac. It was a really easy template to use and rather than cutting all the pieces by hand, I measured each of the template pieces and then used my paper trimmer (I may spend some time making up all of the shapes into my Cricut craft room to make it even quicker next time). I put all of the pieces together with super sticky tape arranging the drawers into a red, green, red patten for the first one. I then used some 12x12 paper to decorate each panel before adding the mirror card numbers (cut using my cricut) & the decorations (Dawn Bibby stocking peel-offs using the waste to fill in and add the colour, peel-off snowflakes & mirror card snowflakes cut using the cricut).
The tree came about after I spotted the small star shaped pots in my local Carole's Crafts shop- they were having a 50% off everything sale so the pack of 24 pots was only £2.50 (bargain!). I have had them since the start of the year and wanted to make some kind of advent calendar with them. I was originally planning to mount them onto a circular shape to make a wreath but when I saw the 3d wooden tree from The MDF Man at the Lincoln Sincerely Yours show I knew it was perfect. I had taken the pots with me hoping to find a wooden circle but this was even better- the mdf tree was just £4 too!
I painted the pieces of the tree with a flat green paint and then sponged it with a metallic green paint over the top to add texture. I then attached the pots to the tree with a hot glue gun, putting 3 on each side (I did this with the tree put together to make sure that I didn't get any pots too close together). I then used the lids of the pots as a template to draw the star shape onto 3 different patterned papers to insert into the lids so that the goodies inside can't be seen. I used peel-off numbers in black to number each pot. I then finished the tree by simply adding some red mirror card candi as decorations.
I am entering the advent calendars into a new challenge blog I have just found:-
Crafting for all Seasons 'anything but a card'
Labels:
Card Candi,
Christmas,
Cricut,
Die Cutting,
House of Zandra,
Mirror Board,
Peel-Offs
Sunday, October 13, 2013
Blue Christmas
Last Christmas, I got a bargain paper pack from Dovecraft called 'Merry & Bright'- all of the papers are pink & turquoise with Christmas prints- I love them! This is the first card I've really made using them though...
I started by colouring the 'Dressy Ebony' digi stamp from The Greeting Farm which is one of the Twilight themed images I got last week (she is very much Alice). I coloured her using a range of spectrum noirs (skin & hair) and Promarkers (clothes). I added glitter to her shoes, dress & hair flower. I carefully trimmed the image leaving a small white border. I used a Kanban mat as a template to cut out the pink snowflake paper to mat the character onto and then mounted that onto a snowflake embossed turquoise mirror card (new from Creata). I chose a piece of 'Merry & Bright' paper from the 8x8 pack and trimmed it slightly to mat onto the 8x8 square card. I then used 3 chipboard trees (that have been in my stash for years) to pick out the design of the backing paper.
I am much happier with the way my hair turned out on this image too
I am entering this card into the following challenges:-
Crafting Muskateers 'Christmas'
The Greeting Farm 'Christmas'
Songbird 'Blue Hawaii'
I started by colouring the 'Dressy Ebony' digi stamp from The Greeting Farm which is one of the Twilight themed images I got last week (she is very much Alice). I coloured her using a range of spectrum noirs (skin & hair) and Promarkers (clothes). I added glitter to her shoes, dress & hair flower. I carefully trimmed the image leaving a small white border. I used a Kanban mat as a template to cut out the pink snowflake paper to mat the character onto and then mounted that onto a snowflake embossed turquoise mirror card (new from Creata). I chose a piece of 'Merry & Bright' paper from the 8x8 pack and trimmed it slightly to mat onto the 8x8 square card. I then used 3 chipboard trees (that have been in my stash for years) to pick out the design of the backing paper.
I am much happier with the way my hair turned out on this image too
I am entering this card into the following challenges:-
Crafting Muskateers 'Christmas'
The Greeting Farm 'Christmas'
Songbird 'Blue Hawaii'
Labels:
Chipboard,
Christmas,
Colouring,
Digi Stamps,
Dovecraft,
Dry Embossing,
Peel-Offs,
TGF
New Grandparents
A friend of mine at work, has just become a grandma/nan for the first time so I've made a card for her this weekend that we can all sign for her and her husband. Her daughter had a little girl, so I've gone a little pink mad!
I started with an 8x8 white square card as I wanted it to be large enough for 15 people to sign. I then chose the topper (from a Lili of the Valley pre-coloured topper set) and the word/message topper (from Kanban). As the word topper had the scalloped edge, I decided to make each corner of the other aspects all different so I used a scallop corner on the other topper before mounting it onto silver mirror card to match the Kanban topper. I then chose 2 pink patterned papers from the Papermania pastel spots & stripes 6x6 paper pack and again, gave them 2 slightly different size of rounded corner. I layered the papers on to the base card, and then added the toppers using double sided tape for the word one and foam pads for the image. I then chose 2 heart buttons for the white spaces and added the peel-off message.
I am entering this card into the following challenges:-
Love to Create 'pink'
Papertake Weekly '2 by 2' (2 toppers, 2 papers, 2 buttons)
Stampin' for the Weekend 'anything goes'
Catch the Bug 'think pink'
Challenges 4 Everybody 'anything goes'
Totally Gorjuss 'wings & things' (the word topper talks about angels- hope this is enough to fit the theme)
I started with an 8x8 white square card as I wanted it to be large enough for 15 people to sign. I then chose the topper (from a Lili of the Valley pre-coloured topper set) and the word/message topper (from Kanban). As the word topper had the scalloped edge, I decided to make each corner of the other aspects all different so I used a scallop corner on the other topper before mounting it onto silver mirror card to match the Kanban topper. I then chose 2 pink patterned papers from the Papermania pastel spots & stripes 6x6 paper pack and again, gave them 2 slightly different size of rounded corner. I layered the papers on to the base card, and then added the toppers using double sided tape for the word one and foam pads for the image. I then chose 2 heart buttons for the white spaces and added the peel-off message.
I am entering this card into the following challenges:-
Love to Create 'pink'
Papertake Weekly '2 by 2' (2 toppers, 2 papers, 2 buttons)
Stampin' for the Weekend 'anything goes'
Catch the Bug 'think pink'
Challenges 4 Everybody 'anything goes'
Totally Gorjuss 'wings & things' (the word topper talks about angels- hope this is enough to fit the theme)
Labels:
Baby,
Buttons,
Kanban,
Lili of the Valley,
Papermania,
Pastel,
Peel-Offs,
Toppers
Wednesday, June 12, 2013
wedding book
As I mentioned in a previous post, I recently got 2 new templates from the 'House of Zandra' stand at the Sincerely Yours show in Lincoln. This is the first thing I've made using the book card template and I can see that there will be lots more to come.
From the front it almost looks like a normal card-
But actually it's a 3d book card-
When you open up the front, there is a deep recess inside creating various opportunities for creativity!
Here's a close up view of the insides-
I started with 2 pieces of black A4 card, using the templates to cut the shapes required. I made up the box element using super sticky tape to attach it. I then used my ScorPal scoring board to emboss the detail on the book cover and then used some gilding wax to add extra detail. I cut some 'gorjuss' backing paper to fit inside the box and to cover the sides. I then added the 3 black paper flowers with card candi centres. I stamped the bunting using white ink onto black card and attached across the front of the box on some cream coloured string. I then decorated the front of the book with the 2 cream hearts (Kanban) with peel-off letters. This is quite a simple box compared to what can be achieved but for my first go, I'm really happy with it.
I am entering this card into the following challenges:-
Crafting Musketeers 'use a stamped image'
Cute Card Thursday 'ebony & ivory'
Catch the Bug 'going to the chapel'
Challenges 4 Everybody 'anything goes'
Labels:
Flowers,
Gilding Wax,
House of Zandra,
Kanban,
Little Claire stamps,
Peel-Offs,
Stamping,
Wedding
Sunday, June 2, 2013
Ron @ The Burrow
Here's another of the cards I've made using the fabulous Har Repotter digi stamps from the Bugaboo website. Today, it's Ron who is one of my favourite characters in the books and films (Rupert Grint is great!).
Both Ron and The Burrow are digi images from Bugaboo, so I started by colouring them with my spectrum noirs & promarkers. I used distress inks and a handmade paper mask to create the hill for the Burrow to sit on. I raised the toppers with 3d foam and then added some peel-off stars around the house.
I am entering this card into the following challenges:-
Challenges 4 Everybody 'anything goes'
MayzyArt 'anything goes'
Love to Create 'bookmark, book or reading'
Creative Inspirations 'anything goes'
Cute Card Thursday 'too cool for school'
Crafty Catz 'storybook or nursery rhyme inspired'
Catch the Bug 'anything goes'
Both Ron and The Burrow are digi images from Bugaboo, so I started by colouring them with my spectrum noirs & promarkers. I used distress inks and a handmade paper mask to create the hill for the Burrow to sit on. I raised the toppers with 3d foam and then added some peel-off stars around the house.
I am entering this card into the following challenges:-
Challenges 4 Everybody 'anything goes'
MayzyArt 'anything goes'
Love to Create 'bookmark, book or reading'
Creative Inspirations 'anything goes'
Cute Card Thursday 'too cool for school'
Crafty Catz 'storybook or nursery rhyme inspired'
Catch the Bug 'anything goes'
Labels:
Bugaboo,
Colouring,
Digi Stamps,
Distress Inks,
Harry Potter,
Peel-Offs
Monday, May 27, 2013
Shoe Tree
I recently saw a really fab idea on Pinterest that was aimed at Wedding receptions. It was a simple tree outline that guests would put their fingerprint on instead of the traditional guest book. I thought it was a really cool idea but I wanted to use it for my cards. The idea included a download of the tree design in A4 size so I printed 2-to-a-page so that they would fit on an A5 card. I didn't just make a normal tree though...
(apologies for the not so great photo- not sure what happened there!)
I decided to make a shoe & bag tree which, if we're honest, most of us girls would love to have in our back gardens- if mine would grow Converse then I'd be in heaven! As I said, I had printed the tree outline to an A5 size but I trimmed it just smaller than this so that I could mat and layer it with some FAB pink glitter paper and a slightly dirty green base card. I used my distress inks to colour the sky (tumbled glass) and grass (mown lawn- I think that's the right name) and then used various shades of brown promarkers to colour the tree. I then used peel-offs, some straight onto the card and some paper pieced, to decorate the tree. A fun card for a fun lady!
I am entering this card into the following challenges:-
Labels:
CAS,
Colouring,
Digi Stamps,
Distress Inks,
Glitter,
Peel-Offs
Tuesday, April 30, 2013
pac-man
I always pride myself on my ability to make cards for the awkward groups- teenagers & men! Here's one of my newest cards that would be suitable for either of those groups of people- kids or the big ones!
This card fully utilises 2 papers from the DCWV 'generation tech' stack- the first I have used for the background, and the second has provided the 3 toppers on the left of the card. I have simply cut the backing paper to size and attached it to an 8x8 card blank and then attached the 3 toppers pyramid style. The sentiment topper is a simple white circle with a slightly larger silver mirror mat. I inked the topper with 'black soot' distress ink and then added the peel-off message.
I am entering this card into the following challenges:-
Paper Shelter 'for the boys'
This card fully utilises 2 papers from the DCWV 'generation tech' stack- the first I have used for the background, and the second has provided the 3 toppers on the left of the card. I have simply cut the backing paper to size and attached it to an 8x8 card blank and then attached the 3 toppers pyramid style. The sentiment topper is a simple white circle with a slightly larger silver mirror mat. I inked the topper with 'black soot' distress ink and then added the peel-off message.
I am entering this card into the following challenges:-
Paper Shelter 'for the boys'
Labels:
DCWV,
Distress Inks,
Kanban,
Peel-Offs
Sunday, April 28, 2013
purple bird
I've been busy trying to make as many cards as possible ready for a craft fair next weekend. I'm trying to use some toppers that haven't yet seen the light of day so I've got as wide a range of cards as possible. This card is made using a topper from a Kanban blockbuster from C&C (suppose we won't be getting any more of those!). Anyways... (apologies for the dodgy photo)
I started by choosing the bird topper which uses lots of vintage colours but with a purple focus & silver foiling. I chose a lilac A5 card base and topped it with some purplish grey patterned paper and then the topper. I added a grosgrain lilac ribbon, purple gem swirl & 'happy birthday' peel-off sentiment.
I am entering this card into the following challenges:-
Love to Create 'bingo' (sentiment, ribbon & bling)
Creative Inspirations 'ribbons & pearls' (pearl aspect is on topper but difficult to see in pic)
Penny's Papercrafting Challenges 'anything goes'
Polka Doodles 'birthday & bling'
Crafty Catz 'purple'
Totally Gorjuss 'ribbons & pearls' (pearl aspect is on topper but difficult to see in pic)
Challenges 4 Everybody 'anything goes'
I started by choosing the bird topper which uses lots of vintage colours but with a purple focus & silver foiling. I chose a lilac A5 card base and topped it with some purplish grey patterned paper and then the topper. I added a grosgrain lilac ribbon, purple gem swirl & 'happy birthday' peel-off sentiment.
I am entering this card into the following challenges:-
Love to Create 'bingo' (sentiment, ribbon & bling)
Creative Inspirations 'ribbons & pearls' (pearl aspect is on topper but difficult to see in pic)
Penny's Papercrafting Challenges 'anything goes'
Polka Doodles 'birthday & bling'
Crafty Catz 'purple'
Totally Gorjuss 'ribbons & pearls' (pearl aspect is on topper but difficult to see in pic)
Challenges 4 Everybody 'anything goes'
Tuesday, April 23, 2013
New Home card
I had an exciting delivery from C&C this week as I treated myself to a early/late birthday present at the start of their birthday weekend- I ordered it before my birthday but it arrived after! I got hold of the Inkadinkado stamping system that allows you to stamp in circles, ovals, squares & rectangles perfectly. It looked fab on screen and I've barely played with it yet but I know there will be lots of cards made using it appearing on my blog over the next few months. The corners of the card were stamped using the system and a simple heart stamp.
I started with my favourite 8x8 white card blank which I stamped using a heart stamp and the circle wheel from the Inkadinkado set. As I overlapped the hearts, they created the almost floral image. I then cut a piece of heart patterned Creata cardstock (that has a hand-drawn look) to a smaller square and mounted this onto the card. The topper is a pre-coloured die-cut from Lily of the Valley. I inked the edges of the topper with the same ink that I used for the stamped corners- 'Worn Lipstick' distress ink. I then got a Kanban die-cut heart and inked it using the same ink and then added the peel-off sentiment.
I am entering this card into the following challenges:-
Labels:
Creata,
Distress Inks,
Inkadinkado,
Kanban,
Lili of the Valley,
Peel-Offs,
Stamping,
Toppers
Sunday, April 21, 2013
love the dj...
I was lucky enough to win some Saturated Canary images a while ago in a blog hop contest and I had to get the 'dj luv' design. Here's the first card that I've made using it-
I printed the image so that 2 fitted onto an A4 sheet of thin card and then used my trimmer to cut the image with just a small border. I coloured the digi-stamp using mainly Promarkers but also Spectrum Noirs for the skin colours. I mounted the finished image onto some silver mirror card leaving just a small border. I then got an 8x8 square card and layered some DCWV 'generation tech' paper onto it. I mounted the topper onto the card and then used a template to cut the small star (for the message) from another paper from the DCWV stack.
I am entering this card into the following challenges:-
Saturated Canary 'anything goes'
Songbird 'stars'
Love to Create 'for the guys'
Crafty Catz 'for the boys'
I printed the image so that 2 fitted onto an A4 sheet of thin card and then used my trimmer to cut the image with just a small border. I coloured the digi-stamp using mainly Promarkers but also Spectrum Noirs for the skin colours. I mounted the finished image onto some silver mirror card leaving just a small border. I then got an 8x8 square card and layered some DCWV 'generation tech' paper onto it. I mounted the topper onto the card and then used a template to cut the small star (for the message) from another paper from the DCWV stack.
I am entering this card into the following challenges:-
Saturated Canary 'anything goes'
Songbird 'stars'
Love to Create 'for the guys'
Crafty Catz 'for the boys'
Labels:
CAS,
Colouring,
DCWV,
Digi Stamps,
Peel-Offs,
Saturated Canary
Tuesday, April 9, 2013
The Night Circus
I recently re-read the book 'The Night Circus' for the second time. I really love it and it inspires me in many different ways. For anyone that has not read it then I recommend it wholeheartedly and after you've read it, you'll see where my card came from! I have also provided this card to the Basic Grey Challenge Blog as my second GDT card so why not go and join in with the Clean & Simple challenge there this time?
As the CAS challenge demands, this was a very simple card to make. I started with a 6x6 white card blank and a Kanban circle mat. I used low tack tape to stick the circle into the middle of the card and then used my black promarker (with fine tip) and a ruler to draw the lines all round. When I removed the circle, I had the perfect blank space. I then used an EK Success star corner punch and my favourite Basic Grey 'eerie' 6x6 paper to punch a range of sizes of stars which I attached to the card with a quickie glue pen. I then added a few silver peel-off stars and the red 'Happy Birthday' message.
I am entering this card into the following challenges-
Monday, April 1, 2013
Dolly Mixtures
The Craftwork Cards stand is always one of my favourites at the NEC as there is always new Card Candi to be had! This year I ended up buying some lovely floral patterned and spotty ones in various colour combos- I'm sure they'll be appearing on some cards on here soon enough. This year I also picked up a bargain set of their new 'Dolly Mixtures' range. It included a 6x6 paper & die-cut pack, dis-cut tickets, 10 lady toppers and a pack of fancy edge 6x6 cards- all for £10. I chose the 'Coleen' papers but the 'Amy' toppers in my set. I've used the topper and elements from the 6x6 pad to make this card.
I started with the topper, which I coloured using a mix of Spectrum Noirs & Promarkers. The dress is paper pieced using a paper from the 6x6 pad and embellished with a matching colour of Card Candi from my stash. I also used Glossy Accents to add shine to the martini glass. When the glossy accents was dry, I mounted the topper onto some silver mirror card and then onto a spotty paper from the 6x6 paper pad. I mounted this onto the bottom corner of the card base. The paper ribbons and hearts both came from the 6x6 pad, as did the flags that I have used to create the bunting at the top of the card. I attached the flags with 3d foam and then used my black promarker to draw on the string. I then used black peel-off letters to spell out 'Happy Birthday'.
I am entering this card into the following challenges:-
Labels:
Card Candi,
Colouring,
Craftwork Cards,
Glossy Accents,
Paper Piecing,
Peel-Offs,
Toppers
Sunday, February 24, 2013
Bling 18th Birthday card
I like to make number cards for the BIG birthdays as lots of people ask me about them at craft fairs. I always tell people that I have numbers that can go on any of my cards but people don't always seem to want the hassle. This is a card that I made that could be used for any female birthday but I've made it into a specific 18th birthday card.
I am entering this card into the Songbird 'age cards' challenge, Paper Shelter 'Celebrations' challenge, Creative Inspirations 'Anything Goes' challenge and Papertake Weekly 'buttons &/or bling' challenge (I've chosen bling obviously!). It was incredibly quick & easy to make.
I started with an A4 white card that I folded in half. The backing paper is from an old Kanban kit and was originally A4 so I just trimmed it down to size leaving a small white border. The heart die-cut is also from a Kanban kit and I attached this to the card using 3d foam, leaving a slight overhang (check that it will fit in your envelopr first though!). I used a number peel-off as a stencil for the '18' on the heart and then covered my pencil lines with gems that I coloured using my promarkers. I finished the card with the peel-off message that I also promarkered to match the gem colour.
I am entering this card into the Songbird 'age cards' challenge, Paper Shelter 'Celebrations' challenge, Creative Inspirations 'Anything Goes' challenge and Papertake Weekly 'buttons &/or bling' challenge (I've chosen bling obviously!). It was incredibly quick & easy to make.
I started with an A4 white card that I folded in half. The backing paper is from an old Kanban kit and was originally A4 so I just trimmed it down to size leaving a small white border. The heart die-cut is also from a Kanban kit and I attached this to the card using 3d foam, leaving a slight overhang (check that it will fit in your envelopr first though!). I used a number peel-off as a stencil for the '18' on the heart and then covered my pencil lines with gems that I coloured using my promarkers. I finished the card with the peel-off message that I also promarkered to match the gem colour.
Monday, February 4, 2013
Kanban 'So Macho'- Top of the Pops
I've been busy again using some of my lovely Kanban toppers from the 'So Macho' kit. I'm entering this card into the Creative Inspirations 'One for the Guys' challenge. I enjoy making mens cards so this challenge was perfect for me.
I started with an 8x8 scalloped edge card blank. I folded the front piece in half back on itself to create the card shape. I then cut the 2 backing paper pieces from one 8x8 sheet from my Making Memories 'Just Chillin' paper pad. I attached one piece onto the front flap and the other onto the exposed back part of the card. The two toppers were from the Kanban 'Top of the Pops' topper sheet from the 'So Macho' kit and I put these onto the card with 3d foam pads. I finally added the black star peel-offs which are from a Woodware 'Rock' themed peel-off sheet.
Labels:
Kanban,
Making Memories,
Peel-Offs,
Toppers
Subscribe to:
Posts (Atom)