Sunday, May 10, 2015

Red Dragon

I've been busy colouring this weekend so just the 1 quick card! I did make my own designer brads though and it's my first make using a new kit from a company that I've never used before. Lelli-Bot crafts was on Create & Craft a few weeks ago and as I hadn't heard of them, I had to watch. They had a whole range of kits that are a little bit different. I ordered 2- this Fantasy Dragon one and Gothic Lace, which is monochrome with skulls and lace.

With the popularity of programmes like Game of Thrones, I thought this kit would be a good investment for some of the craft shows I'll hopefully be selling at during the summer! I haven't personally watched Game of Thrones but I have read the books. I tried to watch it but the 'wights' freaked me out too much in the first episode that I didn't watch any more. They weren't that creepy in my own head!


This card was super quick to make and all of the toppers and papers came from the Fantasy Dragon kit. I started with an 8x8 card blank, rounding the corners for a bit of extra detail. I then used a pearlescent grey paper for the first layer on the card, followed by layers of the patterned papers and the square topper. The message also came from the kit.

To complete the card, I added 3 large red brads to the bottom right hand side of the card. To tie them in to the theme of the card, I stamped and black embossed each one with a small dragon stamp from a Creative Expressions set that I've had forever. I used 2 different sized stamps across the 3 brads. They are not as detailed as I would like, but I'm still happy with them.


I am entering this card into the following challenges:-
Crafting Musketeers 'use a die cut' 28.5
Papertake Weekly 'anything goes' 12.5
Clear It Out 'anything goes' 12.5
Penny's Paper-Crafty Challenges 'anything goes' 12.5
Creative Inspirations 'birthday wishes' 12.5
Polkadoodles 'things with wings' 22.5

Monday, May 4, 2015

Owl Folk

DoCrafts are always bringing out products that I love and their newest range 'Owl Folk' is no exception. Create & Craft had 2 kits last week that together comprised of the entire Owl Folk range. I did a bit of a price comparison and it seemed like a good deal so I got both sets. They arrived on Saturday so the long bank holiday weekend meant that I got to play with them today- I wish every weekend had 3 days! I'd get lots more crafting done- possibly!

Here is my first Owl Folk card-


I started by layering up the decoupage tag and putting together the pocket, both from the Ultimate Die-Cut & Paper pack. I added a short piece of ribbon to the end of the tag so that it can be removed from the pocket if wished. I then chose a backing paper that incorporated the orange colour of the tag and pocket. Once I had chosen my backing paper, I felt that the tag didn't stand out enough so I mounted it onto some navy blue paper from the 6x6 paper pack. I threaded the owl charm onto a length of the same ribbon that I used on the tag and attached it to the spine of my backing paper, securing the ribbon on the back of the paper with double sided tape.

I then folded a sheet of A4 white card to make an A5 card blank and mounted all of my items onto it using tape.

I am entering this card into the following challenges:-
Crafty Boots 'things with wings' 10.5
Penny's paper-crafty challenges 'not a square' 5.5
Creative Inspirations 'cute critters' 5.5
CRAFT 'use a charm/metal' 6.5
Crafty Calendar 'things with wings' 2.6
Crafty Catz 'colour challenge' 7.5
Crafts Galore 'anything goes' 30.5
Catch the Bug 'anything goes' 9.5
Craft Your Passion 'anything goes' 10.5

Sunday, April 19, 2015

Super Stamping

Another busy weekend for me but a little bit of crafting squeezed in as usual! Tried to get a few cards done as I might not get any crafting done next weekend- the ladies football team I play for has our first ever match next Sunday so my usually calm crafty day will instead be a sweaty, active day! We have been promised a post-match team talk in the pub though, so I think I'll survive!

Anyway, here's one of my makes from this weekend...


I am creating more simple, 1 layer, cards recently and this is another example of that style. I love CAS cards and I think this definitely fits into that type of crafting.

I started with a 6x6 white card blank, masking a panel across the middle with a piece of scrap paper. I then used 2 flowers and a leaf stamp that have been in my stash for years (they are very small purple rubber stamps, that I think were called SeeD's by Papermania/Anita's- they are similar to the sort of stamps now sold by Majestix- but not clear) and randomly stamped using just 1 pink and 1 green ink pad. I used 2nd generation stamping to achieve the different shades of colour.

I wanted to add a sentiment to the central panel of the card but was a bit too scared to stamp directly onto my cards base! Instead, I cut a piece of raspberry pink card to slightly smaller than the white strip and then stamped and embossed my message onto that instead. I finished the card by adding liquid pearls and stickles glitter glue into the centre of the flowers (doesn't show up very well on the picture unfortunately!).

I am entering this card into the following challenges:-
Crafty Calendar 'add a sentiment' 1.5
Craft Your Passion 'anything goes' 19.4
Quirky Crafts 'flowers' 26.4
Papertake Weekly 'words, words, words' 21.4
Penny's Paper-Crafty Challenges 'for the girls' 21.4
Crafting for All Seasons 'milestone celebrations' 27.4
In the Pink 'make it sparkle' 29.4
Creatalicious 'embossing' 14.5
Crafty Catz 'girl thing' 23.4

Tuesday, April 14, 2015

Caravan Club

It's been a really nice few days weather wise here so I've been inspired to make a summery card.


I made this caravan shaped card using a template printed from 'Garden Sheds' cd-rom. I printed the caravan image and then used it to cut out the shape onto a folded piece of A4 card. To make sure it stands up, I added the small square at the front of the caravan as a stopper. I then used various patterned papers, mirror card & flower embellishments to decorate the caravan and to create the shapes needed for the details.

I am entering this card into the following challenges:-
Crafter's Cafe 'shaped card' 15.4 (2am)
Crafty Catz '2+ patterned papers' 16.4
Polkadoodles 'pink & pretty' 24.4

Sunday, April 12, 2015

Fly Past

When I went to the NEC at the end of March, I got some beautiful stamp sets from Hobby Art. I ended up with 6 different sets as I couldn't make a decision on just 3 (they were £10 each, 2 sets for £18 or 3 sets for £25- so they HAD to be bought in multiples of 3!). I did buy with a plan in mind as I am going to a local steam rally to sell some cards later in the year so I bought farming themed sets that I could use to make cards along those lines. I also got a set that features old aeroplanes, one of which normally does a fly past at the event. I have used stamps from lots of different sets to make this card.


I started by creating the green and blue circle background of my card which I did using a Clarity stencil, Gelli Plate and Distress Inks (mowed lawn, tumbled glass). I placed the circle aperture Clarity stencil onto my Gelli Plate and used a brayer to roughly apply the green distress ink to the bottom half and the blue distress ink to the top. I tried to make it random rather than a straight line. I used a scrap of paper (screwed up) to remove some of the blue ink, hoping to create a cloud effect. I then removed the stencil and printed the ink onto my card. I was really pleased with how it had turned out- I luckily managed to create something that looked a bit like a hill which was good!

I then used the stencil again and the same colour of distress inks just to ink the edge of each circle aperture to create a little more definition as it was rather pale. It was then time to stamp. I was a bit scared about messing it up by getting the perspective wrong so didn't add too much stamping in case I messed it up!

I started by stamping the plane silhouettes (from Flypast stamp set) into 3 of the sky panels. I then used stamps from 'In the Country', 'Farmhouse Scene-it' & 'Old Barn' on the green 'hill' panels. All of the stamps were inked with Versafine black ink which shows the detail perfectly. I then used some more distress inks (leftovers on my blending mat) to colour up the house and define the hills a little more.

I simply mounted my artwork onto a black, then green, mat and attached it to an 8x8 card base. Took longer than some of my usual cards, but I really love it and I'm glad that I was brave enough to give it a go!

I am entering this card into the following challenges:-
Crafting for All Seasons 'animal magic' 13.4
Crafting Musketeers 'man's world' 28.4
Craft Your Passion 'anything goes' 12.4
Papertake Weekly 'anything goes' 14.4
Clear it Out 'anything goes' 14.4
Crafty Cardmakers 'wings' 19.4
Penny's Papercrafty Challenges 'anything goes' 14.4
Creative Inspirations 'A trio of... planes' 14.4

Sunday, April 5, 2015

Badges galore

Last night, I was having a look around Pinterest (like you do) and found the most fabulous idea for using badges. You can find the original idea here.

I loved it because every time I go to a concert (which is usually at least 3-5 times a year), I tend to buy a t-shirt and a badge pack. This means that I have a stupid amount of badges! When having a clear out a few years ago I also found an original Take That badge from the early 1990's and some Rainbow badges (brilliant kids tv programme) from the late 1980's. I know that I'd never throw them away but it also seems a bit daft that they just sit on a shelf gathering dust. Today I've used an old canvas and some of my badge collection to create this fabulous artwork!


It took a while to make and I'm not convinced that I've stuck the badges securely enough but time will tell! I'll definitely be making another as I have lots more badges to use.

I started with an old, roughly 10" x 10", canvas. It was a bit dirty so I decided to cut a piece of white cardstock to create my design onto and then mount that onto the canvas. I used my Cricut to cut an 8" x 8" heart as a stencil and very lightly traced the shape onto the white card. I then laid out a selection of badges (trying to be as random as possible) onto the shape of the heart to make sure they would fit well. I then carefully removed each badge one at a time and stuck it to the card using a double (sometimes triple) layer of foam pads. Once all the badges were attached, I coated the canvas with a layer of pva glue and then stuck the card to it.

I love it because it uses 2 'old' things and I can now display my badges rather than them being hidden on a shelf!

I am entering this project into the following challenges:-
Clear it out 'use 2 things I'm hoarding' (old canvas & old badges) 7.4
The Pink Elephant 'anything goes' 6.4
Craft Your Passion 'anything goes' 5.4
Penny's Paper-Crafty Challenges 'anything goes' 7.4
Creative Inspirations 'anything goes' 7.4
Crafty Catz 'anything goes' 9.4
Catch the Bug 'anything goes' 11.4

Sunday, March 29, 2015

March Showers, Spring Flowers

Today has been a really miserable day weather wise- began to wonder if the living room windows would stand up to the wind and rain! Good excuse to stay in the house and craft anyway...

Here is today's make:-


Another quick & simple card from me today (my favourite kind) and it is similar to a card I made ages ago but the main image is so detailed that I don't like to add too much too it.

I started by printing the image from my Walk in the Countryside cd-rom and decoupaging the flowers. I mounted it onto a piece of dusky pink card and then mounted that onto a 6x6 scalloped edge card blank. I added a pink organza bow to the spine of the card and a little bit of Stickles glitter glue to the centre of the flowers. Done!

I am entering this card into the following challenges:-
Crafting for All Seasons 'pastel hues' 30.3
In the Pink 'lots of layers' (decoupage) 1.4
Crafty Cardmakers 'spring' 5.4
Craft your Passion 'anything goes' 29.3
Digi Choosday 'lots of layers' (decoupage) 7.4
Paper Shelter 'blooming' 31.3
That Craft Place 'Easter/Spring' 11.4

Saturday, March 21, 2015

The Bunny's Bum

I posted a card a couple of weeks ago that I made for someone at work for Easter and here is the second one. She wanted cards with rabbits on them but apart from that, I was free to play!


It's another CAS card that was quick and easy to make. I started with an A5 scalloped edge card blank which I layered with some green paper, embossed with a leaf design using my Grand Callibur. I then used a circle die to cut the black circle for the rabbit hole and a slightly smaller white one for the bunny's bum! I hand cut the feet, using white and beige paper and then added a white pom-pom for the tail. I added the ribbon around the green paper before attaching it all to the base card. The finishing touch was the peel-off message.

I am entering this card into the following challenges:-
Creatalicious 'anything goes' 15.4
The Pink Elephant 'green' 23.3
Crafty Boots 'spring' 29.3
Craft Your Passion 'anything goes' 22.3
Papertake Weekly 'happy anything' 24.3
Clear it Out 'Easter & pastel' 24.3
Creative Card Crew 'Easter critters' 29.3
Penny's Paper-Crafty Challenges ' favourite embellishments'- ribbon 24.2
Crafters Cafe 'spring-my season' 25.3
The Paper Shelter 'spring' 24.3
Cute Card Thursday 'spring fever' 25.3
Crafty Catz 'no designer paper' 26.3
Catch the Bug 'bingo' (Easter & Die-Cut & my choice- ribbon) 28.3

Monday, March 9, 2015

You should read this book!

A few weeks ago, I made a Dr. Seuss inspired canvas for my school library. This week, I've been making a pin board that will also go in the library and be somewhere for the children to recommend books that they've enjoyed to everyone else. It took ages as the Cricut was playing up a bit but I'm pleased with the final result- now it's done!


I started with a £2 cork pin board from QD which I painted bright yellow using the remains of an emulsion tester pot. All of the letters and images that I have used are from the Cricut Design Space subscription and I made them using the print and cut feature so that I didn't have to layer up lots of different pieces of card. I simply attached the letters and the images around the board with pva glue and then used some DoCrafts Gorjuss baker's twine to make the hanging string.

I am entering this project into the following challenges:-
Crafty Catz 'song title to match image' 12.3 (Paperback Writer by the Beatles)
Crafty Boots 'not a card' 15.3
Clear it out 'anything goes' 10.3
Papertake Weekly 'anything goes' 10.3
Catch the Bug 'anything goes' 14.3

Sunday, March 8, 2015

Princess words

I've been busy starting work on a crafting project for school, so just 1 quick card this weekend.

This is another card made using the 'word collage' images on the Cricut Explore. It's a set of designs that I hadn't used and then fell completely in love with!


I started with the 6x6 base card and a sheet of pink star print backing paper also in 6x6. I used the Cricut to draw the princess lettering in gold ink and then trimmed the design down to fit onto the card. I added a small brush of gold metallic acrylic paint around the edges of the card and to highlight some aspects of the design such as the crown. I then used a pale pink ranger alcohol ink to colour a silver key charm which I then tied into a large gold bow down the spine of the card. To finish it, I added a double layered flower secured with a gold glittery brad.

I am entering this card into the following challenges:-
The Pink Elephant 'girly girl' 9.3
Craft your Passion 'anything goes' 8.3
Quirky Crafts 'pretty in pink' 14.3
Penny's Paper-crafty Challenges 'female cards' 10.3
Crafting for all Seasons 'girly girls' 16.3
Crafter's Cafe 'charms' 11.3
Creative Inspirations 'something old' 10.3 (everything on this card is things that I've had in my stash for ages!)
In the Pink 'special lady' 18.3
Crafty Calendar 'add some metal' 3.4

Tuesday, March 3, 2015

Spring Swim

I've been busy again this weekend, and here is the second of the 2 cards I made. It's a really fun spring/summery Polkadoodles card.


This isn't as CAS as my usual card style but I really love it- it's lots of fun. I recently made a Polkadoodles Work & Play Pinterest board to collate some ideas. I found a really great idea using the swimmer image that was my inspiration for this card, You can find the original here.

I started by looking through my Polkadoodles Work & Play 4 kit and printed off the waves background paper and the swimmer and bunting toppers. The cloud paper came from another Work & Play kit (1, 2 or 3- I can't remember which), as did the spotty paper used on the beach huts. The beach huts are a digi stamp I found on Etsy here for only 50p!

I started by covering an 8x8 card blank with the cloud paper. I cut the wave paper to the same size as the clouds and then cut a square aperture from the centre leaving 3cm on each side. I used my Cricut Explore to create the beach huts, importing the png. image into the Design Space software and then using the print then cut feature. I actually cut them out myself as I only wanted 2 of the 3 beach huts but using the Cricut meant that I could very accurately resize the image which I can't do in a Windows Print. I hand cut the bunting and the pre-coloured swimmer digi too.

Once everything was cut out, I was ready to start to build the card. I layered the beach huts on top of the cloud background, attaching them with a double sided tape. I then used a thin 3d foam to attach the wave frame and then used my thickest foam pads to attach the swimmer and the bunting to the card. It has lots of layers and different things to keep the eye interested but is still quite simple as all the cuts are square.

I am entering this card into the following challenges:-
Digi Choosday 'spring pastels' 3.3
Digi Choosday 'anything goes' 10.3
Crafters Cafe 'lots of layers' 4.3
Penny's Papercrafty Challenges 'lots of layers' 3.3
Paper Shelter 'make it digital' 3.3
Daring Cardmakers 'yellow' 6.3
Crafty Hazlenut Patterned Paper Challenge 'anything goes' 31.3

Sunday, March 1, 2015

Christmas in March

Here is my Christmas card for March-


Can't quite believe I'm still managing this- though I suppose 3 months isn't many is it?

It's another really quick and simple card which is great for me when I do need to make 20 Christmas cards in one night- hopefully not this year though!

Both the backing paper and topper came from a Papermania 12x12 paper pack that I had completely forgotten I had! The topper was from a sheet that had 9 different squares on it so 9 cards in an instant!

I started with a 6x6 card blank, added the cut down backing paper, mounted the topper onto red mirror card and added that to the opposite corner to the corner detail on the backing paper. Done!

I am entering this card into the following challenges:-
The Pink Elephant 'anything goes' 2.3
Crafty Cardmakers 'stripes' 8.3
Craft your Passion 'anything goes' 1.3
Clear it out 'animals and stripes' 3.3
Cute Card Thursday 'fancy corners' 4.3
Crafty Hazlenut's Extra 'anything goes' 31.3
Crafty Hazlenut's Xmas 'cut it up' 6.3
That Craft Place 'anything goes' 14.3
Crafts Galore Encore 'anything goes' 31.3
Christmas Card Challenges 'winter hues' 7.3

Monday, February 23, 2015

Easter Bunny

I've been asked to make some Easter cards for someone at work and she wants them to have bunnies on them. This is my first one and super cute!


I started with the A5 scallop card and added a bright yellow background which I simply rounded the corners on using a punch, helping it to match the scallop base. I then hand-cut the shape of the rabbits ears but used a circle die to cut the face and glittery nose. The whiskers are made from raffia and the eyes are Card Candi. The pink paper bow is from a Craftwork Cards pad. I then added a simple message peel-off to the top corner.

I am entering this card into the following challenges:-
The Paper Shelter 'animal magic' 24.2
Crafting for all Seasons 'dies/punches' 28.2
Quirky Crafts 'best friends' 2.3
Daring Cardmakers 'inspired by a child's book' (Miffy the rabbit) 27.2

Sunday, February 22, 2015

Genius!?!

Often when someone does or says something really stupid (and I do it myself fairly often), I think that maybe they are not actually stupid- I'm just a genius!!! Maybe I'm more of an optimist than  I think?

Anyway, today, I am fairly convinced that I am actually a genius!

I've been learning how to become a better colourist with the Kit & Clowder skin & hair class for the last few months. I haven't been able to give it as much time as I'd like but I can still see an improvement already.

In the classes, Alyce uses brush nib Copics as her marker of choice whereas I own the original Spectrum Noirs with the bullet nib (and no option to change them for brush nibs). It might just be that I need more practice but I do find the flicking difficult with the bullet nibs so I've been looking into the idea of upgrading to the newer version of the Spectrum Noirs that you can get brush nibs for. I though about just buying the main skin colours used in the classes but, because Spectrum Noirs are not available individually, I'd still have to buy 78 pens just to get the 7/8 main skin tones- this seems a bit silly!

This is where the genius idea occurred!!!

On the Crafters Companion website, you can buy the blender pens separately (as a gold club inspire member I can get them for £1.27 and free p&p- can't beat that!) and the refill inks. I needed some refills anyway so as well as those, I ordered one of the separate blender pens to test out my idea.

When the blender pen arrived, I carefully removed both nibs and placed them, and the pen barrel, into my airing cupboard (the warmest place in my house) for a few hours. The nibs dried out really quickly but when I replaced the broad tip and then started to colour, some of the blender remained. I removed the nib again, and put the pen back into the airing cupboard. When I tried the pen again the next day, nothing came through the broad tip so it was time for stage 2!

I then took one of my skin re-inkers and used this ink (FS4) to re-ink the (now empty) new, blender pen. I left the ink to settle for a while (2/3 hours) and then tried it. In all honesty, the ink is working better from the broad tip end rather than the bullet which is a little pale at the moment- I think this is because the re-inker ink is put into the broad tip end. When I compare the colour coming from the blender pen to the colour from my original FS4 pen, the ink colour is very similar and, if anything, the new version looks brighter and slightly darker (possibly because my original is getting short of ink anyway).

I now plan to buy a pack of the brush nibs (which can be used as replacements for the broad tip in the new Spectrum Noir barrels) and then create my own brush nib Spectrum's for just the colours I need & use.

It will still end up costing more per pen than it would if I was buying a set but at least then I can just get the colours I actually need.

I am pretty impressed with my own ingenuity! Even if I do say so myself!!!

Friday, February 20, 2015

Pink & Green

I've managed to get in the craft room again today and have made another card. It's certainly not as CAS as my last one but was still pretty quick to put together when I'd finally chosen what it was that I wanted to use- far too many things to choose from!!!


I started with a 6x6 white card blank and the topper. I wanted to pick out the pink and green elements from the topper and bring that into the rest of my card. I took the spotty paper from Papermania 'spots and stripes pastels' pack but it didn't look right being put straight onto the base card (because of the white on white) so I mounted it onto some pink 'bling' cardstock before adding it to the card. I gutted the middle of the bling card so that I could use that to mount the topper instead of needing another piece. I layered up all of the papers/toppers and then started to embellish.

I added a Craftwork Cards striped paper bow, buttons and the green sticky ribbon to finish off the card.

I am entering this card into the following challenges:-
Cute Card Thursday 'floral' 25.2
In the Pink 'cute as a button' 4.3
Creative Inspirations 'buttons' 24.2
Pennys' Paper Crafty Challenges 'spots & stripes' 24.2
Digi Choosday 'pastels' 3.3
Papertake Weekly 'bingo- ribbon, die-cut & buttons' 24.2
Ooh La La 'green' 1.3
Catch the Bug 'girls just wanna have fun' 21.2

Thursday, February 19, 2015

Congratulations

I've been busy crafting today making a card to celebrate an engagement of 2 people I work with. It's a bit of a different card style for me but I really like it and think I will be making more like this. It was super quick too.


I started with a 6x6 white card blank and a circle clarity stencil. I placed the stencil onto the edge of the card and secured it with low-tack tape, making sure to cover the other parts of the stencil so I didn't accidentally get ink on other parts. The danger with this very simple kind of card is that any mistake would be really obvious!

I inked the circle using 'squeezed lemonade' distress ink and then inked only the edges using 'worn lipstick'. Where the 2 colours have blended, a really nice orange colour has been made. I used a Clarity Stamps 'Wee Folk' stamp to stamp the couple silhouette into the circle. I then used my Cricut Explore to cut the message from black card and stuck it onto the base card.

I am entering this card into the following challenges:-
CRAFT 'CAS' 25.2
That Craft Place 'film inspired' 28.2 (the focus colour around the couple reminds me of the end of a rom-com just as the screen goes to the credits and turns black)
Craft Your Passion 'anything goes' 22.2
Daring Cardmakers 'L.O.V.E.' 20.2 (One Layer for a Valentines Engagement- O.L.V.E- spelling never is my strong point!)

Friday, February 13, 2015

Christmas in February

I've made it to month 2 in the one Christmas card per month challenge!

Here it is-

It was a really quick & simple card to make (my favourite kind)!

I started with a 6x6 card blank and a sheet of Craftwork Cards Christmas 8x8 paper. The deer is part of the paper design so I made sure that when I trimmed the paper down to fit the card, I kept him in tact. I simply added the message topper and paper bow (both from the same Craftwork Cards set) to the opposite corner and then used some red stickles glitter glue onto the baubles that are hanging from his antlers.

I am entering this card into the following challenges:-
Christmas Card Challenges 'anything xmas' 14.2
Crafty Hazlenut Christmas 'decorated corner' 13.2
Creative Card Crew 'glitter' 15.2
Crafty Hazlenut Christmas Extra 'anything goes' 28.2

Sunday, February 8, 2015

Why Mr Darcy...

I've not had too much time for card making this weekend as I've had sewing projects for work to start but I've managed to make another card using one of the brilliant 'word collage' designs from the Cricut Explore!

This one uses the Jane Austen themed words which matched perfectly to a Pride & Prejudice themed decoupage topper that I've had for years (no exaggeration!).


I started with an 8x8 base card and a sheet of new Papermania 'Eau de nil' paper. I got the cricut to draw with a silver marker straight onto the backing paper which was surprisingly easy to line up. I trimmed the backing paper to size and mounted it onto the card. The topper I had already decoupaged so I simply attached this to the card with double sided tape. The two extra toppers came with the main decoupage so I added these with 3d foam to finish the card.

I am entering this card into the following challenges:-
Catch the Bug 'anything goes' 14.2
Crafty Calendar 'anything goes' 1.3
CRAFT 'decoupage' 11.2
Creative Inspirations 'love is in the air' 10.2
Paper Shelter 'be my valentine' 10.2
Cute Card Thursday 'crazy in love' 11.2
Clear it Out 'anything goes' 10.2
Papertake Weekly 'anything goes' 10.2

Monday, February 2, 2015

Flower Power

I haven't managed to make many cards this weekend as I've finally got back into my Kit & Clowder colouring class and have managed to complete the first lesson on colouring skin. I can already see an improvement in what I'm doing and strangely seem to have found the advanced technique easier than the basic one- I never have done things the easy way!

After practising my skin technique, I decided to colour up one of my Polkadoodles Work & Play 2 images (florist) to have a try. I'm not overly happy with the hair but I haven't got to this part of the class yet!

Here it is made up onto a card


I started by colouring up the image using a whole host of Spectrum Noir pens. I hand cut the digi into the shape using a Kanban mat as a template and then used a slightly larger version to cut a mat from a 12x12 DCWV 'timeless textures stack' paper. I chose 2 different 'rose' patterned papers to pick out the roses in the digi. The dark one came from a 6x6 Papermania paper pack (freebie with the DoCrafts Creativity magazine) and the larger one is from a Creata A5 paper pack. I trimmed the papers slightly to fit onto the 8x8 card.

I tried out lots of different layouts before settling on this one- I liked the idea of making the smaller darker paper sit at an angle but my brain couldn't deal with it- it was much happier with a nice straight line!

The ticket sentiments also came from the Work & Play 2 collection so I simply cut them out, inked them with 'worn lipstick' distress ink and attached them to the card with a small piece of double sided tape. the top right hand corner looked a little bare so I added the 3 pale pink gems just to finish it off.

It's a bit more fussy than my usual style but still fairly CAS considering it's got 3 different papers on it!

I am entering this card into the following challenges:-
The Paper Shelter '3+ layers of paper' 3.2
Creative Inspirations 'roses' 3.2
Cute Card Thursday 'stamping mad' 4.2
Polkadoodles 'flower power' 13.2
Crafts Galore Encore 'stamp/digi' 28.2
Crafty Hazlenut Patterned Paper Challenge 'anything goes' 28.2
The Pink Elephant 'photo inspiration' 9.2
Craft Your Passion 'anything goes' 8.2
That Craft Place 'anything goes' 14.2

Saturday, January 31, 2015

Beautiful Butterflies

I've made another new card this week, using a beautiful stencil from Clarity Stamps and papers from Craftwork Cards.


I started with an 8x8 white card blank to which I attached the heart/leaf Clarity stencil using low tack tape. I inked through (and around) the stencil using distress ink (lipstick?). I removed the stencil and then used thin double sided tape to apply gilding flakes around the border left by the edge of the stencil. The butterflies were cut out of a Craftwork Cards paper stack (Pretty in Pink) that has been in my stash for a while. I carefully bent the wings of the butterflies and then attached the body part using PVA glue.

I am entering this card into the following challenges:-
Crafty Boots 'butterflies' 1.2
Crafting for all Seasons 'things with wings' 2.2
In the Pink 'pink & pearlie' (tricky to see but the butterflies are all pearlescent) 5.2
Pink Elephant 'anything goes' 5.2
Craft your Passion 'anything goes' 2.2
Crafter's Cafe 'make your own background' 4.2
Penny's Paper Crafty Challenges 'anything goes' 3.2

Tuesday, January 27, 2015

you can leave your hat on!

I'm still trying hard with my Christmas Card challenge and here is my second one of this month. It was really quick and simple to make.


I started with a 6x6 white card blank. I took a piece of Dovecraft 6x6 Christmas paper and trimmed it to fit the card base leaving a small white border. I layered it using double sided tape. I then added a chipboard topper that has been in my stash for ages and finished the card with the peel-off message and peel-off stars. Done!

I am entering this card into the following challenges:-
Catch the Bug 'photo inspiration' (the robin with the hat on) 31.1
Crafty Hazlenut 'joy to the world' (there is nothing more joyful than building a snowman in my opinion!) 30.1

Sunday, January 25, 2015

Read, Know, Learn, Go

I'm always finding things on Pinterest and Create & Craft that inspire me to try something new and today's make is no different.

The original idea was shown on Create & Craft ages ago when they had a new show with lots of beautiful papers and large stencils/masks (can't remember the brand name but there were American). The guest took a canvas and covered it with paper, masked words and then painted over the top. When the mask is removed, the words are revealed in the base design. I've wanted to try it since I saw it and I've finally found an excuse!

In my school, I am the literacy co-ordinator and one of the projects I want to work on is improving the use of our library. I've found lots of nice ideas on Pinterest that I will be doing but my first project has been to make something arty to brighten up the room a bit.

This is what I've made


I started with a canvas that I've had for ages (but they are on offer in The Works at the moment) and covered it using PVA glue with pages torn from a spare copy of Harry Potter and the Philosophers Stone that I have for crafting purposes! I used the glue over the top of the papers also and then left to dry.

I then used the Cricut Explore to cut my lettering out of sticky back plastic- I used 3 different fonts all included in the Cricut Design Space subscription package. I laid the letters out onto the canvas (with the backing still on) so that I could place them accurately and then carefully stuck them onto the dry canvas.

When I had attached all the letters, I painted over the whole canvas with purple emulsion paint from a tester pot (Wilko's new 'magic' colour) and them dry brushed some hints of dark grey emulsion (Wilko's 'barely black') on top.


When the paint was dry, I used my pokey tool to carefully remove the sticky back plastic letter masks to reveal the text underneath. It was actually kind of fun too to see which words would be revealed. When one of the small letters revealed 'Professor Weasley' I had to smile (maybe Charlie teaching Care of Magical Creatures?).

I now want to try one for my own classroom with a fab quote I've seen on Pinterest that says "excuse the mess but we're learning in here", although this could work just as well for my craft room!

I am entering this project into the following challenges:-
CRAFT 'recycling' (old canvas)- 28.1
A Blog named Hero 'personalise' 29.1
Craft your Passion 'anything goes' 25.1
Ooh, la, la, 'once upon a time' (pages used from a book & it's for a library) 1.2
Polkadoodles 'case it' (idea seen on Pinterest and C&C) 30.1
Penny's paper-crafty challenges 'anything goes' 27.1

Sunday, January 18, 2015

Christmas in January

Last year, I had a plan to make at least 1 Christmas card each month so I didn't have a mad December rush. I think I managed about 3 months before it went pear shaped! Maybe this year will work better!

Here is my January Christmas card-


This card was really simple to make and uses some old stash and some new goodies too. I started with a 6x6 white blank card and added a Dovecraft patterned paper to the bottom half. The paper is from a monochrome set that included papers, ribbons buttons etc. from The Range and was a great deal. The snowflake dies are also new but the mirror card I used to cut them out of has been in my stash for years(no exaggeration!)

Before attaching the die cut snowflakes, I used double sided tape and glitter to add an extra sparkle to the join between the card base and the paper. I attached the snowflakes and then used a fine black pen to draw on the strings. I finished the card with a really simple peel-off greeting.

I am entering this card into the following challenges:-
Crafty Hazlenut's Extra 'xmas'- 31.1
Country View 'use something new'- 31.1
Crafty Cardmakers 'old and new'- 25.1
Love to Create 'snowflakes'- 18.1
Papertake Weekly 'all new'- 20.1
Penny's 'anything goes'- 20.1
Paper Shelter 'punches and/or dies'- 20.1
Creative Inspirations 'anything goes'- 20.1
CRAFT 'Xmas'- 21.1
Creatalicious 'winter'- 14.2
Crafty Catz 'new beginnings'- 22.1

Tuesday, January 13, 2015

hop hop hooray!

Here's another of my SWALK cards, this time using a topper that could be suitable for a whole range of occasions- new baby, exams, driving test, child's birthday, thank you etc.


I started with the topper which is printed from the SWALK cd and created my own message topper using the verse writer facility. I inked both of these pieces with 'salty ocean' distress ink and then mounted them onto a star print holographic mirror board. I then got a 6x6 white card blank and topped it with a Kanban star print paper. I then added the toppers and finished the card with 3 star gems.

I am entering this card into the following challenges:-
Creatalicious 'new beginnings' 14.1
Quirky Crafts 'clean & simple' 17.1
Creative Card Crew 'for a child' 18.1
Digi Choosday 'thanks' 20.1
Crafters Cafe 'new' 14.1
Crafty Catz 'polka dots' 15.1
Cute Card Thursday 'what's new?' 14.1

Sunday, January 11, 2015

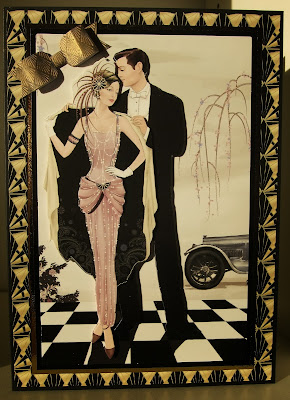
art deco- black & gold

Ages ago, I made an Art Deco style card using a red & black colour scheme. I've just made another, but this time it's black & gold.


As with the red & black card, I started with an A4 sheet of black card that I folded into an A5 card blank. I added a backing paper from the Papermania 'Art Deco' ultimate die-cut paper pack. The decoupage topper came from the same pack, so I just matted it onto some gold mirror card to help it stand out. I finished the card with another of the Craftwork Cards paper bows- this time I added some gilding wax to it to give it a shine.

I am entering this card into the following challenges:-
Crafts Galore Encore 'anything goes' 31.1
Graph'It 'shiny & new' 16.1
The Pink Elephant 'colour combo- black & gold' 12.1
Love to Create 'anything goes' 11.1
Papertake Weekly 'anything goes' 13.1
Clear it Out 'anything goes' 13.1
Penny's Papercrafting Challenges 'anything goes' 13.1
Creative Inspirations 'use a bow' 13.1