Showing posts with label Stamping. Show all posts

Sunday, May 10, 2015

Red Dragon

I've been busy colouring this weekend so just the 1 quick card! I did make my own designer brads though and it's my first make using a new kit from a company that I've never used before. Lelli-Bot crafts was on Create & Craft a few weeks ago and as I hadn't heard of them, I had to watch. They had a whole range of kits that are a little bit different. I ordered 2- this Fantasy Dragon one and Gothic Lace, which is monochrome with skulls and lace.

With the popularity of programmes like Game of Thrones, I thought this kit would be a good investment for some of the craft shows I'll hopefully be selling at during the summer! I haven't personally watched Game of Thrones but I have read the books. I tried to watch it but the 'wights' freaked me out too much in the first episode that I didn't watch any more. They weren't that creepy in my own head!


This card was super quick to make and all of the toppers and papers came from the Fantasy Dragon kit. I started with an 8x8 card blank, rounding the corners for a bit of extra detail. I then used a pearlescent grey paper for the first layer on the card, followed by layers of the patterned papers and the square topper. The message also came from the kit.

To complete the card, I added 3 large red brads to the bottom right hand side of the card. To tie them in to the theme of the card, I stamped and black embossed each one with a small dragon stamp from a Creative Expressions set that I've had forever. I used 2 different sized stamps across the 3 brads. They are not as detailed as I would like, but I'm still happy with them.


I am entering this card into the following challenges:-
Crafting Musketeers 'use a die cut' 28.5
Papertake Weekly 'anything goes' 12.5
Clear It Out 'anything goes' 12.5
Penny's Paper-Crafty Challenges 'anything goes' 12.5
Creative Inspirations 'birthday wishes' 12.5
Polkadoodles 'things with wings' 22.5

Sunday, April 19, 2015

Super Stamping

Another busy weekend for me but a little bit of crafting squeezed in as usual! Tried to get a few cards done as I might not get any crafting done next weekend- the ladies football team I play for has our first ever match next Sunday so my usually calm crafty day will instead be a sweaty, active day! We have been promised a post-match team talk in the pub though, so I think I'll survive!

Anyway, here's one of my makes from this weekend...


I am creating more simple, 1 layer, cards recently and this is another example of that style. I love CAS cards and I think this definitely fits into that type of crafting.

I started with a 6x6 white card blank, masking a panel across the middle with a piece of scrap paper. I then used 2 flowers and a leaf stamp that have been in my stash for years (they are very small purple rubber stamps, that I think were called SeeD's by Papermania/Anita's- they are similar to the sort of stamps now sold by Majestix- but not clear) and randomly stamped using just 1 pink and 1 green ink pad. I used 2nd generation stamping to achieve the different shades of colour.

I wanted to add a sentiment to the central panel of the card but was a bit too scared to stamp directly onto my cards base! Instead, I cut a piece of raspberry pink card to slightly smaller than the white strip and then stamped and embossed my message onto that instead. I finished the card by adding liquid pearls and stickles glitter glue into the centre of the flowers (doesn't show up very well on the picture unfortunately!).

I am entering this card into the following challenges:-
Crafty Calendar 'add a sentiment' 1.5
Craft Your Passion 'anything goes' 19.4
Quirky Crafts 'flowers' 26.4
Papertake Weekly 'words, words, words' 21.4
Penny's Paper-Crafty Challenges 'for the girls' 21.4
Crafting for All Seasons 'milestone celebrations' 27.4
In the Pink 'make it sparkle' 29.4
Creatalicious 'embossing' 14.5
Crafty Catz 'girl thing' 23.4

Sunday, April 12, 2015

Fly Past

When I went to the NEC at the end of March, I got some beautiful stamp sets from Hobby Art. I ended up with 6 different sets as I couldn't make a decision on just 3 (they were £10 each, 2 sets for £18 or 3 sets for £25- so they HAD to be bought in multiples of 3!). I did buy with a plan in mind as I am going to a local steam rally to sell some cards later in the year so I bought farming themed sets that I could use to make cards along those lines. I also got a set that features old aeroplanes, one of which normally does a fly past at the event. I have used stamps from lots of different sets to make this card.


I started by creating the green and blue circle background of my card which I did using a Clarity stencil, Gelli Plate and Distress Inks (mowed lawn, tumbled glass). I placed the circle aperture Clarity stencil onto my Gelli Plate and used a brayer to roughly apply the green distress ink to the bottom half and the blue distress ink to the top. I tried to make it random rather than a straight line. I used a scrap of paper (screwed up) to remove some of the blue ink, hoping to create a cloud effect. I then removed the stencil and printed the ink onto my card. I was really pleased with how it had turned out- I luckily managed to create something that looked a bit like a hill which was good!

I then used the stencil again and the same colour of distress inks just to ink the edge of each circle aperture to create a little more definition as it was rather pale. It was then time to stamp. I was a bit scared about messing it up by getting the perspective wrong so didn't add too much stamping in case I messed it up!

I started by stamping the plane silhouettes (from Flypast stamp set) into 3 of the sky panels. I then used stamps from 'In the Country', 'Farmhouse Scene-it' & 'Old Barn' on the green 'hill' panels. All of the stamps were inked with Versafine black ink which shows the detail perfectly. I then used some more distress inks (leftovers on my blending mat) to colour up the house and define the hills a little more.

I simply mounted my artwork onto a black, then green, mat and attached it to an 8x8 card base. Took longer than some of my usual cards, but I really love it and I'm glad that I was brave enough to give it a go!

I am entering this card into the following challenges:-
Crafting for All Seasons 'animal magic' 13.4
Crafting Musketeers 'man's world' 28.4
Craft Your Passion 'anything goes' 12.4
Papertake Weekly 'anything goes' 14.4
Clear it Out 'anything goes' 14.4
Crafty Cardmakers 'wings' 19.4
Penny's Papercrafty Challenges 'anything goes' 14.4
Creative Inspirations 'A trio of... planes' 14.4

Sunday, June 8, 2014

All aboard...

Over Father's Day weekend, I am going to a local 'Town & Country Fayre' with my cards, bags etc., hoping to make a few pennies to buy some more crafty goodies with! With that in mind, I've been busy making some cards that I think will suit the kind of people that would attend that sort of event. There are going to be people displaying their vintage cars and tractors so I've dug out the 'men' box and gone a bit mad.

This is one of the cards I've made-


I didn't want to make anything too simple but the obvious rules of chucking glitter at a card can't really work here, so I had to think outside the box.

I started with the pyramaged train topper which is from a Kanban set and then chose the other elements to go with it. The topper is quite large so I went for an 8x8 square card that I covered with a piece of kraft cardstock. Before attaching the kraft card to the base, I stamped 2 corners with a Kanban gear stamp in Walnut Stain distress ink. I took a piece of Papermania vintage travel inspired map paper (from a set I believe is called All Aboard) and ripped the edge to give it a vintage look. I then also inked the edge of the map paper using the Walnut Stain ink. I attached my various items to the card, completing it with an old cigarette card and a piece of Anita's sticky ribbon.

I am entering this card into the following challenges:-
Crafts Galore 'stamp/digi' 30/6
Craft Your Passion 'rip it' 9/6
Digi Choosday 'men' 17/6
Crafting Musketeers 'stamp/digi' 30/6
Crafters Cafe 'masculine' 11/6
CRAFT 'male' 11/6
Stampin' for the Weekend 'anything goes' 19/6

Wednesday, February 19, 2014

Angelica giggles

Just this morning, I had a delivery of the beautiful new Crafters Companion 'Angelica & Adam' double cd-rom that I ordered from C&C on Monday morning. It has some brilliant boy friendly images and cute girly ones too. This is the first card I've made using the digi stamps that are on cd 2. I'm really pleased with how it turned out although I'm not sure if I used enough pink! :-)


I started by printing the digi stamp from the cd to roughly half a sheet of A4 (the option that puts 2 photos on one sheet but slightly smaller because of not fitting to frame). I then coloured the image using my Spectrum Noirs but (for me) using a very limited selection. I tried not to blend the colours too much, particularly on the skirt, as after watching Leann from Crafters Companion doing her demos, I think I probably blend my colours together a little too much and lose the shading- I like how this has turned out anyway.

When I had finished colouring the image, I used an old Kanban mat as a stencil to mark out and hand cut the image to the finished shape. I did the same with a slightly larger mat onto some Kanban pink dot embossed card which I matted my topper onto. I then chose a piece of pink A4 card stock and folded it in half to make an A5 card blank. I wanted to add an extra something to the background but not too much to take away from the main image. In the end, I decided on some stamping. I used my Inkadinkado rectangle stamping gear and simple heart stamp to create the simple background design.

I mounted my topper up onto the base card and then added 4 small pink buttons in the corners. The final touch was to add some 'crystal' Stickles glitter glue to the girls dress and bows. You can't have a pink girly card without glitter on it somewhere, can you?

Close up of the new colouring style...


I am entering this card into the following challenges:-
Catch the Bug 'bingo challenge' buttons, pink/red, embossing
Craft your Passion 'girly' 24/2
Cutie Pie challenge blog 'spots' 1/3
Creative Inspirations 'buttons' 25/2
Crafters Companion 'Clean & Simple'

Crafters Companion are also having a DT call. I've entered, if you want more info there's a link here.

Sunday, January 26, 2014

Loud Music

Before Christmas, I was lucky enough to win a £100 voucher to spend at Create & Craft. It was surprisingly difficult to find things to spend that much money on, even though I never seem to struggle when I don't have a voucher!

One of the things I bought was a brilliant Indigo Blu A5 stamp set called 'Loud Music'. It has a wide range of stamps fitting many different music styles e.g. flowing notes, a guitar, a tape & some fun sentiments. I've already used the set once to make a birthday card for a musical man at work and thought it was about time I did another.

It's a mix between chalkboard & grunge...


I started with a piece of A4 white card which I folded to make an A5 card blank. I cut a piece of black card 2.5cm smaller on each side than the base card and stamped it with the Indigo Blu stamps using white Brilliance Ink. Before the ink had a chance to dry, I rubbed each image gently with some distress ink foam to blur the edges and look like the chalk had rubbed off slightly. When I had finished stamping, I mounted the black card onto some silver mirror board.

I then used 2 off cuts of black stripe paper (left over from my 'pretty grunge' card) in 2 opposite corners of the card and used Black Soot distress ink in the other 2. To finish the card I then used black memento ink and an Inkadinkado star stamp over the top of the distress ink.

I am entering this card into the following challenges:-
Craft Your Passion 'music' 27/1
Crafty Cardmakers 'black & white' 2/2
Crafty Catz 'monochrome' 30/1
Daring Cardmakers 'stripes' 31/1

Tuesday, December 24, 2013

Hogwarts Acceptance Letter

Happy Christmas Eve!!!

Another non-card making post today as thankfully my Christmas related cards are all done. Unfortunately, the same can't be said for presents! I never really feel in a Christmas present sorting mood until work had finished for the holidays so that never leaves me much time. 

Luckily a trip to the shops yesterday was very fruitful, last night I finished making my own version of Mrs Weasley's clock (for a Harry Potter loving friend) and the sewing machine is now busy making a Hogwarts Acceptance Letter for the same friend- hope she loves them as much as I do!


I used a blank 12x12 piece of mdf, painted it matt black and then used Indigo Blu Flitter Glu and foil to do the numbers, distressed edges and the hands. I then printed small pictures of each member of the family and glued those to the hands. 

It's not quite as magical as Mrs Weasley's but it really works!


This is my other creation, a Harry Potter Hogwarts Acceptance Letter, word by word true to the original in the Philosophers Stone but personalised for my friend. I plan to frame it so she can hang it somewhere in her home. 

I tried a practice run a while ago and it worked really well.


Merry Christmas!

I am entering the clock into a new challenge blog I have just found:-
Crafting for all Seasons 'anything but a card'

Sunday, October 6, 2013

on top of the world...

I just had to make the most of the sunny weather this weekend to get some cross stitch done as I'm desperate to finish my Hogwarts crest that I started back in July but it's so detailed, I can only do it in perfect daylight and that's hard to come by most of the time right now! That means that I've only had time for 1 card, but I think it's a goodie...


It's another really simple card made using 'Gorjuss' products from DoCrafts that I've had for ages. I started with an 8x8 white card blank onto which I matted some striped 'gorjuss' paper. I took a sheet of blue 6x6 paper (also from the gorjuss range) and stamped the image using just a black memento ink. I also stamped the message which is from the same stamp set. I used a stencil to trace the stars onto double sided adhesive sheet and then cut them out with non-stick scissors! I added these stars to the card and then used gilding flakes over the top of them. When I went to mount the topper onto the stripe paper, it needed something to make it stand out so I added a layer of black mirror card which I distressed the edges of using sandpaper. I rubbed in a circular motion giving the loopy edge to the distressing.


I am entering this card into the following challenges:-
Papertake Weekly 'anything goes'
Penny's Paper-Crafty Challenges 'anything goes'
Crafty Catz 'anything goes'
Totally Gorjuss 'stars'
Catch the Bug 'anything goes'

Sunday, September 29, 2013

Autumnal Oak

This weekend there don't seem to have been enough daylight hours for me to do everything I want to! I love winter and the dark nights but there are lots of jobs I want to do that require daylight and it's just gone too soon at the minute. My Hogwarts crest cross stitch is not going to be finished any time soon!

Anyway, no cross stitch but plenty of card making. Here's my first card made this weekend


I've been busy on Pinterest looking for some winter themed art for an activity with the kids at work and that partly led to the inspiration for this card. It combines lots of different techniques and products.

I started with a 6x6 white card blank. I inked the edges with 'spiced marmalade' distress ink and then added 'gathered twigs' to some edges. I trimmed a piece of DCWV autumn leaf paper to fit the card and then mounted it with double sided tape. I stamped my Sheena Douglass 'majestic oak' stamp with a brown memento ink onto some plain white cardstock. I then brayered the background using 'squeezed lemonade', 'spiced marmalade' & 'barn door' distress inks. The stamp is simply the branches of the tree so I used a mix of promarkers (named) and spectrum noirs (numbered) to add the leaves. I worked on a small area at a time as I wanted the alcohol inks to blend. I put down my lightest colour GB1 down first and then added dots of GB6, GB10, OR2, Crimson & Burnt Orange. I used the GB1 ink to blend the colours in. It looked a little odd at the beginning but after sitting for a while, blended well. I then mounted my tree onto some brown mirror card and added it to the card.

Here's a close up of the tree so that you can see the blending now it has settled


I am entering this card into the following challenges:-
Love to Create 'autumn colours'
Creative Inspirations 'favourite stamp brand' (Sheena Douglass)
Crafty Little Fairies 'autumn colours'
Graph'It 'autumn colours'

Sunday, September 22, 2013

Truly, Madly, Deeply- Songbird Challenge Blog DT call

When I saw that the Songbird Challenge Blog was looking for some new DT members, I knew that I had to give it a go. I love music and I love crafting so it's a blog I love! Here's the card that I've made for the DT call... (I've even managed to sneak a song title into it)


This card reflects my crafting style in many different ways. It has a broadly CAS style, includes stamping & colouring, has a little bit of sparkle and isn't your run of the mill design. It also has a technique that I'd not tried before today. I love to try out new things & always have a wide range of crafting projects on the go (at the moment it's cards, scrapbooking, cross stitch (picture & phone cover), wax crayon melting & shoe decoration)!


I started with a square of black card that I had cut from an A4 sheet to 19cm. I used my Inkadinkado circle stamping gear and my new 'Halloween' stamps to create the skull design around the card. I stamped using Indigo Blu 'Flitterglu' so that I could use my gilding flakes on them. This is the first time I've used the Flitterglu even though I've had it for a while. It worked brilliantly.


I then stamped the goblet (from Sheena Douglass' 'a little bit magical' stamps) onto card using a memento ink (so I could Promarker it) and onto acetate using stazon. I used 3 green promarkers to create the liquid inside the glass on the card version and then painted silver stencil paint onto the back of the acetate goblet so that when I layered them together, it looked more like a realistic glass. I stamped the potions bottles onto card and again coloured them with a range of promarkers before adding glossy accents to the glass areas. I attached the goblet & bottles to the black card with double sided tape and then stamped the 3 word sets to look as if they were coming out of the goblet. I stamped them in a Versamark ink and then used silver & green mica powders to colour them.

I am entering this card into the following challenges (as well as the DT call):-
Songbird Challenge Blog 'DT call'
Challenges 4 Everybody 'anything goes'
Love to Create 'Clean & Simple'
Creative Inspirations 'Clean & Simple'
Graph' It 'no characters'

Sunday, September 15, 2013

Quoth the Raven

I always love to buy Halloween themed papers (esp. DCWV) but here in the UK we rarely give cards for Halloween. This means that I have lots of beautiful papers I rarely use and only one friend that would really appreciate a card of a gothic style. When I saw the Graph'It challenge for this week, it gave me a great excuse to use them.


I again started with an 8x8 white card blank. I cut down a piece of DCWV 'Midnight Spell' 8x8 paper to fit the card and then stamped around the edge of it with my Imkadinkado gears system and a new branch stamp from a set called 'Halloween'. I stamped with a versamark ink and then embossed it with a black glitter embossing powder. It is difficult to see in the photograph but in real life adds an extra dimension because the printed paper is flat black. I chose a Saturated Canary digi stamp and coloured it using my promarkers. I trimmed it leaving a small white border and mounted this onto the card. I used a star punch with some black glitter paper to make the embellishments for the card and then wrapped some black & white bakers twine around the edge of the card, adding the skull bead.

I am entering this card into the following challenges:-
Smudgy Antics 'embellishments'
Creative Inspirations 'anything goes'
Paper Shelter 'sun, moon or stars'
Penny's Paper-Crafty Challenges 'anything goes'
Cute Card Thursday 'hip to be square'
Graph'It 'Halloween colours'
Daring Cardmakers 'signature style' (8x8 square card, CAS, stars)

Sunday, September 8, 2013

Don't Blink...

I've been waiting patiently (or not) for the Melt Pot I ordered to arrive all the way from America since the start of August, and it's finally here. I've tried melting normal embossing powders in it but it doesn't seem to be working for me (anyone got any tips) and I've only got 1 colour of UTEE, so I've only been able to make one more Doctor Who card to add to my collection. The 'Weeping Angels' are my favourite Doctor Who monster though so I've been dying to make this card...


I made the angels first by melting Platinum UTEE in my Melt Pot and then pouring it into my Weeping Angel silicone mould (from Lakeland- meant to be for baking). When they were cool, I removed them from the mould and rubbed the top with a little gilding wax. The background of the card is made on an 8x8 white card blank and the scene is die-cut using an x-cut die set. I stamped the message 'Don't Blink' in a mixed font to match the Tardis & Dalek card I had made previously. The UTEE toppers are very light so I simply attached them to the card with red super sticky tape.

I am entering this card into the following challenges:-
Creative Card Crew 'things with wings'
Challenges 4 Everybody 'anything goes'

Wednesday, August 7, 2013

T'wit T'woo

We've got a new challenge over at Card Makin Mamas for August and it's a nice simple one (I think)! All you need to do is make a card using just 3 colours- BLACK, WHITE + 1 OTHER and link it up to our challenge here. The prize is a mystery box of goodies from head mama Jess so come and take a look. Here's my DT card using BLACK, WHITE & BRONZE.


It's a really simple card starting with a sheet of A4 white card that I folded to make an A5 base card. I used different sized feather stamps from Sheena Douglass to stamp the base card to create my own design. I used a black VersaFine inkpad, double stamping to get the grey tone as well as the pure black, and a bronze VersaColour inkpad. The main owl image is a beautiful Indigo Blu stamp that I got at a show recently- it has amazing detail and stamps beautifully. I stamped it and embossed with black embossing powder and then coloured the image with 3 different shades of bronze Cosmic Shimmer iridescent watercolour paints. I cut out my Owl image as close to the embossing as I could and then used 3d foam to mount it onto a double layered Kanban mat.

This card shows that with a beautiful stamp, it's easy to make a fantastic card. Now show us what you can do!

Saturday, August 3, 2013

Ooo Wee Ooo #2

I am super excited about this card for many different reasons! #1- I LOVE Doctor Who, #2- rumours are that the new Doctor will be announced in a tv special on Sunday night! & #3- the dalek & tardis on this card are my own hand-made embellishments (I tried a new idea and it worked really well!)


At the moment, Lakeland stores have a new range of Doctor Who baking supplies e.g. cake toppers, cake cases and the most awesome cake pan for making a 3d Dalek cake (is it ok to have that as a cake for your 30th birthday???). They also have dusting stencils, ice cube moulds & chocolate moulds (these are the 3 things I've bought for crafting with). The moulds are all made of silicone so are great for a wide range of crafting products. The chocolate moulds are shallow and the ice cube ones quite deep. For the toppers on this card, I've used the shallow chocolate moulds. I don't have a melt pot (yet!) but I still wanted to have a go at using my embossing powders in the moulds so I did it layer by layer with a versamark pen! The silicone mould can happily take the heat of the heat gun and actually stays warm for enough time to be able to re-powder without re-inking every time. Because this method took quite a long time, my toppers are very thin (paper thin) but this does mean that they are very lightweight and easy to attach with 3d foam pads. Once I had made them, I rubbed them with a little gilding wax as the back of the embossing powders are always dull and then arranged them onto my backing card (pearlescent design from Kanban kit). I then used some typography style clear stamps that have been in more stash for years (maybe decades) to stamp the 'ooo wee ooo' message in a pearlescent platinum brilliance ink so it isn't too obvious but is definitely there. I then mounted it all onto a 6x6 white card blank.

I sense a whole set coming on as the mould also has K-9, a cyberman head, a sontaran head and (my favourite) weeping angel! Looking to get a bargain melt pot first though so it's a bit quicker to do- anyone know where I can get a bargain???

I am entering this card into the following challenges:-

Friday, August 2, 2013

Acceptance card

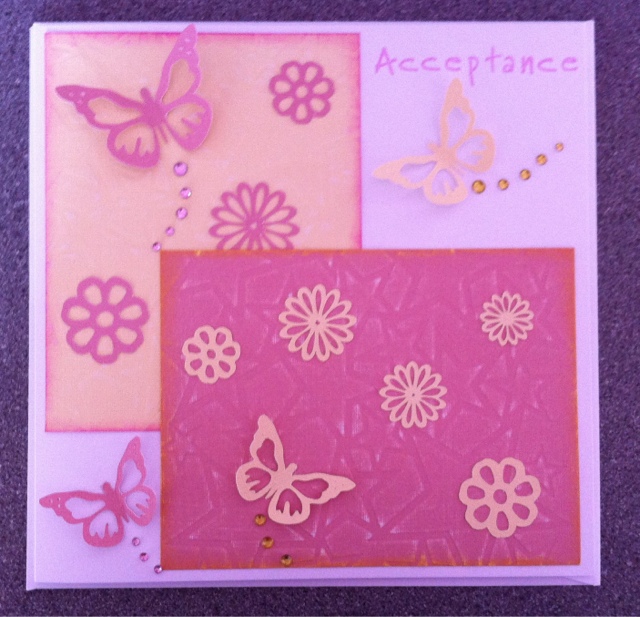
I recently made some invitations for some friends who are having a Naming Ceremony (non-religious Christening) for their baby girl. I also needed to make an acceptance card to say that I was going! I decided to make a card that matched the invitation in colour choice and theme but was completely different. The invitations used the same butterflies & flowers but they were die-cut from the card leaving a cut out design behind. This is my variation of the idea-


I started with an 8x8 white card blank and 4 sheets of pastel DCWV mat stack cardstock (2 yellow, 2 pink). I took one of each colour of card and embossed it with a star design using my Grand Callibur and then inked the edges in the opposite colourway using distress inks (squeezed lemonade on the pink card & picked raspberry on the yellow). I mounted these onto the card overlapping one corner. I then used my cricut to cut out the flower & butterfly toppers from the other piece of each colour of card. I arranged the toppers before sticking them down and then added the as the butterfly trails. I finished the card by stamping the 'acceptance' sentiment using Brilliance pearlescent pink ink and alphabet clear stamps.

I am entering this card into the following challenges:-

Wednesday, June 12, 2013

wedding book

As I mentioned in a previous post, I recently got 2 new templates from the 'House of Zandra' stand at the Sincerely Yours show in Lincoln. This is the first thing I've made using the book card template and I can see that there will be lots more to come.

From the front it almost looks like a normal card-

But actually it's a 3d book card-

When you open up the front, there is a deep recess inside creating various opportunities for creativity!

Here's a close up view of the insides-

I started with 2 pieces of black A4 card, using the templates to cut the shapes required. I made up the box element using super sticky tape to attach it. I then used my ScorPal scoring board to emboss the detail on the book cover and then used some gilding wax to add extra detail. I cut some 'gorjuss' backing paper to fit inside the box and to cover the sides. I then added the 3 black paper flowers with card candi centres. I stamped the bunting using white ink onto black card and attached across the front of the box on some cream coloured string. I then decorated the front of the book with the 2 cream hearts (Kanban) with peel-off letters. This is quite a simple box compared to what can be achieved but for my first go, I'm really happy with it.

I am entering this card into the following challenges:-
Crafting Musketeers 'use a stamped image'
Cute Card Thursday 'ebony & ivory'
Catch the Bug 'going to the chapel'
Challenges 4 Everybody 'anything goes'

Tuesday, June 11, 2013

good luck bunting

I recently got a brilliant paper pad called 'up, up & away' for a bargain price from my local dunelm shop. This is the first card I've made using it- I love the colour combo.


I rounded the corners of a 6x6 square card blank and then inked it with 'pumice stone' distress ink. I cut & rounded a piece of glittery backing paper and added this to the card. The topper is from Lily of the Valley and was already coloured so I simply matted it onto a plain green cardstock that came from the same paper pad as the patterned paper and then put it in the bottom corner of the card. I got some new stamps from the 'Little Claire' range at the Lincoln Sincerely Yours show and I've been desperate to use them. They are a set of letters, numbers & patterns on bunting meaning that you can make any words you want. I stamped them onto the plain green card and then cut them out leaving a small border before glueing them onto a string stretched across the card. This gives them movement and extra dimension to the card.

I am entering this card into the following challenges:-

Monday, May 20, 2013

Sk8er Boy

Here's another new card I've made using one of my favourite rubber stamps- Skater Ian. It was a bargain I got from the Sincerely Yours show at Lincoln last year which I hope bodes well for next week when I'll be visiting again!


I took a 6x6 'Black Magic' Coredinations paper, trimmed it to size & embossed it with a checkerboard pattern. I then distressed it to reveal the bluey grey base. I then used a chevron stencil and silver stencil paint to add an extra texture to the card. I then added some new washi tape to the corner of the card and mounted it onto a white 6x6 card base. I stamped the skater image onto white card and coloured it using promarkers and spectrum noirs. I then re-inked the hat and stamped it onto a small scrap of an old Basic Grey paper and paper pieced it onto my topper. I mounted the stamped image onto the card using 3d foam to add depth.

I am entering this card into the following challenges:-
Crafty Cardmakers 'embossing, distressing & paper piecing'
Papertake Weekly 'sound of music' (inspired by the song 'Sk8ter Boi' by Avril Lavigne)
Daring Cardmakers 'stencil it'
Basic Grey 'song inspired' (sk8ter boi)

Sunday, May 19, 2013

Shore Thing!

Last week I bought some of the new 'Ahoy There!' papers from Papermania thinking that they would go really well with the Michael Powell seaside stamps I got last year. Here's the first card I've made using both the papers and the stamps.


I started with a white 6x6 card blank which I had rounded the corners of with a corner punch. I then took one of the Ahoy There! 6x6 papers and trimmed it to fit the card before also rounding the corners of it. I stamped the 'shore thing' stamp onto white card using a black Versafine ink pad as I was planning to water-colour the image. I used my distress inks to do the watercolouring, sticking to the 3 main colours of red, yellow & blue. I used 'squeezed lemonade, 'barn door', 'chipped sapphire' & 'tumbled glass', putting some ink onto an acrylic block and then picking it up with me water brush. This allowed me to control the amount of colour I used and therefore the shading of the image. I trimmed the image leaving a small white border and again rounded the corners before mounting onto the card. I completed the card by adding the 3 white buttons which I threaded with red, yellow & blue twine from the Dovecraft 'London Line' range to echo the colour pattern of the beach huts in the main topper.

I am entering this card into the following challenges:-
Stampin' for the Weekend 'buttons'
MayzyArt 'for the boys'
Pink Elephant 'male birthday' (I haven't put the message on yet as I sell cards to many non-English speakers who want a message in their own langauge)
Here Come the Boys 'buttons'
Totally Gorjuss 'water'
Crafty Catz '3-2-1' (3 buttons, 2 layers, 1 topper)
Polkadoodles 'spring colours/pastels'
Paper Shelter 'anything goes'
Challenges 4 Everybody 'anything goes'

Tuesday, April 30, 2013

New CMM challenge- Washi Tape

There's a brand new challenge over at the Card Makin Mamas blog and this time it's Washi Tape. I'm not a huge fan of washi tape so this was most definitely a challenge for me! I had a look around pinterest to try and find some inspiration and this is what I created...


I started by placing stripes of the tape onto the card in both vertical & horizontal directions. I then used a Sheena Douglas butterfly stamp, with black stazon, straight onto the top of the tape giving me the gappy image (technical term!). I then added the 2 small stamped butterflies using a black versafine ink basically to prove that I can stamp properly when I want to! Really simple and not my most favourite card ever but still pretty effective I think.

If I can manage a washi tape card then so can you so come & join in- you might be a lucky winner!

I am entering this card into the following challenges:-
MayzyArt 'rainbow'
Pink Elephant 'washi tape'