I posted a card a couple of weeks ago that I made for someone at work for Easter and here is the second one. She wanted cards with rabbits on them but apart from that, I was free to play!
It's another CAS card that was quick and easy to make. I started with an A5 scalloped edge card blank which I layered with some green paper, embossed with a leaf design using my Grand Callibur. I then used a circle die to cut the black circle for the rabbit hole and a slightly smaller white one for the bunny's bum! I hand cut the feet, using white and beige paper and then added a white pom-pom for the tail. I added the ribbon around the green paper before attaching it all to the base card. The finishing touch was the peel-off message.
I am entering this card into the following challenges:-
Creatalicious 'anything goes' 15.4
The Pink Elephant 'green' 23.3
Crafty Boots 'spring' 29.3
Craft Your Passion 'anything goes' 22.3
Papertake Weekly 'happy anything' 24.3
Clear it Out 'Easter & pastel' 24.3
Creative Card Crew 'Easter critters' 29.3
Penny's Paper-Crafty Challenges ' favourite embellishments'- ribbon 24.2
Crafters Cafe 'spring-my season' 25.3
The Paper Shelter 'spring' 24.3
Cute Card Thursday 'spring fever' 25.3
Crafty Catz 'no designer paper' 26.3
Catch the Bug 'bingo' (Easter & Die-Cut & my choice- ribbon) 28.3
I love to craft and I love to shop, particularly for crafty stash (and shoes). I'll blog about the shops I visit, the stuff I buy and what I've done with it all!
Showing posts with label Dry Embossing. Show all posts
Saturday, March 21, 2015
The Bunny's Bum
Labels:
Die Cutting,
Dry Embossing,
easter,
grand callibur,
Peel-Offs,
pom-poms,
Ribbon
Sunday, July 6, 2014
Flying high...
Now that I've discovered the wonderful world of box cards, I keep coming up with loads of ideas that I want to try- so far this is definitely my favourite!
My colouring is not the greatest so I have signed up to a Skin & Hair class at Kit & Clowder. They ask you to colour an image before you start the class to compare to later on so I decided to colour a Mary Poppins digi that I love. I chose this because I had a great idea for a card so even though the colouring isn't brilliant, I think the card is.
Here it is...
I used a sheet of pale blue A4 cardstock to cut the box card base and then trimmed the flaps to just 5cm to show the base a little more. I used docrafts London dies to cut out 3 layers of London skyline and scored these to match the base of the box. I then attached them with plenty of double sided tape.
I cut DCWV blue cardstock (as it has a white core) to fit as mats for the flaps and back panel and then embossed them with a Clarity Stencils cloud design. I sanded back the card to show the white core through for the clouds and then edged each piece with white ink before adding to the card.
I then used scraps of blue card (from 2 card bases that didn't quite work) to make my interior supports for some clouds cut using the Cricut from some glitter card. I chose slightly different clouds from 3 different cartridges included in my subscription (Nate's ABC, The first few years & Groovy Times). I attached one cloud to the inside front of the box, 2 onto the 2 supports and one onto the back panel before adding the Mary Poppins digi, coloured with Spectrum Noirs & Promarkers, using foam pads.
I'm loving the fact that she's actually flying over the London skyline! :-)
I am entering this card into the following challenges:-
Fantabulous Cricut 'anything goes'
Crafts Galore 'stamp/digi' 31/7
Creative Inspirations 'anything goes' 8/7
A Blog Named Hero 'colour it in' 14/7
Catch the Bug 'anything goes' 19/7
Graph'It 'anything with an alcohol marker' 11/7
My colouring is not the greatest so I have signed up to a Skin & Hair class at Kit & Clowder. They ask you to colour an image before you start the class to compare to later on so I decided to colour a Mary Poppins digi that I love. I chose this because I had a great idea for a card so even though the colouring isn't brilliant, I think the card is.
Here it is...
I used a sheet of pale blue A4 cardstock to cut the box card base and then trimmed the flaps to just 5cm to show the base a little more. I used docrafts London dies to cut out 3 layers of London skyline and scored these to match the base of the box. I then attached them with plenty of double sided tape.
I cut DCWV blue cardstock (as it has a white core) to fit as mats for the flaps and back panel and then embossed them with a Clarity Stencils cloud design. I sanded back the card to show the white core through for the clouds and then edged each piece with white ink before adding to the card.
I then used scraps of blue card (from 2 card bases that didn't quite work) to make my interior supports for some clouds cut using the Cricut from some glitter card. I chose slightly different clouds from 3 different cartridges included in my subscription (Nate's ABC, The first few years & Groovy Times). I attached one cloud to the inside front of the box, 2 onto the 2 supports and one onto the back panel before adding the Mary Poppins digi, coloured with Spectrum Noirs & Promarkers, using foam pads.
I am entering this card into the following challenges:-
Fantabulous Cricut 'anything goes'
Crafts Galore 'stamp/digi' 31/7
Creative Inspirations 'anything goes' 8/7
A Blog Named Hero 'colour it in' 14/7
Catch the Bug 'anything goes' 19/7
Graph'It 'anything with an alcohol marker' 11/7
Labels:
Box Card,
Clarity Stamps & Stencils,
Colouring,
Cricut,
DCWV,
Digi Stamps,
Dry Embossing,
Promarkers,
Sanding,
Spectrum Noirs,
Stencils
Monday, May 26, 2014
Muddy Mess
I made another card today using lots of old goodies but some of them haven't been used very much!
It's a card in my usual CAS style and was quite quick to create (apart from the colouring of the digi stamp). The digi image comes from an Angelica & Adam crafters companion cd-rom that I've had for a while but not used all that much. I coloured the image with a mix of promarkers and spectrum noirs. I then used walnut stain distress ink to dirty up the edges of the topper. I took two different colours of camouflage print paper from DCWV 'boys'A4 stack and cut them to mat the topper. I used a Sheena Douglass embossing folder to add muddy splats to the green paper and then inked it with the same walnut stain distress ink as the topper. I scrunched up the brown paper before teaching it to the card to add the dirty scruffy look and add another texture. I layered everything up onto a khaki green A5 card blank folded from a sheet of A4 card.
I am entering this card into the following challenges:-
A blog named hero 'embossing' 28/5
Catch the Bug 'photo inspiration' 31/5
Challenges 4 Everybody 'anything goes' 30/5
Crafty Catz 'embossing' 29/5
Digi Choosday 'day out' 3/6
Papertake Weekly 'cute' 27/5
Cutie Pie 'embossing' 7/6
It's a card in my usual CAS style and was quite quick to create (apart from the colouring of the digi stamp). The digi image comes from an Angelica & Adam crafters companion cd-rom that I've had for a while but not used all that much. I coloured the image with a mix of promarkers and spectrum noirs. I then used walnut stain distress ink to dirty up the edges of the topper. I took two different colours of camouflage print paper from DCWV 'boys'A4 stack and cut them to mat the topper. I used a Sheena Douglass embossing folder to add muddy splats to the green paper and then inked it with the same walnut stain distress ink as the topper. I scrunched up the brown paper before teaching it to the card to add the dirty scruffy look and add another texture. I layered everything up onto a khaki green A5 card blank folded from a sheet of A4 card.
I am entering this card into the following challenges:-
A blog named hero 'embossing' 28/5
Catch the Bug 'photo inspiration' 31/5
Challenges 4 Everybody 'anything goes' 30/5
Crafty Catz 'embossing' 29/5
Digi Choosday 'day out' 3/6
Papertake Weekly 'cute' 27/5
Cutie Pie 'embossing' 7/6
Labels:
Angelica and Adam,
CAS,
CD Crafting,
Colouring,
Crafters Companion,
Digi Stamps,
Distress Inks,
Distressing,
Dry Embossing,
Promarkers,
Sheena Douglass,
Spectrum Noirs
Sunday, March 9, 2014
DJ love
Only 1 card made this weekend as I've finally started my Harry Potter scrapbook and while I seem to be in the mood, I want to get as much done as possible!
Here it is...
A nice simple card using a fab Saturated Canary digi stamp.
I started by colouring my digi aiming to use the colours to emphasise what I see in the image- a very confidant woman and a shy man. I used very bright colours for her and quite muted tones for him. When I had finished the colouring of the digi, I mounted it onto some silver mirror card just to help it stand out.
I chose a piece of bright orange A4 card to make into the A5 base card that matched the orange colour used on the digi. I then took a piece of turquoise chevron patterned paper from DCWV Girlhood Stack and embossed it with Sheena Douglass 'splat' embossing folder. I then inked the paper with Spiced Marmalade distress ink to highlight the embossing.
I used double sided tape and 3d foam tape to attach all of the pieces together before finishing off with the turquoise jems.
I am entering this card into the following challenges:-
cards galore 'use a digi/stamp' 30/3
Daring Cardmakers 'colour challenge' 14/3
Graph'It 'male colours' 21/3
Paper Shelter 'DT call' 20/3
Penny's paper crafty challenges 'not square' 11/3
Paper shelter 'anything goes' 11/3
Creative Inspirations 'anything goes' 11/3
Craft room challenges '20th Century' 17/3 (records being used on the turntable)
Challenges 4 Everybody 'anything goes' 4/4
Here it is...
A nice simple card using a fab Saturated Canary digi stamp.
I started by colouring my digi aiming to use the colours to emphasise what I see in the image- a very confidant woman and a shy man. I used very bright colours for her and quite muted tones for him. When I had finished the colouring of the digi, I mounted it onto some silver mirror card just to help it stand out.
I chose a piece of bright orange A4 card to make into the A5 base card that matched the orange colour used on the digi. I then took a piece of turquoise chevron patterned paper from DCWV Girlhood Stack and embossed it with Sheena Douglass 'splat' embossing folder. I then inked the paper with Spiced Marmalade distress ink to highlight the embossing.
I used double sided tape and 3d foam tape to attach all of the pieces together before finishing off with the turquoise jems.
I am entering this card into the following challenges:-
cards galore 'use a digi/stamp' 30/3
Daring Cardmakers 'colour challenge' 14/3
Graph'It 'male colours' 21/3
Paper Shelter 'DT call' 20/3
Penny's paper crafty challenges 'not square' 11/3
Paper shelter 'anything goes' 11/3
Creative Inspirations 'anything goes' 11/3
Craft room challenges '20th Century' 17/3 (records being used on the turntable)
Challenges 4 Everybody 'anything goes' 4/4
Labels:
CAS,
Colouring,
DCWV,
Digi Stamps,
Distress Inks,
Distressing,
Dry Embossing,
Gems,
Mirror Board,
Promarkers,
Saturated Canary,
Sheena Douglass,
Spectrum Noirs
Wednesday, February 19, 2014
Angelica giggles
Just this morning, I had a delivery of the beautiful new Crafters Companion 'Angelica & Adam' double cd-rom that I ordered from C&C on Monday morning. It has some brilliant boy friendly images and cute girly ones too. This is the first card I've made using the digi stamps that are on cd 2. I'm really pleased with how it turned out although I'm not sure if I used enough pink! :-)
I started by printing the digi stamp from the cd to roughly half a sheet of A4 (the option that puts 2 photos on one sheet but slightly smaller because of not fitting to frame). I then coloured the image using my Spectrum Noirs but (for me) using a very limited selection. I tried not to blend the colours too much, particularly on the skirt, as after watching Leann from Crafters Companion doing her demos, I think I probably blend my colours together a little too much and lose the shading- I like how this has turned out anyway.
When I had finished colouring the image, I used an old Kanban mat as a stencil to mark out and hand cut the image to the finished shape. I did the same with a slightly larger mat onto some Kanban pink dot embossed card which I matted my topper onto. I then chose a piece of pink A4 card stock and folded it in half to make an A5 card blank. I wanted to add an extra something to the background but not too much to take away from the main image. In the end, I decided on some stamping. I used my Inkadinkado rectangle stamping gear and simple heart stamp to create the simple background design.
I mounted my topper up onto the base card and then added 4 small pink buttons in the corners. The final touch was to add some 'crystal' Stickles glitter glue to the girls dress and bows. You can't have a pink girly card without glitter on it somewhere, can you?
Close up of the new colouring style...
I am entering this card into the following challenges:-
Catch the Bug 'bingo challenge' buttons, pink/red, embossing
Craft your Passion 'girly' 24/2
Cutie Pie challenge blog 'spots' 1/3
Creative Inspirations 'buttons' 25/2
Crafters Companion 'Clean & Simple'
Crafters Companion are also having a DT call. I've entered, if you want more info there's a link here.
I started by printing the digi stamp from the cd to roughly half a sheet of A4 (the option that puts 2 photos on one sheet but slightly smaller because of not fitting to frame). I then coloured the image using my Spectrum Noirs but (for me) using a very limited selection. I tried not to blend the colours too much, particularly on the skirt, as after watching Leann from Crafters Companion doing her demos, I think I probably blend my colours together a little too much and lose the shading- I like how this has turned out anyway.
When I had finished colouring the image, I used an old Kanban mat as a stencil to mark out and hand cut the image to the finished shape. I did the same with a slightly larger mat onto some Kanban pink dot embossed card which I matted my topper onto. I then chose a piece of pink A4 card stock and folded it in half to make an A5 card blank. I wanted to add an extra something to the background but not too much to take away from the main image. In the end, I decided on some stamping. I used my Inkadinkado rectangle stamping gear and simple heart stamp to create the simple background design.
I mounted my topper up onto the base card and then added 4 small pink buttons in the corners. The final touch was to add some 'crystal' Stickles glitter glue to the girls dress and bows. You can't have a pink girly card without glitter on it somewhere, can you?
Close up of the new colouring style...
Catch the Bug 'bingo challenge' buttons, pink/red, embossing
Craft your Passion 'girly' 24/2
Cutie Pie challenge blog 'spots' 1/3
Creative Inspirations 'buttons' 25/2
Crafters Companion 'Clean & Simple'
Crafters Companion are also having a DT call. I've entered, if you want more info there's a link here.
Labels:
Angelica and Adam,
Buttons,
CAS,
CD Crafting,
Colouring,
Crafters Companion,
Digi Stamps,
Dry Embossing,
Inkadinkado,
Kanban,
Spectrum Noirs,
Stamping,
stickles
Sunday, February 2, 2014
Sunny Sunflowers
This is my final card of the weekend and one that I'm really pleased with. It uses some new stash and some new ideas that I've not tried before but now I know it works, I'll definitely be using it again.
This card is made using another new Sheena Douglass embossing folder.
I wanted to create a distressed background but didn't have a core'dinations cardstock in the colour palette I needed- so I made my own!!! I started with a piece of brown A4 card that I painted with yellow emulsion from a tester pot (it even had its own brush so no mess!). I then embossed it using the sunflower embossing folder and then used fine sand paper to sand back the paint to reveal the brown paper underneath. It works really well and I'vegot hundreds of tester pot colours that now have a new use!
I trimmed down my backing paper, tied a brown organza ribbon around the spine and attached it to an 8x8 white base card. I then embossed the same sunflower design onto gold/yellow mirror card and then went over the top of the raised aspects of the design with a brown promarker. I cut them out and used various levels of 3d foam to mount them onto the card.
I finished the card by using the remainder of the painted cardstock to cut a small mat (using a Kanban one as a template) and then attaching it to the card backwards and adding the peel-off message.
I am entering this card into the following challenges:-
Country View Challenges 'paint' 28/2
Totally Gorjuss 'sunny colours' 7/2
Cute Card Thursday 'new' 5/2
A Blog Named Hero 'flowers' 14/2
Daring Cardmakers 'belt & braces' 7/2
Crafty Catz 'anything goes' 6/2
Crafters Cafe 'ribbon' 4/2
This card is made using another new Sheena Douglass embossing folder.
I wanted to create a distressed background but didn't have a core'dinations cardstock in the colour palette I needed- so I made my own!!! I started with a piece of brown A4 card that I painted with yellow emulsion from a tester pot (it even had its own brush so no mess!). I then embossed it using the sunflower embossing folder and then used fine sand paper to sand back the paint to reveal the brown paper underneath. It works really well and I'vegot hundreds of tester pot colours that now have a new use!
I am entering this card into the following challenges:-
Country View Challenges 'paint' 28/2
Totally Gorjuss 'sunny colours' 7/2
Cute Card Thursday 'new' 5/2
A Blog Named Hero 'flowers' 14/2
Daring Cardmakers 'belt & braces' 7/2
Crafty Catz 'anything goes' 6/2
Crafters Cafe 'ribbon' 4/2
Labels:
Dry Embossing,
Flowers,
Mirror Board,
Peel-Offs,
Promarkers,
Ribbon,
Sheena Douglass
Flower Power
I've been busy crafting again this weekend and have managed to make a few cards. Here's the first...
I've used all manner of new things on this card today- some of which are completely new (as in arrived on Thursday from C&C) and some which are new as in had for ages but not used yet!
This card started with the flower design embossing folder which is from the Sheena Douglass range which was a Pick of the Week/4 day deal on C&C last week. I inked one piece of white card using both Picked Raspberry & Peacock Feathers distress ink and then embossed it with the folder. I then sanded back the top of the card to make the flower design stand out as white against the coloured background. I had to join the design as it is an A5 folder so I placed a purple ribbon across the join and attached the 2 pieces to the outside panels of the card. To provide contrast, I wanted the middle panel to be embossed in the opposite way so I embossed it first and then inked it using the same distress ink colours, so that the debossed side was used.
I then coloured the Ebony digi stamp (from The Greeting Farm) using a similar colour palette of pink, turquoise & purple and some gems for her headband. I cut out the digi leaving a small white border and then attached her to the central panel of the card with 3d foam pads. I then added the peel-off message.
To complete the card, I used the same floral embossing folder and three different colours of black core'dinations cardstock to emboss more flowers which I sanded back before cutting out and using as toppers across the card.
This is the first time that I've made a card in this 3 panel style but I really like it and it was quick to put together (although the sanding took ages and made a lot of mess!)
I am entering this card into the following challenges:-
Catch the Bug 'anything goes' 8/2
Polkadoodles 'anything goes/oriental' 9/2
Cards Galore 'bling' 28/2
Graph'It 'anything goes/different colour hair' 9/2
Cute Card Thursday 'something new' 5/2
TGF Farm Fresh Friday 'layers' 7/2
Creative Inspirations 'stamping' 4/2
Digi Choosday 'anything goes/in the pink' 3/2
Challenges 4 Everybody 'anything goes' 28/2
Daring Cardmakers 'belt & braces' 7/2
I've used all manner of new things on this card today- some of which are completely new (as in arrived on Thursday from C&C) and some which are new as in had for ages but not used yet!
This card started with the flower design embossing folder which is from the Sheena Douglass range which was a Pick of the Week/4 day deal on C&C last week. I inked one piece of white card using both Picked Raspberry & Peacock Feathers distress ink and then embossed it with the folder. I then sanded back the top of the card to make the flower design stand out as white against the coloured background. I had to join the design as it is an A5 folder so I placed a purple ribbon across the join and attached the 2 pieces to the outside panels of the card. To provide contrast, I wanted the middle panel to be embossed in the opposite way so I embossed it first and then inked it using the same distress ink colours, so that the debossed side was used.
I then coloured the Ebony digi stamp (from The Greeting Farm) using a similar colour palette of pink, turquoise & purple and some gems for her headband. I cut out the digi leaving a small white border and then attached her to the central panel of the card with 3d foam pads. I then added the peel-off message.
To complete the card, I used the same floral embossing folder and three different colours of black core'dinations cardstock to emboss more flowers which I sanded back before cutting out and using as toppers across the card.
This is the first time that I've made a card in this 3 panel style but I really like it and it was quick to put together (although the sanding took ages and made a lot of mess!)
I am entering this card into the following challenges:-
Catch the Bug 'anything goes' 8/2
Polkadoodles 'anything goes/oriental' 9/2
Cards Galore 'bling' 28/2
Graph'It 'anything goes/different colour hair' 9/2
Cute Card Thursday 'something new' 5/2
TGF Farm Fresh Friday 'layers' 7/2
Creative Inspirations 'stamping' 4/2
Digi Choosday 'anything goes/in the pink' 3/2
Challenges 4 Everybody 'anything goes' 28/2
Daring Cardmakers 'belt & braces' 7/2
Labels:
Colouring,
core'dinations,
Digi Stamps,
Distress Inks,
Distressing,
Dry Embossing,
Flowers,
Peel-Offs,
Ribbon,
Shaped Card,
Sheena Douglass,
The Greeting Farm
Tuesday, January 14, 2014
winter wonderland
This card uses another topper that I coloured a while ago but ran out of time to make into a card. I've finally got round to using it, and it means that I've made 2 Christmas cards so far in January!!!
I coloured the topper using both Spectrum Noirs & Promarkers and then used a Kanban mat as a stencil to cut it into the decorative shape. I added a, hand cut, blue mirror card mat and a larger mat cut from Dovecraft 'Merry & Bright' snowman paper. To add extra detail to the 6x6 elegant edge Craftwork Cards card blank, I ran it through my grand callibur with a snowflake mask, and then gently rubbed on some pale blue chalk with my finger.
I am entering this card into the following challenges:-
Christmas Card Challenges 'anything goes with option of polka dots' 19/1
Catch the Bug 'winter wonderland' 18/1
Crafty-Hazlenut's Christmas Challenge 'winter weather' 17/1
Cute Card Thursday 'cold & frosty' 15/1
Creatalicious Challenges 'turquoise winter' 13/2
I coloured the topper using both Spectrum Noirs & Promarkers and then used a Kanban mat as a stencil to cut it into the decorative shape. I added a, hand cut, blue mirror card mat and a larger mat cut from Dovecraft 'Merry & Bright' snowman paper. To add extra detail to the 6x6 elegant edge Craftwork Cards card blank, I ran it through my grand callibur with a snowflake mask, and then gently rubbed on some pale blue chalk with my finger.
I am entering this card into the following challenges:-
Christmas Card Challenges 'anything goes with option of polka dots' 19/1
Catch the Bug 'winter wonderland' 18/1
Crafty-Hazlenut's Christmas Challenge 'winter weather' 17/1
Cute Card Thursday 'cold & frosty' 15/1
Creatalicious Challenges 'turquoise winter' 13/2
Labels:
CD Crafting,
Christmas,
Colouring,
Crafters Companion,
Dovecraft,
Dry Embossing,
Flocking,
Mirror Board,
S.W.A.L.K.
Sunday, October 13, 2013
Blue Christmas
Last Christmas, I got a bargain paper pack from Dovecraft called 'Merry & Bright'- all of the papers are pink & turquoise with Christmas prints- I love them! This is the first card I've really made using them though...
I started by colouring the 'Dressy Ebony' digi stamp from The Greeting Farm which is one of the Twilight themed images I got last week (she is very much Alice). I coloured her using a range of spectrum noirs (skin & hair) and Promarkers (clothes). I added glitter to her shoes, dress & hair flower. I carefully trimmed the image leaving a small white border. I used a Kanban mat as a template to cut out the pink snowflake paper to mat the character onto and then mounted that onto a snowflake embossed turquoise mirror card (new from Creata). I chose a piece of 'Merry & Bright' paper from the 8x8 pack and trimmed it slightly to mat onto the 8x8 square card. I then used 3 chipboard trees (that have been in my stash for years) to pick out the design of the backing paper.
I am much happier with the way my hair turned out on this image too
I am entering this card into the following challenges:-
Crafting Muskateers 'Christmas'
The Greeting Farm 'Christmas'
Songbird 'Blue Hawaii'
I started by colouring the 'Dressy Ebony' digi stamp from The Greeting Farm which is one of the Twilight themed images I got last week (she is very much Alice). I coloured her using a range of spectrum noirs (skin & hair) and Promarkers (clothes). I added glitter to her shoes, dress & hair flower. I carefully trimmed the image leaving a small white border. I used a Kanban mat as a template to cut out the pink snowflake paper to mat the character onto and then mounted that onto a snowflake embossed turquoise mirror card (new from Creata). I chose a piece of 'Merry & Bright' paper from the 8x8 pack and trimmed it slightly to mat onto the 8x8 square card. I then used 3 chipboard trees (that have been in my stash for years) to pick out the design of the backing paper.
I am much happier with the way my hair turned out on this image too
I am entering this card into the following challenges:-
Crafting Muskateers 'Christmas'
The Greeting Farm 'Christmas'
Songbird 'Blue Hawaii'
Labels:
Chipboard,
Christmas,
Colouring,
Digi Stamps,
Dovecraft,
Dry Embossing,
Peel-Offs,
TGF
Sunday, September 8, 2013
Krafty Christmas
I went to my local 'The Range' store last weekend to look at (and buy obviously) the new ranges from DoCrafts- I always know that I'm going to love their stuff. This is the first card I've made using my purchases from the 'Forever Friends Kraft Christmas' range.
This card took minutes to make in reality but I'm really happy with it. I started with a 6x6 white card blank which I mounted a dark blue stripe paper from the 'Ultimate Paper & Die-Cut Pack' onto. I then cut a piece of kraft card to a 12cm square and embossed it with a snowflake design. The embossing didn't come out as much as I would have liked so I carefully sanded it back and then rubbed it with a white ink to make the snowflakes stand out more. The topper came straight from the die-cut pack and I mounted that onto the card too. I finished the card by adding the 'Midnight Blue' Stickles dots into the opposite corners. This isn't a colour combo I've really used before but I'm loving it and can see I'll be using it more often.
I am entering this card into the following challenges:-
Labels:
CAS,
Christmas,
DoCrafts,
Dry Embossing,
Forever Friends,
Glitter,
Toppers
Monday, August 12, 2013
Winter Wishes
This is the first Christmas card I've made in 2013 and even though I absolutely love winter time, it does feel a bit odd making Christmas cards in the middle of summer! I'm really happy with this card though- it's a bit different to my usual style...
I started with the beautiful 'Lily of the Valley' topper and worked the rest of my card around it. It's a very simple topper with limited colours so I chose to go for the icy blues & greys colour scheme. I chose 2 matching DCWV papers that both had a hint of glitter and then 3 shades of cardstock from DCWV pastel mat-stack. I also used some Bazzil Bling silver cardstock to mount the topper onto.
I worked exclusively with odd cm sized squares so started by cutting all of my different cardstock. The striped square is cut to 19cm and used to mat the 8x8 base card. The paisley design card is cut to 15cm, plain blue to 11cm and plain grey to 9cm. I edged all of the card pieces with my black promarker to make them stand out from each other. The silver Bazzil Bling mat was cut to 13cm square.
I laid out all of my cardstock pieces onto my base card but I felt that the topper needed some more interest to it so I tried something that I've not done before and after a bit of trial and error, it worked quite well. I used the grand callibur to emboss a swirly snowflake design onto the topper above the penguin image. I then wanted to repeat this at the bottom of the card so I repeated the process. This meant that my original embossing got a bit squashed by the rollers as it went through the second time and lost its definition. Turns out that I needed to leave the bit that I'd already embossed hanging out of the mat so that it didn't squash that bit. I carefully lined up the embossing and tried it again and it thankfully worked pretty well. To add a bit of extra definition to the embossing, I gently edged it with some silver gilding wax using exactly the same method I use for distress inks but on paper rather than my ink blending mat.
I attached all of the layers to my base card and then used 2 different xcut snowflake punches with the darkest blue DCWV cardstock to punch some snowflakes to add as the finishing touch to the card.
This card definitely has more layers than my usual style but I think it's still quite simple thanks to the clean lines of the layers. Embossing onto toppers is definitely something I'll be trying again (now I know how to do it properly!).
I am entering this card into the following challenges:-
Labels:
Christmas,
DCWV,
Distress Inks,
Dry Embossing,
Lili of the Valley,
Toppers
Friday, August 2, 2013
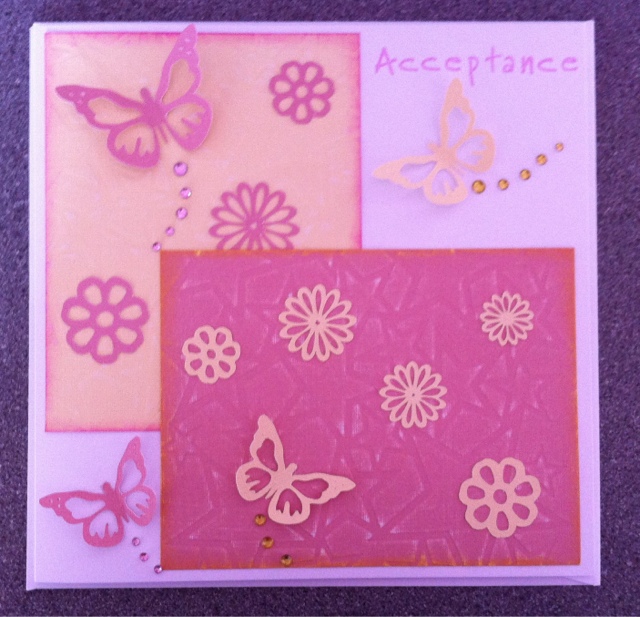
Acceptance card
I recently made some invitations for some friends who are having a Naming Ceremony (non-religious Christening) for their baby girl. I also needed to make an acceptance card to say that I was going! I decided to make a card that matched the invitation in colour choice and theme but was completely different. The invitations used the same butterflies & flowers but they were die-cut from the card leaving a cut out design behind. This is my variation of the idea-
I started with an 8x8 white card blank and 4 sheets of pastel DCWV mat stack cardstock (2 yellow, 2 pink). I took one of each colour of card and embossed it with a star design using my Grand Callibur and then inked the edges in the opposite colourway using distress inks (squeezed lemonade on the pink card & picked raspberry on the yellow). I mounted these onto the card overlapping one corner. I then used my cricut to cut out the flower & butterfly toppers from the other piece of each colour of card. I arranged the toppers before sticking them down and then added the as the butterfly trails. I finished the card by stamping the 'acceptance' sentiment using Brilliance pearlescent pink ink and alphabet clear stamps.
I am entering this card into the following challenges:-
Labels:
Cricut,
DCWV,
Distress Inks,
Dry Embossing,
Gems,
Pastel,
Stamping
Sunday, July 7, 2013
Nevaeh- red, white & blue
Today has been a very exciting day here in the UK! It's taken 77 years but finally a British man has won the Wimbledon singles title- it seemed appropriate to make a patriotic card!
I started with an 8x8 card blank which I put through the Grand Callibur to emboss the star design. I inked the edges with Barn Door distress ink and then Salty Ocean on top. I coloured the Nevaeh digi stamp with my promarkers & spectrum noirs sticking to the red, white & blue colour scheme. I mounted her onto the card with 3d foam and then added the 3 paper flowers with the glittery centres to the edge of the card.
I am entering this card into the following challenges:-
Papertake Weekly 'anything goes'
Clear It Out 'make someone's day sparkly'
Creative Inspirations 'red, white & blue'
Cute Card Thursday 'stars &/or stripes'
Saturated Canary 'celebration'
Polkadoodles 'make your own background'
Challenges 4 Everybody 'anything goes'
I started with an 8x8 card blank which I put through the Grand Callibur to emboss the star design. I inked the edges with Barn Door distress ink and then Salty Ocean on top. I coloured the Nevaeh digi stamp with my promarkers & spectrum noirs sticking to the red, white & blue colour scheme. I mounted her onto the card with 3d foam and then added the 3 paper flowers with the glittery centres to the edge of the card.
I am entering this card into the following challenges:-
Papertake Weekly 'anything goes'
Clear It Out 'make someone's day sparkly'
Creative Inspirations 'red, white & blue'
Cute Card Thursday 'stars &/or stripes'
Saturated Canary 'celebration'
Polkadoodles 'make your own background'
Challenges 4 Everybody 'anything goes'
Labels:
Colouring,
Digi Stamps,
Distress Inks,
Dry Embossing,
Flowers,
Saturated Canary
Saturday, May 25, 2013
OOO WEE OOO
Not sure what I'm going to do with my early Saturday evenings now that the latest series of Doctor Who has finished. I am loving Matt Smith as the doctor more and more but no-one will ever be as brilliant as David Tennant in my eyes- he was my first doctor so will always have a special place in my heart! This brilliant fanart is from the MayzyArt blog and I had to use it to make a card for a friend.
The base card is a 6x6 scalloped edge white card which I left completely as it was (no distress inks! shock horror!). I then used my favorite 'eerie' Basic Grey paper, rounding the corners before attaching it with double sided tape. I ran a silver mirror card mat through the grand calibur and embossed a star design onto it and then mounted my coloured image onto it. I coloured the image with my usual mix of spectrum noirs and promarkers. I wanted to add the key charm to the card as this is such an important aspect of the Doctor Who story so I used some TARDIS coloured ribbon wrapped twice around the spine of the card and threaded the key onto it.
I love this card and just wish that more of my family/friends loved Mr Tennant as much as I do!
I am entering this card into the following challenges:-
Labels:
Basic Grey,
Colouring,
Digi Stamps,
Doctor Who,
Dry Embossing,
MayzyArt,
Metal,
Ribbon
Monday, May 20, 2013
Sk8er Boy
Here's another new card I've made using one of my favourite rubber stamps- Skater Ian. It was a bargain I got from the Sincerely Yours show at Lincoln last year which I hope bodes well for next week when I'll be visiting again!
I took a 6x6 'Black Magic' Coredinations paper, trimmed it to size & embossed it with a checkerboard pattern. I then distressed it to reveal the bluey grey base. I then used a chevron stencil and silver stencil paint to add an extra texture to the card. I then added some new washi tape to the corner of the card and mounted it onto a white 6x6 card base. I stamped the skater image onto white card and coloured it using promarkers and spectrum noirs. I then re-inked the hat and stamped it onto a small scrap of an old Basic Grey paper and paper pieced it onto my topper. I mounted the stamped image onto the card using 3d foam to add depth.
I am entering this card into the following challenges:-
Crafty Cardmakers 'embossing, distressing & paper piecing'
Papertake Weekly 'sound of music' (inspired by the song 'Sk8ter Boi' by Avril Lavigne)
Daring Cardmakers 'stencil it'
Basic Grey 'song inspired' (sk8ter boi)
I took a 6x6 'Black Magic' Coredinations paper, trimmed it to size & embossed it with a checkerboard pattern. I then distressed it to reveal the bluey grey base. I then used a chevron stencil and silver stencil paint to add an extra texture to the card. I then added some new washi tape to the corner of the card and mounted it onto a white 6x6 card base. I stamped the skater image onto white card and coloured it using promarkers and spectrum noirs. I then re-inked the hat and stamped it onto a small scrap of an old Basic Grey paper and paper pieced it onto my topper. I mounted the stamped image onto the card using 3d foam to add depth.
I am entering this card into the following challenges:-
Crafty Cardmakers 'embossing, distressing & paper piecing'
Papertake Weekly 'sound of music' (inspired by the song 'Sk8ter Boi' by Avril Lavigne)
Daring Cardmakers 'stencil it'
Basic Grey 'song inspired' (sk8ter boi)
Labels:
Colouring,
Dry Embossing,
Paper Piecing,
Stamping,
Stencils,
Washi Tape
Tuesday, February 19, 2013
SC Purple & Black
My latest card is my absolute favourite- EVER! (I usually do like my newest card best but this is my MOST favourite...)- the reason is, I have used my 2 favourite colours so this card is perfect for me- Would it be a bit weird to send myself a birthday card?
This card also fits with lots of challenge themes this week so I am entering it into the following challenges:-
Saturated Canary 'Love' (as I love the digi image & the colours)
Creatalicious 'L'Amour' (for the reasons above)
Basic Grey 'Favourite' (as I've used my favourite 'eerie' papers)
Penny's Paper-Crafty Challenge Blog 'favourite colour combo' (purple & black)
Challenges 4 Everybody 'Anything Goes'
Crafty Catz 'bingo' (embossing, flowers & punches)
Polkadoodles 'shabby chic' (distressed edge papers- this is as shabby as I'll ever get!)
Stampin' for the Weekend 'distressed' (sanding of the embossed star cardstock)
Cute Card Thursday 'an eye for detail'
I started with an 8x8 scalloped edge card, which I matted with Craftwork Cards purple star embossed cardstock (from a prize pack!) that I distressed slightly and Basic Grey 'eerie' 6x6 paper (that I punched a star corner into). The main image is a digi stamp from Satuarted Canary (Honey) which I coloured with both Promarkers & Spectrum Noirs. The 3 flowers came from a pack that I picked up cheaply after Christmas so I didn't mind putting 3 on the one card!
This card also fits with lots of challenge themes this week so I am entering it into the following challenges:-
Saturated Canary 'Love' (as I love the digi image & the colours)
Creatalicious 'L'Amour' (for the reasons above)
Basic Grey 'Favourite' (as I've used my favourite 'eerie' papers)
Penny's Paper-Crafty Challenge Blog 'favourite colour combo' (purple & black)
Challenges 4 Everybody 'Anything Goes'
Crafty Catz 'bingo' (embossing, flowers & punches)
Polkadoodles 'shabby chic' (distressed edge papers- this is as shabby as I'll ever get!)
Stampin' for the Weekend 'distressed' (sanding of the embossed star cardstock)
Cute Card Thursday 'an eye for detail'
I started with an 8x8 scalloped edge card, which I matted with Craftwork Cards purple star embossed cardstock (from a prize pack!) that I distressed slightly and Basic Grey 'eerie' 6x6 paper (that I punched a star corner into). The main image is a digi stamp from Satuarted Canary (Honey) which I coloured with both Promarkers & Spectrum Noirs. The 3 flowers came from a pack that I picked up cheaply after Christmas so I didn't mind putting 3 on the one card!
Labels:
Basic Grey,
Colouring,
Digi Stamps,
Dry Embossing,
Flowers,
Glitter,
Punches,
Saturated Canary
Monday, February 11, 2013
SC (Sparkling Chic & Saturated Canary) 'Jules'
Here is another new creation, that I've made to enter 4 different challenges. I am entering this card into the Craftwork Cards 'Anything Goes' challenge, Saturated Canary 'challenge #36 colour inspiration', Penny's Paper-Crafty Challenge #113 'Ribbons & Bows' and Papertake Weekly 'Anything Goes'.
I started with a 6x6 scalloped card blank which I left plain. I then cut a piece of Craftwork Cards 8x8 pearlescent paper (which I was lucky enough to win in a challenge) which I embossed with 'mini star shower' template from Crafter's Workshop. The main topper is a Saturated Canary digi stamp (Jules) and I coloured her using my Spectrum Noirs. I finished the card with 2 Prima flowers which I layered and then finished with a star print Papermania brad which has been in my crafty stash for yonks!
Labels:
Colouring,
Craftwork Cards,
Digi Stamps,
Dry Embossing,
Flowers,
Saturated Canary
Tuesday, January 22, 2013
Blondie (with a hint of pink)
This is my latest card inspired by, no less than, 4 different challenges! I started by aiming to make something suitable for the latest Saturated Canary challenge 'Movie Inspiration'. I decided to use the 'Nevaeh' image to make a 'Legally Blonde' inspired card where everything was a bit over the top pink. I then realised that the same idea would be perfect for the Creative Inspirations 'one for the girls' challenge too. The more time I spent thinking about how the card was going to be, the more I realised that it would also fit with the Card Makin Mamas 'clean and simple' challenge and Daring Cardmakers 'embossability' challenge. This is the first time I've made one card that can fit into so many challenges- I hope that hasn't made me lose my focus.
Anyways, enough chat. Here it is
I started with the Saturated Canary 'Nevaeh' image which I coloured using my Spectrum Noirs. I had already chosen the 'Legally Blonde' theme so went for pale blonde hair, a bright pink dress and sensible grey tights as a bit of a nod to her very sensible job. I was really pleased with how the hair turned out today as this is the bit that I always feels lets me down. The extra practice is obviously helping!
When I had finished colouring the image, I carefully cut around it leaving a small white border. I then got a 6x6 Craftwork Cards scalloped edge white card balnk and embossed it with the floral design using my Grand Calibur and a Crafter's Workshop 'flower frenzy' template. I lightly inked the eges of the card with 'Picked Raspberry' distress ink. I then mounted my main image directly onto the card using some 3d foam pads.
The flowers added the final touch, onto the edge of the card. I punched them using 2 different sizes of xcut flower punches and some plain DCWV cardstock. The large flowers are from a paler pink and the inner smaller flower from a slightly darker shade. I attached these to the card with some PVA glue, starting with the central flower so that I could get then evenly spaced along the card. I added a small clear crystal gem into the centre of each flower and also onto Nevaeh's dress.
Anyways, enough chat. Here it is
I started with the Saturated Canary 'Nevaeh' image which I coloured using my Spectrum Noirs. I had already chosen the 'Legally Blonde' theme so went for pale blonde hair, a bright pink dress and sensible grey tights as a bit of a nod to her very sensible job. I was really pleased with how the hair turned out today as this is the bit that I always feels lets me down. The extra practice is obviously helping!
When I had finished colouring the image, I carefully cut around it leaving a small white border. I then got a 6x6 Craftwork Cards scalloped edge white card balnk and embossed it with the floral design using my Grand Calibur and a Crafter's Workshop 'flower frenzy' template. I lightly inked the eges of the card with 'Picked Raspberry' distress ink. I then mounted my main image directly onto the card using some 3d foam pads.
The flowers added the final touch, onto the edge of the card. I punched them using 2 different sizes of xcut flower punches and some plain DCWV cardstock. The large flowers are from a paler pink and the inner smaller flower from a slightly darker shade. I attached these to the card with some PVA glue, starting with the central flower so that I could get then evenly spaced along the card. I added a small clear crystal gem into the centre of each flower and also onto Nevaeh's dress.
Labels:
CAS,
Colouring,
Digi Stamps,
Distress Inks,
Dry Embossing,
Flowers,
Saturated Canary
Sunday, January 20, 2013
s.w.a.l.k. 'new parents' card
I've been having a play with my new s.w.a.l.k. digi stamp cd rom and really loved some of the images for the slightly more unusual card sending moments e.g. new home, belated birthday & expecting a baby. They seemed perfect for the Basic Grey Challenges blog, challenge 85 'New Beginnings' http://basicgreychallenges.blogspot.co.uk/2013/01/challenge-85-new-beginningssomething-new.html. So here's my entry-
I started with a Craftwork Cards 6x6 fancy edge card. I drew round the card onto the back of a flamingo & giraffe print 6x6 paper from Basic Grey 'sugared' paper pad. The paper made me think of couples and love as the giraffes had little hearts above their heads. I cut out the paper to match the shape of the base card and attached it with double sided tape.
The topper was printed from my Crafters Companion s.w.a.l.k. cd-rom and coloured with Spectrum Noir pens. I used the leftover piece from a Kanban mat sheet, as a stencil, to draw the fancy shape around the image and then cut it out by hand. I inked it very lightly around the edges with 'Squeezed Lemonade' distress ink. I then got a matching Kanban silver mirror card mat slightly larger than the one I had cut myself. I used my Grand Calibur with a Crafters Workshop 'Mini Star Shower' 6x6 stencil to emboss a star design onto the mirror card mat. I then inked this with Tim Holtz Adirondack 'Wild Plum' alcohol ink to give it the pink tone to match the backing paper. I completed the card by using 3d foam tape to attach the mirror card layer and then the main topper.
I started with a Craftwork Cards 6x6 fancy edge card. I drew round the card onto the back of a flamingo & giraffe print 6x6 paper from Basic Grey 'sugared' paper pad. The paper made me think of couples and love as the giraffes had little hearts above their heads. I cut out the paper to match the shape of the base card and attached it with double sided tape.
The topper was printed from my Crafters Companion s.w.a.l.k. cd-rom and coloured with Spectrum Noir pens. I used the leftover piece from a Kanban mat sheet, as a stencil, to draw the fancy shape around the image and then cut it out by hand. I inked it very lightly around the edges with 'Squeezed Lemonade' distress ink. I then got a matching Kanban silver mirror card mat slightly larger than the one I had cut myself. I used my Grand Calibur with a Crafters Workshop 'Mini Star Shower' 6x6 stencil to emboss a star design onto the mirror card mat. I then inked this with Tim Holtz Adirondack 'Wild Plum' alcohol ink to give it the pink tone to match the backing paper. I completed the card by using 3d foam tape to attach the mirror card layer and then the main topper.
Labels:
Basic Grey,
CD Crafting,
Colouring,
Crafters Companion,
Digi Stamps,
Dry Embossing,
S.W.A.L.K.
Sunday, January 13, 2013
Saturated Canary challenge #34- song inspiration! 'Star Girl' & '5 Colours in her Hair' card
When I found the Saturated Canary blog http://saturatedcanary.blogspot.co.uk/ just last week, I opened a whole new world of ideas and fell in love with the design style. I then found the challenge blog http://saturatedcanarychallenge.blogspot.co.uk/ and the current challenge seemed perfect for me. The only rule was to use a Saturated Canary digi stamp and link to the theme of 'Song Inspiration'. As soon as I saw one of the design team had made a card inspired by a Take That song- I was hooked!
I had a look at the Saturated Canary shop and ended up buying 8 digi stamps which came to just over £20 which I think is excellent value. These are the first digi stamps I've bought over the internet and can see that this will be something I'll be doing again. They are much cheaper than rubber/acrylic stamps and, I think, more versatile as you can print them off at whatever size you need.
Out of all the stamps I bought, I chose to use the 'Starla' image as it reminded me instantly of the McFly song 'Star Girl'. Here is the card I have made for the challenge http://saturatedcanarychallenge.blogspot.co.uk/2013/01/challenge-34.html
As well as 'Star Girl' I have also been influenced by another McFly song '5 colours in her Hair' and used this inspiration in the colouring of the image.
I started by colouring the image using my spectrum noirs and promarkers. I then added the star shaped self adhesive pearlescent & sparkle gems. I carefully cut out the image and set aside for later. I then got a 6x6 scalloped edge card blank and inked the edges with 'Peacock Feahers' & 'Picked Raspberry' distress inks. I then layered a Making Memories 8x8 paper that I randomly cut the edge of onto the card base. I then got a Kanban pre-cut white mat and embossed it with a star stencil using my grand calibur. I then used the same distress inks to emphasise the embossing. I layered the mat onto the card with double sided tape and then attached my 'Starla' image using 3d foam pads. I also used one of the messages that came with the didi stamp.
I had a look at the Saturated Canary shop and ended up buying 8 digi stamps which came to just over £20 which I think is excellent value. These are the first digi stamps I've bought over the internet and can see that this will be something I'll be doing again. They are much cheaper than rubber/acrylic stamps and, I think, more versatile as you can print them off at whatever size you need.
Out of all the stamps I bought, I chose to use the 'Starla' image as it reminded me instantly of the McFly song 'Star Girl'. Here is the card I have made for the challenge http://saturatedcanarychallenge.blogspot.co.uk/2013/01/challenge-34.html
As well as 'Star Girl' I have also been influenced by another McFly song '5 colours in her Hair' and used this inspiration in the colouring of the image.
I started by colouring the image using my spectrum noirs and promarkers. I then added the star shaped self adhesive pearlescent & sparkle gems. I carefully cut out the image and set aside for later. I then got a 6x6 scalloped edge card blank and inked the edges with 'Peacock Feahers' & 'Picked Raspberry' distress inks. I then layered a Making Memories 8x8 paper that I randomly cut the edge of onto the card base. I then got a Kanban pre-cut white mat and embossed it with a star stencil using my grand calibur. I then used the same distress inks to emphasise the embossing. I layered the mat onto the card with double sided tape and then attached my 'Starla' image using 3d foam pads. I also used one of the messages that came with the didi stamp.
Labels:
Colouring,
Digi Stamps,
Distress Inks,
Dry Embossing,
Gems,
Kanban,
Making Memories,
Saturated Canary
Subscribe to:
Posts (Atom)